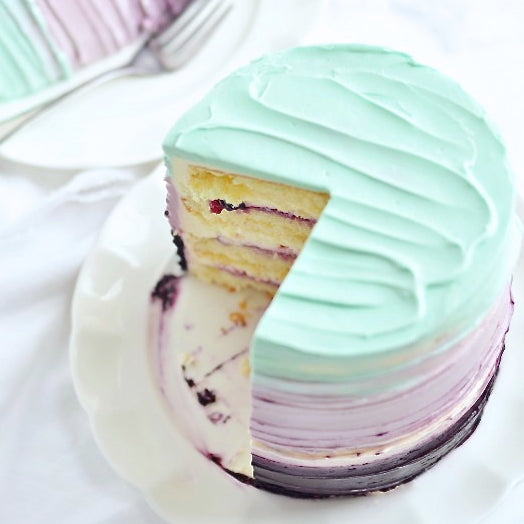
 So, are you still feeling the love from yesterday? Are you all stocked up on chocolate-ness? After much frolicking with the recent Vanilla Cream-Filled Double Chocolate Cake for Two (which actually became for one), I was feeling a serious need for vanilla and pastel. That, and Grant is a vanilla-man, through and through, so I thought I might make something for us to share to celebrate Valentine's Day -- something super vanilla, but made with a bit more love, a bit more going on and a whole lot of colour. This time, the colours took cue from the flavours, which I knew had to include blackberry compote and fresh blackberries. I've been craving this for so long, and I don't know why I waited this long.
  So colourful swirls aside, what's going in inside this cake? It's 4 layers of a moist and fluffy vanilla cake, filled with a vanilla mascarpone whipped cream filling and a homemade blackberry compote, fresh blackberries and frosted in a whipped vanilla frosting (on the sweeter side). I recently started using the fabulous Princess Bakery Flavor, which I use in place of vanilla extract. It imparts the most nostalgic vanilla-almond, hard-to-describe flavour and doesn't look flavour while baking (remember my passion for the Red Velvet emulsion from this Red Velvet & Raspberry Supreme Cake?). Now I'm finding I use it in cookies, french toast, pancakes and pretty much anything I can manage to add it to. And with all of this vanilla-ness happening in this cake, I feel that the blackberries and mascarpone whipped cream create a balance, making it a glorious eclipse of childhood nostalgia and a grown-up palate.
  Sure, I do call this a "cake for two" with its bitty 5-inch diameter, but it could definitely work for three or four (if you're into that sort of thing). I just love a dessert that you can dig right into with someone .
  Kind of like this. This was the iPhone snap of the test-run of this cake I made last week -- there's just something awesome about digging right in (and here's another 6-second looped video of me doing just that). The first time I made it I added more compote and blackberries (which is reflected in the recipe below), and that was the way to go. Bursts of blackberries and clouds of mascarpone meringue in every bite -- a must. You might notice that the whipped cream filling that I used here (minus the mascarpone) is the same recipe from the past 2 cakes I've posted, and some of you have written me with issues of your cream falling apart when you add the gelatin mixture. Just a note that, although it's a fairly straight-forward recipe, it's crucial that you add the gelatin mixture very gradually while the cream in the mixer has just reached a soft peak. If you whip the cream past this point and then add the gelatin mixture, and/or if you add the mixture too quickly, it will flop (I did this). Once you get used to it, you'll find that this filling is an amazing cream base that can be modified and flavoured in so many ways. I love that it's not sweet, and that it's so cloud-like.
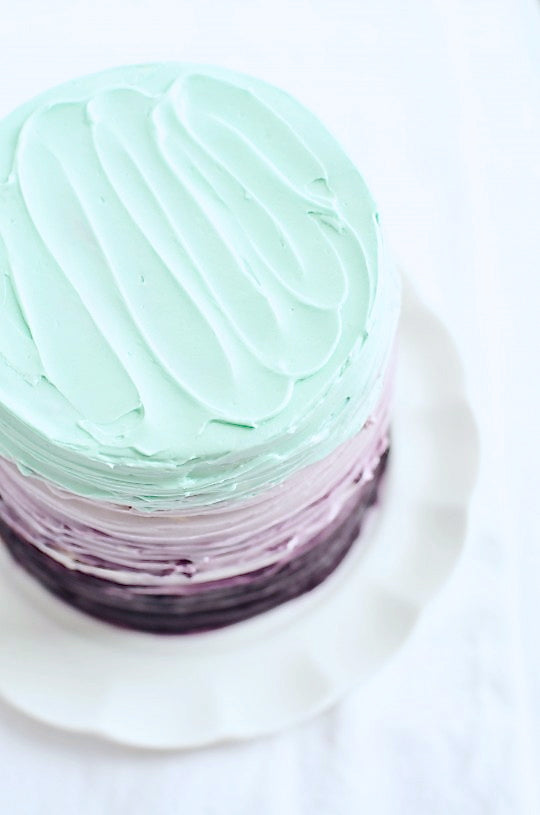
  For the swirly colour technique, I chose to work in a dark blackberry colour, and then tied it into a pastel version of the same colour and then some minty turquoise for interest. You can certainly work with any colours you like, but I felt that this was a neat way to hint at what flavours are ready to burst inside.
  I've included the previous video tutorial, which you might find helpful if you're making this cake. The good news is that you really can't go wrong, as long as you choose colours that work nicely together. If you aren't sure what colours to work well together, you can pull ideas and inspiration from almost anything around you. Pinterest is, of course, a great place to start.
So there we go! As you can probably imagine, the colour combinations are endless for this technique, which is one of the reasons it makes me so happy -- no two cakes are ever the same.

Vanilla Blackberry-Mascarpone Cake for Two
Four layers of light, moist and fluffy vanilla cake filled with blackberry compote, fresh blackberries, whipped vanilla mascarpone filling and covered in a sweet, creamy vanilla frosting.
For the Cake:
- 1/2 cup 120 ml whole milk, at room temperature
- 2 egg whites (65 g, at room temperature)
- 1 whole egg (at room temperature)
- 2 teaspoons 10 ml *Princess Cake & Bakery Emulsion OR pure vanilla extract
- 1 cup + 3 tablespoons (142 g cake flour, sifted twice)
- 3/4 cup 150 g sugar
- 1-1/4 teaspoons 8 g baking powder
- 1/2 teaspoon 4 g salt
- 1/4 cup 57 g unsalted butter, at room temperature
- 2 tablespoons 28 g vegetable shortening
For the Blackberry Compote:
- 2 cups fresh or frozen blackberries (divided)
- 1/2 cup 100 g superfine sugar
- 2 tablespoons 30 ml orange juice
- Pinch of salt
For the Whipped Mascarpone Filling:
- 2 tablespoons 30 ml cold water
- 2 teaspoons 10 ml unflavoured gelatin (such as Knox brand)
- 1-3/4 cups 420 ml whipping cream (35-37% fat), cold, divided
- 1/4 cup 30 g icing sugar
- 1 teaspoon 5 ml pure vanilla extract
- Pinch of salt
- 1/3 cup mascarpone cheese
For the Whipped Vanilla Frosting:
- 3 sticks + 2 tablespoons (375 g unsalted butter, softened and cut into cubes)
- 3.5 cups 400 g confectioners’ sugar, sifted
- 3 tablespoons 45 ml milk
- 1 tablespoon 15 ml pure vanilla extract
- 1 tablespoon 15 ml water
- Pinch of salt
You Will Also Need:
- Medium or Large Pastry Bag fitted with plain round tip (a resealable Ziploc bag will do in a pinch)
- Food colour of your choice
- Small Offset Spatula
For the Cake:
- Preheat oven to 350°F. Grease, line with parchment, butter and flour two round 5-inch pans.
- In a medium bowl or measuring cup, combine and stir the egg whites, egg, 2 tablespoons of the milk and emulsion (or vanilla). Set aside.
- In the bowl of an electric mixer fitted with the paddle attachment, combine the dry ingredients, including the sugar, together on low speed (I use the “stir” setting on my mixer) for 30 seconds.
- Add the butter and shortening, and blend on low speed for about 30 seconds, then add remaining milk, and mix on low speed until just moistened. Increase to medium speed and mix for 1-1/2 minutes.
- Scrape the sides of the bowl and begin to add the egg/milk mixture in 3 separate batches; beat on medium for 20 seconds after each addition.
- Divide the batter in two, spreading it evenly with a small offset palette knife. If you have a kitchen scale, weigh the batter in the pans to ensure 2 even layers (they should each weigh about 270 g).
- Bake 20-25 minutes or until a cake tester comes clean when inserted into the center. Be so careful to not over-bake. Check cake at 20 minutes, but not before, and once you feel it’s almost ready, set the timer for 2 minute intervals.
- Let cool on racks for 10 minutes before loosening the sides with a small metal spatula, and invert onto greased wire racks. Gently turn cakes back up, so the tops are up and cool completely.
For the Blackberry Compote:
- In a small saucepan over medium heat, combine 1-1/2 cups of the blackberries, sugar, orange juice and salt until the berries start to break down, stirring often, about 10 minutes.
- Lower the heat and simmer until compote coats a spoon, about 15 minutes.
- Remove from heat and let cool down slightly. Using an immersion blender (carefully) or counter-top blender, pulse until smooth. Push compote through a fine mesh sieve into a clean glass bowl and discard the seeded pulp from the sieve. Stir in remaining fresh blackberries. Keep covered and chilled for up to 3 days.
For the Whipped Vanilla Mascarpone Filling:
- In a small bowl, place the cold water and sprinkle with the gelatin. Let sit for at least 10 minutes. In a small saucepan, bring 1/3 cup of the cream just to a simmer, then stir into the gelatin mixture. Refrigerate, stirring frequently, until cool but not set, about 8 minutes.
- In a chilled stainless steel bowl with a chilled whisk attachment (for stand mixer), beat the remaining whipping cream, icing sugar, vanillla and salt until it thickens just slightly and soft peaks begin to form, about 1 minute. Very gradually add the gelatin mixture and continue beating until medium-firm peaks form (should be thick enough to spread). In a large bowl, soften mascarpone and gently fold in whipped cream mixture. Keep covered and chilled until ready to use.
For the Whipped Vanilla Frosting:
- In the bowl of an electric mixer fitted with the paddle attachment, whip butter for 8 minutes on medium (I use “4″ on my KitchenAid). Butter will become very pale & creamy.
- Add remaining ingredients and mix on low speed for 1 minute, then on medium for 6 minutes. Frosting will be very light, creamy and fluffy. Separate into 3 bowls and tint with your favourite food colours. Best used right away (for ideal spreading consistency).
Assembly of the Vanilla Blackberry & Mascarpone Cake for Two:
- Cut your 2 cake layers each once horizontally with a long, serrated knife, so you have a total of 4 layers. Place your first cake layer, face-up, onto a small plate or cake stand (or 5-inch round foil cake board).Fill your pastry bag with about a cup of the Whipped Vanilla Frosting (un-tinted) and pipe a dam around the perimeter of the cake layer (this will keep our compote and Whipped Mascarpone Filling in place). Spoon a few tablespoons of the compote and berries inside of the dam, along with a few tablespoons of the whipped filling. Gently spread the filling using a small offset spatula.
- Repeat until you come to your final cake layer, which you will place face-down. If you find the cake too soft and unstable, put in refrigerator for a few moments to firm it up, then resume. If you see any spots where the compote is peeking through or starting to ooze out (ahh!), use your piping bag to squeeze more frosting over it, between the layers. Use your clean offset spatula to carefully smooth the frosting so it's flat against the cake.
- Cover the entire cake gently with plastic wrap (I like Press n' Seal), and then, once covered, use your hands to carefully ensure the cake is lined up straight and flattening any lumps or bumps of frosting. Chill for at least 30 minutes.
- Once cake is stable and chilled, apply an even layer of frosting to the entire cake, to seal in crumbs. Chill again until frosting is firm, about 30 minutes (at least). While the cake is chilling, you can divide remaining frosting into 4 small bowls, and tint 3 of them with your soft gel paste. Keep one bowl of frosting un-tinted.
- Place cake plate/board with cake onto a turntable, if possible. Be sure your frosting is smooth and fluffy, working it with a rubber spatula for a few moments. You can even warm in microwave for a few seconds to soften it up. Apply a thick layer of your darkest colour to the bottom third of your cake, then another above it over the middle of the cake, and finally your final colour of frosting all over the top and upper third of cake. Add the un-tinted frosting in a few areas, to add interest. Using a metal spatula blend the colours together by smoothing frosting all over cake, as you would a typical one-colour cake. Be careful to not overblend. For textured effect (as in photos) you can use a small metal spatula, holding it with one hand on an angle starting at bottom of cake, keeping it fairly still, move the turntable with the other hand, slowly letting the spatula move up slightly with every turn.
*You can make the compote up to 2 days ahead.
**Keep cake chilled for up to 2 days, but serve at room temperature.
Feeling creative? You can top with your favourite sprinkles - I personally love the way Pastel Bit Chips look sprinkled on top, or keep it simple with some White Crunchy Sprinkles!
- I used Princess Bakery Flavor for the vanilla cake, which is an amazing emulsion that gives the cake a vanilla-almond sort of flavour and doesn't lose taste when baked. You can simply use vanilla if you can't find this.
- I use this MAC Knife for all of my cake layering. It’s super sharp and makes clean cake layers, ideal for building not-so-crumby layer cakes.
- To achieve similar colours on this cake, try a few drops of any Sweetapolita Oil Based Colours adjusting the amount of drops until you find your desired shade.
- You'll want to keep this cake in the fridge between servings for up to two days, but it's best served at room temperature and day 1.