Hello, hello, my cake-loving friends! Since we all love to explore our artistic side, it's been on my mind to create a party cake that plays on the lovely
painted/watercolor cake trend, but using
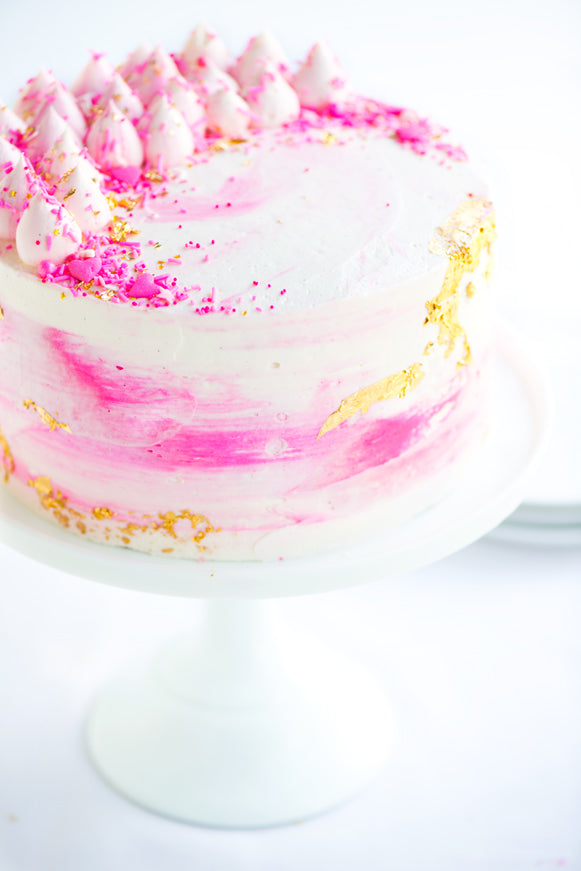
all buttercream and not a fondant icing surface. I love fondant, I do (and the way it tastes, although I know it's not for everyone), but the truth-be-told fondant cakes are a bit of an endeavour time-wise, and of course you need just the right supplies, etc. The idea behind this cake is that
it is quick and simple to do, but artistic with wow-factor. Active time, this cake is literally a 30 minute job, or less. We use only a quick
super-fluffy one-bowl whipped vanilla bean frosting (like vanilla bean clouds, really) and the ever-moist, dark chocolate one-bowl cake layers, and then create a pretty painted effect with the spreading of the frosting, top it with buttercream "poofs" and a little medley of sprinkles. Voilà! I even added a few bits of edible gold leaf for drama, which I highly recommend. You might remember the
Pastel Swirl Cake I made awhile back, and that cake stays close to my heart. Aside from the swirls of beachy, ever-pleasing pastel frosting, what I love about is how it's really a simple technique that anyone can do, and each time we make a cake like that it, it becomes a little piece of art. These are the cakes you want to crawl right in and live inside for the rest of eternity . . . or maybe that's just me. :)
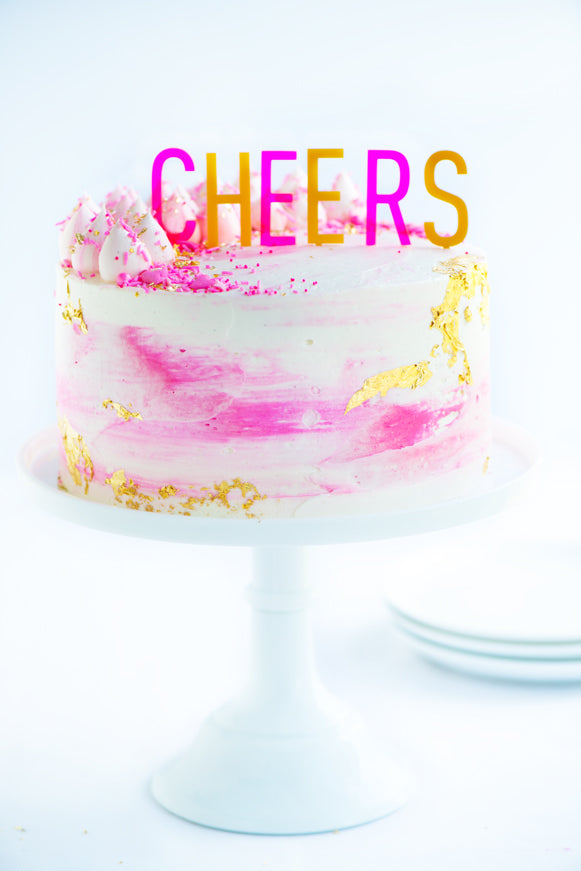
The inspiration for the colours on this cake--the pink and gold--comes from my new CHEERS acrylic cake topper I found from
Creative Bag. They have so many adorable cake toppers, baking supplies, packaging and more. Of course you can go with any cake flavour and frosting colour combination you wish, and I can imagine so many lovely options for this style cake.

So rather than the gorgeous meringue tops I love, I opted to pipe these poofs in the buttercream, for simplicity and yumminess purposes. Plus there are few things as delightful as sprinkle covered mountains of vanilla bean buttercream poofs. You know? I created a little
pink and gold sprinkle medley to tie the colours together, but you can simply mix your favourite sprinkles and such in a little bowl and make a customized medley depending on the colour scheme of your cake. Sprinkles forever!
The cake topper certainly makes the cake party-ready! It's amazing what a cute topper can add to a cake, and truth-be-told a fun topper on a plain cake works beautifully too. They can add an instant hit of personality to any cake!
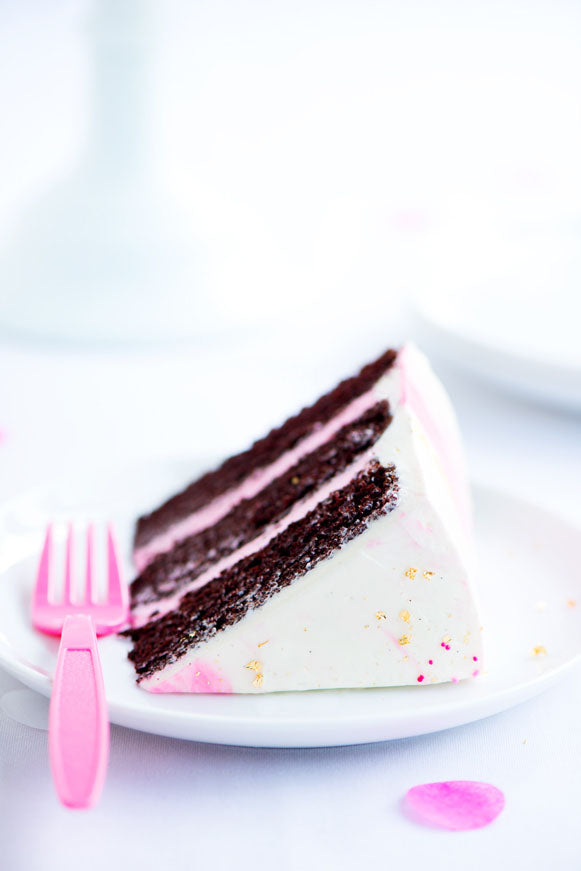
I opted for chocolate cake, as I tend to do with artsy frosted cakes--I think the contrast is stunning, and a moist, dark chocolate cake paired with vanilla bean frosting never disappoints.

And because I couldn't resist, how about some
Vanilla Bean Milk Minis? Mini vanilla bean milk bottles adorned with our pink and gold sprinkles-- this is such a sweet and simple way to use up
left over frosting and sprinkles, particularly for kids' parties or, well, grown up parties and even a rainy Tuesday. I simply pressed the rims of the bottles into some remaining frosting, and then into my sprinkle medley. Then I stirred some vanilla bean paste (that we used in our frosting) into 2% milk (about 1/2 teaspoon for every 240 ml cup) and poured it in the prepared bottles. So easy! If you have my book, you may have noticed I use similar mini milk bottles for the
Birthday Cake Milkshakes. I had to source the ones I used in the book from Asia and have them shipped, but I was so excited to see that my friends at Creative Bag now sell these! My cakelets LOVE these little bottles. Don't forget to check out my friends at
Creative bag and their baking-themed promo & giveaway today (you may even win a copy of my book, along with other adorable baking-related goodies), as well as their week-long promo and giveaway party going on until Friday. So let's make this cake, shall we?
Watercolor Buttercream Party Cake
- 2 1/4 cups 285 g all-purpose flour
- 2 1/4 cups 450 g superfine sugar
- 1 cup 120 g dark unsweetened cocoa powder (see Notes)
- 1 tablespoon baking soda
- 1 1/2 teaspoons baking powder
- 1 teaspoon salt
- 1 1/2 cups 360 ml buttermilk, room temperature
- 1 cup 240 ml hot coffee (if you can't use coffee, substitute with very hot water)
- 3/4 cup 180 ml vegetable oil
- 2 teaspoons pure vanilla extract
- 3 eggs (room temperature)
For the frosting:
- 1 cup 227 g unsalted butter, softened
- 1/2 cup vegetable shortening (see Notes)
- Pinch of salt
- 5 cups 620 g confectioners' sugar
- 2/3 cup 160 ml heavy cream
- 1 tablespoon warm water
- 2 teaspoons vanilla bean paste (see Notes)
- Bright pink food colouring (see Notes)
- Edible gold leaf (optional (see Notes)
-
Pink sprinkles (optional, see notes for more sprinkly suggestions!)
For the cake layers:
- Preheat oven to 350° F (180°C). Spray the bottom of three 8-inch round cake pans with cooking spray and line bottoms with parchment rounds. Set aside.
- In a large mixing bowl, sift flour, sugar, cocoa powder, baking soda, baking powder, and salt.
- In a medium bowl or measuring cup, combine the buttermilk, coffee, oil, and vanilla, and then mix in eggs.
- Add liquid mixture to dry ingredients and whisk until smooth, about 1 minute. Divide batter equally among the three cake pans or weigh for accuracy--each pan should weigh about 580 grams.
- Bake the first two layers until a wooden pick inserted into the centre of the cake comes out with a only a few crumbs, about 23 minutes. Try not to over-bake. Let cakes cool in pans on a wire rack for 10 minutes, and then turn onto rack to cool completely. Repeat with the final cake layer. When ready to assemble the cake, wrap the layers in plastic wrap and chill for about 30 minutes.
For the frosting:
- In the bowl of an electric mixer fitted with the paddle attachment, beat the butter, shortening, and salt on medium speed until very pale and creamy, 8 minutes.
- Reduce the speed to the lowest setting and gradually add the confectioners' sugar, heavy cream, vanilla bean paste and water. Increase the speed to medium-high and beat until very light and fluffy, about 6 minutes.
- The frosting will keep in an airtight container in the refrigerator for up to 3 days. Bring chilled frosting to room temperature and beat on low speed to soften. If necessary, you can warm the frosting in a heatproof container in the microwave in 10-second intervals, stirring after each one, until smooth and spreadable. Add a small amount of water, one tablespoon at a time, if the frosting needs more "glide."
Assembly of the Watercolor Buttercream Party Cake:
- Transfer about 3 cups of the frosting to another bowl and tint medium pink--this will be for your cake filling and the pink on the outside of the cake. Put a smudge of frosting in the center of an 8-inch round cake board (or cake plate) or 10-inch scalloped cake board.
- Put your first cake layer top-up on the cake board or plate, and spread about 1 1/4 cups of the pink frosting evenly across layer. Put the second cake layer on top and repeat with another layer of frosting. Put the final cake layer top-down. Make sure that your layers are straight and lined up with the ones below.
- Using a turntable, if possible, frost entire outside of cake with a thin layer of the untinted frosting to seal in the crumbs. Chill until the frosting begins to firm-up, about 30 minutes. Meanwhile, tint the remaining pink frosting (there should be about 1/2 cup) a very bright pink.
- Remove the cake from the refrigerator and return it to the turntable. Using a medium straight palette knife (metal spatula), spread small patches of the bright pink frosting around the cake (a few inches here and there). Cover the rest of the cake with the untinted frosting as usual. Using your palette knife again, smooth the frosting around the cake, which will blend the bright pink just enough to create a "watercolor" effect. To reveal more pink, gently go over those areas again until you achieve the desired look.
- Fill a pastry bag fitted with a large plain round tip with the remaining frosting and pipe some buttercream "poofs" on the top. Sprinkle the top of the cake with a handful of pink and gold sprinkles. I love the way Flamingo Sprinkle Medley looks, but you could also try out Pastel Bit Chips, Pink Crunchy sprinkles or even Gold Stars Edible Glitter!
- If adding gold leaf onto the cake, return the cake to the fridge to set, about 30 minutes before gently pressing random patches of the gold onto the cake. Cake will keep covered at room temperature for up to 1 day, or chilled for up to 3 days. Serve at room temperature.
If you'd like a visual of a similar technique, you can watch my How to Make a Pastel Swirl Cake video. For the Watercolor Buttercream Cake you would do this technique but rather than using 3 frosting colours, you would use mostly untinted with random patches of the hot pink.
Sweetapolita's Notes:
- For the vegetable shortening in the frosting, I use high-ratio shortening, but you can also use standard Crisco shortening since it is a small amount. Typically I find Crisco-style shortening leaves an unpleasant mouth-feel in a frosting, but due to the generous amount of heavy cream and the touch of warm water added, the result is super fluffy with no lasting film feeling on the tongue and no confectioners' sugar grit.
- I swear by vanilla bean paste, as you it's so much more convenient and affordable than buying the vanilla pods on their own. There are several quality brands out there, but I like LorAnn Oils Madagascar Vanilla Bean Paste
 .
.
- To achieve a very bright, deep pink frosting, try a few drops of Sweetapolita Bright Pink.
-
For the gold leaf, I used 23 Carat Edible Gold Leaf. Of course it's a luxury, but you use just a touch here and there on cakes, cookies, cupcakes, macarons and so much more, and it lasts for quite some time.
See you soon with more cake and sprinkles!