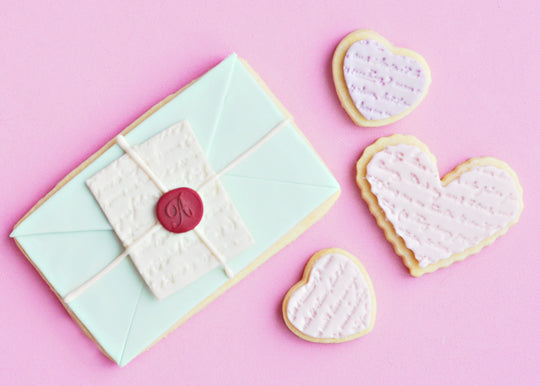
Happy love-month, everyone! I've been having so much fun exploring different love-themed treats, now that the Valentine's spirit is upon us. I have a seemingly endless list of lovey sweets in my blog-ideas notebook, so I hope to somehow make it through several more before Valentine's Day. I feel, though, that so many of these designs would also make for gorgeous wedding, bridal shower, or anniversary confections, because where there is love, oh please, let there be cookies!

While browsing a recent issue of Martha Stewart Living, I was beyond inspired (as usual). This time, though, things were really clicking. Every time I turned the page, I felt creative nudge upon creative nudge, resulting in some quick scribbles and sketches in my pink Moleskine notebook (I should be buying the notebooks by the dozen these days!). One of the most inspiring images, to me, was a gorgeous set of pastel letters with wine-coloured seals. Seeing as I don't think in paper, but in sugar, I immediately started to design this collection of love letter cookies.

As a hopeless romantic, love letters get me every time. It seems we're all enchanted by the love letters--no matter whose they are, really. I noticed this after I watched a third Nicholas Sparks (clearly a deep and sensitive author who has a real adoration for love letters) movie last weekend--all of which have a cameo appearance (or more) by a big stack of gorgeously tattered and heartfelt letters. The Notebook, of course, which is centered around the tragic pile of letters intercepted and hidden by the mother of a girl in a star-crossed love affair; Dear John, which also focuses on the written word of love between a young couple parted by war; and finally, my most recent watch, The Last Song--another story of love, but with a heap of unread letters from a father to his daughter. It all reminds me how inspirational and beautiful words really are; even the simple aesthetic of script, to me, is so lovely and artful. 
I suppose that's why I was so taken with the script rubber stamp I found the other day. The effect when impressed upon the fondant is simple, but I think it's so pretty, textural, and perfectly antiquated.

So here we have a happy little family of scripted love cookies. You know, speaking of family and love letters, I wanted to share a really neat book/idea with you. Shortly after our first daughter, Reese, was born, I received a beautiful book called "Love, Mommy: Writing Love Letters To Your Baby." The author, Judy Siblin-Librach, encourages and inspires the reader to do just that: to write heartfelt love letters to your baby. This gives them something amazing to cherish when they're older, and they can learn all about specific, day-to-day reasons why you love them so. So, every night, for an entire year, I wrote Reese a love letter in a journal. I've put it away so that I can wrap it up and give it to her either on her wedding day, or when the time is right. I've also started this for Neve. I can't wait to sit down with the girls, years from now, and read each of their love letters again.

Once I started creating these cookies, I began imagining endless possibilities--there may even be a part two to this post, if I can't resist the urge to create the next part of my vision! I hope you run with this theme. If you'd like to re-create what I've done above, here is the how-to:
Love Letters:
1. Using large rectangular cookie cutter (these are 4.5" x 3"), cut out/bake/cool desired number of "letters."
2. Colour fondant (I use Satin Ice brand) desired colours. I used ivory fondant and added pink, mauve, teal and burgundy (in tiny amounts). You can create similar shades by mixing some Sweetapolita Oil Based Colour shades!
3. Roll out your fondant to about 1/8" thickness, one cookie at a time, keeping the remaining fondant covered, and cut rectangle using same cookie cutter you used for cookie. When rolling fondant for cookies, I like to sprinkle icing sugar on counter surface before rolling, and then let the cut-out sit for a moment or two before lifting up with an artist's palette knife. This way the fondant doesn't get stretched in any way.
4. Spread a very, very thin layer of royal icing onto the inner surface of the cookie with an offset palette knife, and gently place your fondant cut-out on top, gently smoothing with your fingers.
5. Cut a top flap (any style you like--I used real envelopes for reference) and adhere to your "envelope" with a dab of water. Using a knife, create two angled envelope lines.
6. For scripted detail piece: roll out ivory fondant, then press the rubber stamp firmly down upon the fondant and lift straight up. Using a knife, cut a rectangular piece, let dry for about 15 minutes, and adhere to envelope with royal icing.
7. Using a #2 tip, pipe string onto envelope. 8. Roll a small ball of burgundy fondant, and emboss with wax seal, then place in centre of cookie. Let cookies dry for several hours, preferably overnight, before packaging.
Scripted Heart Cookies:
These are so simple!
1. Cut out/bake/cool any heart shapes you desire.
2. Roll pastel coloured fondant as with letter cookies, and impress script using rubber stamp. Using same cutters as used for making cookies, cut scripted fondant hearts.
3. Adhere to corresponding cookie using very thin layer of royal icing and an offset palette knife. I can see these making for fabulous event favours, gifts for loved ones & friends, dessert table details, and more.
Good luck & enjoy!


