
I hope you had a wonderful weekend filled with feasting, family, and friends. I know we certainly did! We celebrated Easter as well as our little Reese's 4th birthday. On Saturday we went to "The County," to visit some family at the farm. It's such a neat situation, because when we go with the kids, there's so much for them to see and do. With Easter and Reese's birthday falling on the same weekend this year (a rare occurrence), we decided it would be fun to celebrate in The County on Saturday. When Reese and I were talking about birthday cake ideas, we thought it would be the perfect time to make the brilliant Rainbow Cake.

When Reese first saw the Rainbow Cake on Whisk Kid's blog, she fell in love with it, and rightfully so--this cake is a kid's dream come true with its 6 vibrant rainbow-coloured layers and tons of buttercream! Kaitlin's blog is filled with scrumptious cakes and treats, photos, and helpful baking hints, and if you haven't yet, you really must check it out! As a cake girl myself, I have to tell you that I think her rainbow cake invention was likely the most genius layer cake design in the history of cake. She's pretty amazing herself--a 20 year old sophomore at Michigan State University who happens to be a super-bright, passionate and talented baker/blogger, and more. If you don't believe me, ask Martha Stewart who had Kaitlin herself on the show to demonstrate the making of the Rainbow Cake!

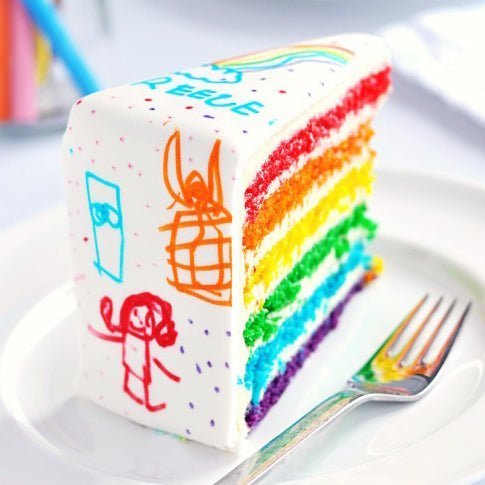
I told Kaitlin that I think the fact that she left her buttercream Rainbow Cake white on the outside was complete brilliance and perfectly executed. I was tempted to do that as well, but I thought it would be so fun to let Reese design the outside of her own cake, so I covered the buttercream Rainbow Cake with some white fondant, chilled it overnight, and then handed her a pack of edible food colour markers --again, a dream come true for an artsy and infinitely creative kid like her. I ordered these pens awhile back, and promised her that someday soon she could colour on her own cake. She was so excited that she even sketched out some ideas on paper with regular markers, so that she was ready and prepared (this is so my child). First thing she did was write her first name, then her full name, then a number 4. Then she thought about it, and just did whatever she wanted until the cake was filled with doodles. My personal favourite is the rainbow and the big yellow sun. Wouldn't it be cute to make matching sugar cookies covered in white fondant, and let the kids decorate their own cookies at a birthday party? Or even writing guests' names on fancy cookies as place cards. So much fun!  What I absolutely love about this cake is the element of surprise and the wow-factor, when the first piece is cut and served. There was literally some audible gasps at the table when they saw the rainbow inside, and the kid inside of me couldn't be more in love with rainbow layers (was a tween in the 80s, what can I say). The cake is made by dividing and colouring vanilla cake batter using food colours (I used the recipe below, but any vanilla butter cake would work well) and baking in separate pans for 15 minutes each. The process was really a fun change for me and Reese helped colour all of the bowls of batter. This piece with "Alyea" on it makes me smile; I suppose that's one way to claim your piece! I think I may start doing that around here. The cake itself was so delicious, and I just adore Lemon Swiss Meringue Buttercream, so that was the perfect addition to the vanilla cake and vanilla fondant. So decadent with all of that gorgeous buttercream!
Here's our little birthday girl full of love, laughter, and life . . .

Just sitting around being cute and, well, four. It's hard to believe that she's four, actually. Sounds cliche, but it's so true. When she was a baby, I used to sing "Turn Around" to her on a regular basis, and every single time I sang that to her I would be crying before even the end of verse 1:
Where are you going my little one, little one Where are you going my baby, my own Turn around and you're two Turn around and you're four Turn around and you're a young girl Going out of the door...
Okay, it seems that even writing about it makes me cry, but that's exactly what happened: I turned around she was two, and then I turned around and she was four. Here's my favourite photo of her when she was two:

My favourite of Reese's modeling gigs--definitely a particularly proud mommy moment (sorry if that's a total mommy brag)! Well, on second thought, I won't complain that she's four, because as the next verse of that song reminds me, I'll turn around and she'll be having "babes of her own." I'll take four and enjoy every minute of it. 
An unexpected birthday highlight at the farm was driving Grandpa's tractor for the first time. Apparently, she's quite the driver!

After those tractor-driving lessons from Grandpa, she was ready to drive cousin Lucas' Jeep, and did she ever.

Then it was time to hitch a ride with cousin Piper; now if only the closest Starbucks wasn't 30 miles away . . .
Here's the recipe for the Rainbow Cake followed by my how-to for the Doodle Cake version. Have a wonderful week!:
Rainbow Doodle Birthday Cake
- 2 sticks (226 g) butter, room temp
- 2 1/3 c (466 g) sugar 5 egg whites, room temp
- 2 teaspoons vanilla 3 c (375 g) all-purpose flour
- 4 tsp baking powder ½ tsp salt
- 1 1/2 c (355 g) milk, warmed for 30 sec in microwave to bring to room temp
- Red, orange, yellow, green, blue and purple GEL food coloring. Liquid will not be vibrant enough! Try any of Sweetapolita's Oil Based Colours!
Preheat the oven to 350F degrees. Oil and line how ever many 9” cake pans you have (I have three and I just reused them). Sift together the flour, baking powder and salt. Set aside. Cream the sugar and butter, then add the egg whites (I cracked them all into one bowl) and add them a little at a time. Add the vanilla and mix until fully incorporated. Then, alternating between wet and dry, add the milk and flour mixture in two parts. Divide the batter amongst 6 bowls (I did it by weight. Weigh your mixing bowl before you begin adding ingredients and then subtract the weight of the bowl from the final measurement after the batter is completed. Divide that number by six and add that weight of batter to each bowl), and then whisk a fair amount of the appropriate food color into each bowl. Keep in mind that the color of the unbaked batter will be the color of the baked batter. Pour into the pans and bake for 15 minutes each. When you remove them from the oven, let them rest on the cooling rack, in the pan, for ten minutes. Then flip, cover, and stash them in the fridge to cool quickly.
Lemony Swiss Meringue Buttercream
To fill and crumb coat:
- 9 egg whites 1 ¾ c (350 g) sugar
- 4 sticks (454 g) of butter, room temp
- 2 tsp lemon extract
To frost:
- 5 egg whites
- 1 c (200 g) sugar
- 2 sticks (227 g) butter, room temp
- 1 tsp lemon extract
Cook the egg whites and sugar in a small saucepan over medium heat, whisking constantly, until the sugar is completely dissolved (test by rubbing some between your fingers. If it's completely smooth, it's done). Pour into another bowl (a stand mixer is preferable) and whip on high speed until room temp. Then, on a medium-slow speed, add the butter, waiting until each piece is completely incorporated before adding the next. After all the butter has been added, turn the mixer back to high speed and whip until it has come together, about five minutes. Add the extract, beat briefly and then use. If the buttercream seems soupy after all of the butter is added and does not come together after whipping, refrigerate for 5 to 7 minutes and continue whipping until it becomes fluffy and workable.
Assembly
Stack the layers in your preferred order and fill and frost as you would any other cake.
Sweetapolita's Notes & Doodle Cake How-To:
- You may find my previous post 50 Tips for Baking Better Cakes helpful with this cake (and hopefully others).
- I was worried at first that I somehow made the layers too thin, but they were perfect, so don't panic when they seem almost pancake-like! Once you pile 6 of those layers and all of that buttercream, the cake is a perfect height. Mine was about 4.5" high. Use a 9-inch, 1/4" thick cake board when building the cake.
- To make the doodle cake, cover the buttercream cake in white fondant and refrigerate overnight. You will need approximately 2 lbs, 3 oz of fondant for a 9" round 5" high cake. Remove cake from refrigerator and let child (or anyone!) colour all over cake using AmeriColor Food Colour Markers (below). Place cake back in refrigerator every 15 minutes or so, if it begins to soften before child is finished (otherwise you will get dents in the cake). It's also fun to have everyone at a birthday party sign the cake, write a message, draw a picture, etc!
- You can store finished cake in refrigerator, but serve at room temperature or buttercream won't be soft enough and the flavours won't come through as intended. I typically take this type of fondant-covered cake out of refrigerator about 6 hours before serving. Just a note the cake will dent very easily when ready to serve, so avoid touching the cake itself.
*Achieve these vibrant colours with any of Sweetapolita's Oil Based Colours!
Good luck & enjoy!