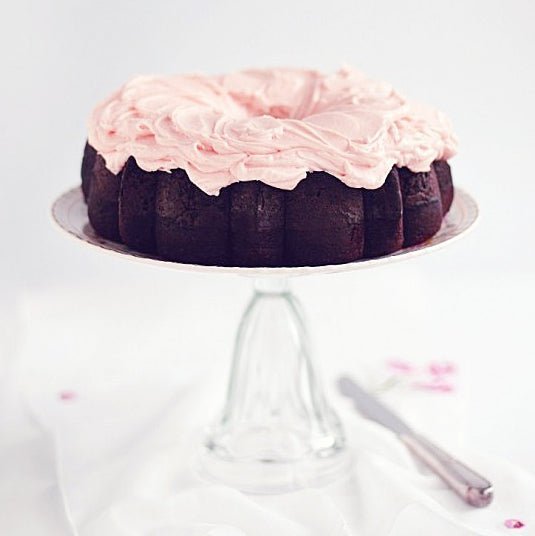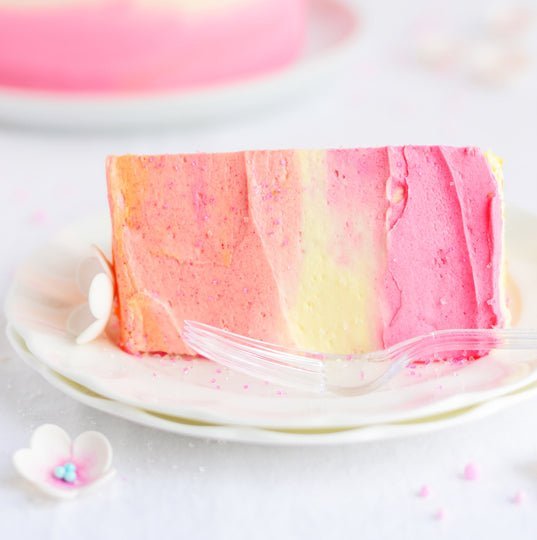

Hello from the land of orange cake! I'm finally getting a chance to share this happy-happy orange cake with you guys. Let's just say since my last post, where lavender & strawberry made a summery debut, it's been all about orange (and a whole lot of book recipe testing!). I made orange layer cake exactly 5 times in one week, and this was the one I was truly pleased with. Why did it take me 5 tries, you ask? Well, it was one-part cake fail, one-part inferior butter (we'll talk more about that), one-part aesthetic let-down, one-part perfectionism, and two-parts me being completely Willy Wonky at (most) times. But alas, I really love this cake! It's a moist yellow cake infused with fresh orange juice and zest, filled with an orange vanilla whipped cream, and frosted with an orange frosting tinted in a few sherbet shades using one of my favourite decorating techniques, the super-simple but strangely rewarding Pastel Swirl style. It's a really neat (and quick) way to tell a story of the flavours inside the cake (much like the Vanilla Blackberry-Mascarpone Cake I shared recently), or simply to add an artistic flair to any layer cake. Just remember that, although the colour combinations are virtually endless, I find this works best when the colours really blend together (but not over-blended or they'll become one colour), so I've discovered that sticking to three (or so) colours that actually look nice when combined is ideal, not just colours that look nice beside each other. So in this case, since orange and pink make coral, I was able to blend them together to achieve a pretty new colour. I added some un-tinted frosting in there too, so that it would create pastel versions of the same colour scheme.

I made a little batch of sugar flowers (which would be super cute on the cupcake version of this cake, which I will likely do with the extra flowers from this post!), and ended up using a single little blossom and some pink and white sanding sugar to give the cake a little bit of a tropical feel. You could also fold in Pink Crunchy or White Crunchy sprinkles into the frosting for a slightly different feel! Real flowers would be so lovely on this style as well, and I can see a tropical shower cake, birthday cake, or even wedding cake a few tiers high becoming a total showstopper.

So I'm lucky enough to have you as a regular reader, you'll likely notice that the filling and frosting recipes are variations on those found in many of my cake recipes. See, I don't think you always have to start from "scratch," but rather can make a few modifications on your favourite existing recipes to make a whole new cake. In this case, I simply added orange zest/juice to my favourite vanilla recipes, and it completely changes the experience. I absolutely love working with oranges in dessert, as I think they offer so much flavour and instantly make most desserts so much more interesting. And they literally fragrance the entire house one you start zesting away. It's truly a lovely baking experience. I typically use Valencia oranges when baking/juicing, because they're so, well, juicy! I also find them even more fragrant than Navel oranges, offering even more orangey-ness to recipes. I did experiment with Pure Orange Extract while making this, but in the end I took it out of the recipe--it just gave it a medicinal quality that wasn't so happy-happy. One option would be to experiment with Orange Blossom Water to the frosting, as that would give it a unique orange flavour as well, but I find the juice and zest of the Valencia oranges worked well.

So, remember way up there when I mentioned that I had an inferior butter experience? Well, I'm actually glad I did, even though it meant 3 layers of cake in the garbage. And this feels important enough to make a separate post about butter in itself, but for now let me touch on what happened. So, as you know, I'm working on my first book (hooray!), which means I'm currently living in a sea of bags of sugar and flour that weigh more than my children, and have had to forgo buying groceries so I can make room in our fridge for the endless pounds of butter (kidding . . . sort of), I decided that maybe I need to experiment with the less pricey butter variety, to see if it really makes a difference, or if it's at least good enough for everyday baking. I decided that I'd buy my favourite butter, Lactancia My Country Unsalted Butter, for frostings and buttercreams, and try the Great Value butter for the actual cakes, etc. I made the cake back-to-back using each butter, while keeping every single step and ingredient the same, but the Great Value version was so dense and greasy. I tried it, and it tasted like cornbread--it was honestly, inedible, in my opinion. When I made it right then again with the Lactancia, it was just as it should be: light, tender and orange-y. I can assume that the Lactancia has a higher fat content, but it's hard to know . . . I can see this is a topic that likely requires extensive research, because aside from experimenting with every brand of butter out there in the same cake recipe, it would be impossible to know from simply looking at the butter packages at the store. The nutritional info on the packages are typically all the same, but that doesn't mean that butter is made up of the same fat/water ratios. I would love to spend more time really figuring this out, because this is the first time in my life I've tasted a cake that tasted like cornbread, yet in this previous post from the Fluffy Vanilla Cake, some people have mentioned that they thought it tasted that way. I was perplexed! Especially since out of over 450 reader comments on that post, hundreds of people seem to share my love for how fluffy and light that cake is. Very mysterious . . . Now I'm also wondering about those who have had separation issues with their Swiss Meringue Buttercream--again, something that's never happened to me, and not because I don't have epic baking fails, but maybe because I've only used higher-priced butter. It does kind of all make sense . . . So that being said, it seems that in some cases, you might "get what you pay for" when it comes to butter for baking cakes and making meringue buttercream. I can't say that every fancy brand is perfect for baking, and every inexpensive brand is terrible, but between these two brands for my cakes it was night and day. Something to think about! And if you have any experience with this, feel free to share your story in in the comments. Let's get to the bottom of this. In the meantime, here's the recipe for this happy-happy orange party cake:
Orange Party Cake with Whipped Orange Frosting
For the Orange Cake:
- 4 whole eggs (room temperature)
- 2 egg yolks (room temperature)
- 1 cup 240 ml whole milk, at room temperature
- 1/4 cup freshly squeezed orange juice (strained (I like Valencia oranges))
- 3 cups 345 g cake flour, sifted
- 2 cups 400 g sugar
- 1 tablespoon plus 1 teaspoon (19 g baking powder)
- 1/2 teaspoon 4 g salt
- 3/4 cup 170 g unsalted butter, cold and cut into small even pieces
- Zest from 2 medium oranges
For the Orange-Vanilla Whipped Cream Filling:
- 2 tablespoons 30 ml cold water
- 2 teaspoons 10 ml unflavoured gelatin (such as Knox brand)
- 2 cups 500 ml whipping cream (35-37% fat), cold
- 1/4 cup 30 g icing/confectioners' sugar
- 1 teaspoon 5 ml pure vanilla extract
- Zest from 1 medium orange
- Pinch of salt
For the Whipped Orange Frosting:
- 1 cups 227 g unsalted butter, softened and cut into cubes
- 4-1/2 cups 565 g confectioners’ sugar, sifted
- 1/4 cup 59 ml whipping cream (35% heavy cream)
- 1/4 cup 59 ml freshly squeezed orange juice, strained
- Pinch of salt
For the Orange Cake:
- Preheat the oven to 350° F. Butter the bottoms and sides of three 8-inch round cake pans, line bottoms with parchment round and dust sides with flour.
- In a medium measuring cup with a spout, lightly break up the eggs and yolks. In a separate measuring cup, combine the orange juice and milk.
- In the bowl of an electric mixer fitted with the paddle attachment, whisk together the flour, sugar, baking powder and salt. With the mixer set to low speed, add the cold butter one piece at a time, about 10 seconds apart. (You can keep half in the fridge while you add the first half of butter.) Continue mixing on low speed until all of the butter has been blended and there are no clumps. Mixture should have a fine crumbly, cornmeal-like texture.
- Gradually add the milk/orange juice mixture to these dry ingredients, and mix on medium speed for 4 minutes. Scrape the sides and bottom of the bowl to ensure all of the ingredients are well incorporated. Reduce the speed to low and gradually add the egg mixture; once the mixture has been added, increase speed to medium and beat for 1 minute, but no more. Gently fold in the zest.
- Divide batter evenly among the 3 prepared pans (use a kitchen scale to ensure 3 even layers--cakes should weight ~460 g each). Place two of the cake pans on a baking sheet and bake until a cake tester or wooden toothpick inserted into the center comes out with a few crumbs but no batter, about 23 minutes. Repeat with the final layer. Let the layers cool in the pans for 15 minutes, then loosen sides with thin metal spatula or knife, and carefully turn out onto wire racks, peel of the paper liners, and let cool completely.
For the Vanilla Bean Whipped Cream Filling:
- In a small stainless steel bowl, place the cold water and sprinkle with the gelatin. Let sit for at least 10 minutes. In a small saucepan, bring 1/3 cup of the cream just to a simmer, then stir into the gelatin mixture until the gelatin has dissolved. Refrigerate, stirring frequently, until cool but not set, about 8 minutes. (Be careful to keep your eye on it, or you'll end up with Panna Cotta!)
- In a chilled stainless steel mixer bowl with a chilled whisk attachment, beat the remaining whipping cream, icing/confectioners' sugar, vanillla and salt until it thickens just slightly and soft peaks begin to form, about 1 minute. Very gradually add the gelatin mixture and continue beating until medium-firm peaks form (should be thick enough to spread). Fold in zest. Keep covered and chilled until ready to use.
For the Whipped Orange Frosting:
- In the bowl of an electric mixer fitted with the paddle attachment, whip butter for 8 minutes on medium speed (I use “4″ on my KitchenAid). Butter will become very pale & creamy.
- Add icing sugar, whipping cream, orange juice and salt, and mix on low speed for 1 minute, then on medium for 6 minutes. Frosting will be very light, creamy and fluffy.
Assembly of the Orange Party Cake:
- Trim any dark edges or crust from cake layers with a very sharp serrated knife. Place your first cake layer, face-up, onto a cake stand, plate or 8-inch round foil cake board. Fill your pastry bag with about 1-1/2 cups of the Whipped Orange Frosting and pipe a dam around the perimeter of the cake layer (this will keep our Orange-Vanilla Whipped Cream Filling in place). Place about 1 cup of the cream filling on top of the cake layer, inside of the dam. Gently spread the filling using a small offset spatula.
- Repeat until you come to your final cake layer, which you will place face-down. If you find the cake too soft and unstable, put in refrigerator for a few moments to firm it up, then resume. Use your clean offset spatula to carefully smooth the frosting so it's flat against the cake.
- Cover the entire cake gently with plastic wrap (I like Press n' Seal), and then, once covered, use your hands to carefully ensure the cake is lined up straight and flattening any lumps or bumps of frosting. Chill for at least 30 minutes.
- Once cake is stable and chilled, apply an even layer of frosting to the entire cake, to seal in crumbs. Chill again until frosting is firm, about 30 minutes.
- Place cake plate/board with cake onto a turntable, if possible. Be sure your remaining frosting is smooth and fluffy, working it with a rubber spatula for a few moments. You can even warm in microwave for a few seconds to soften it up.
- Divide frosting into 4 separate small bowls. Tint 3 of them: 1 orange, 1 bright pink, 1 bright coral (pink + orange). Leave the remaining frosting un-tinted. Place cake on a turntable, if possible.
- Using a small offset spatula, spread the orange frosting on the top of the cake, letting it extend about 1/2" over the edge. Using a straight medium spatula, spread a thick layer of bright pink frosting along the bottom third of the entire cake, followed by the un-tinted frosting on the middle of the cake, and the coral on the upper third of the cake. Clean your medium straight spatula and then smooth the sides of cake, slowly turning the cake turntable while holding the spatula steady. Use your small offset spatula to smooth top of cake. Top with sanding sugar and sugar blossom, if desired, or any sprinkles that you love!
- Keep cake refrigerated for up to 2 days, but serve at room temperature.
- For this sherbet colour scheme, try Pink and Orange from the Sweetapolita oil-based colour collection. Just a note that you'll want to get your pink super bright, as it will fade a bit after applying to the cake. The reason I use brighter colours when tinting frosting with an ivory tone (so pretty much anything with butter), is because I feel that those bold colours cut through the yellow better than regular colours. You just have to add a little at a time until you get where you want to be.
- For all of my cake decorating, I use a cake turntable--it's definitely a must-have. I have a homemade version, but have recently started using the Ateco Revolving Cake Stand, and I love it.
- I always use a Small Offset Spatula and Medium Straight Spatula when frosting a cake.
- For the blossoms, I used a 5-Petal Flower Cutter set, and simply cut them from thinly-rolled Gum Paste, shaping them by letting them dry in a egg carton (or you can always buy flower formers, but I have a designated egg carton for this kind of thing). Once dry I brushed on a little pink petal dust into the centre, and attached sugar pearls in the centre using a tiny dab of Clear Piping Gel. Nonpareils would work great too!
Good luck & enjoy!