millionairesliced

Sweet & Salty Millionaire's Layer Cake

Midnight Cookies & Cream Cake Reading Sweet & Salty Millionaire's Layer Cake 13 minutes Next Sugar & Spice Delight Cake

Hello, hello! After many, many months of devoted book creating, I'm excited to be back here with you, blogging on a regular basis! I'm also incredibly eager to share my book with you all, once it's printed and released--it has been, wow, an incredible learning experience. It's still kind of surreal to me that a book with my name on it will actually exist. A dream come true, for certain. So . . . cake! And not just cake--the most decadent sweet & salty cake you could ever imagine. I call this layer cake "Sweet & Salty Millionaire's Layer Cake" because it is my take on those ridiculously addicting Millionaire's Bars--you know the ones: buttery shortbread topped with gooey caramel and a layer of rich, shiny chocolate. If that doesn't beg to become a layer cake, I don't know what does.

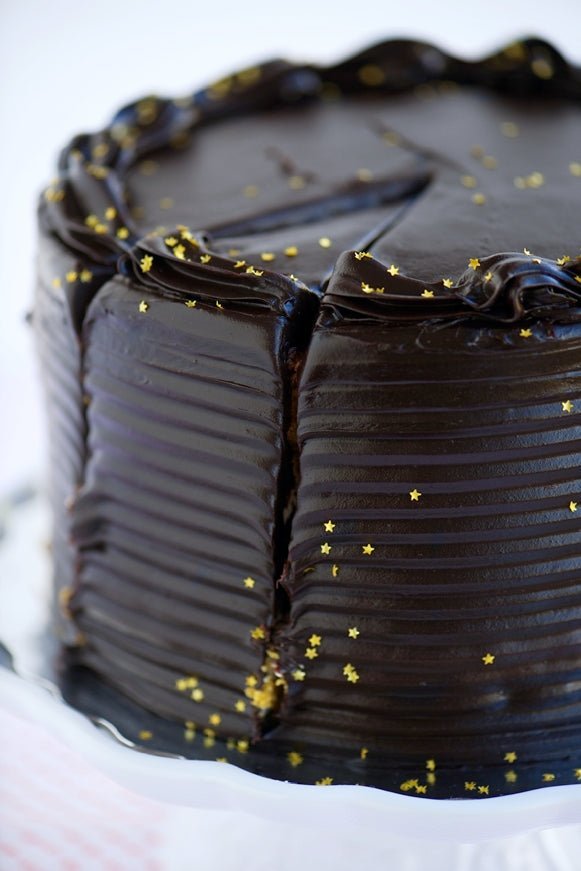
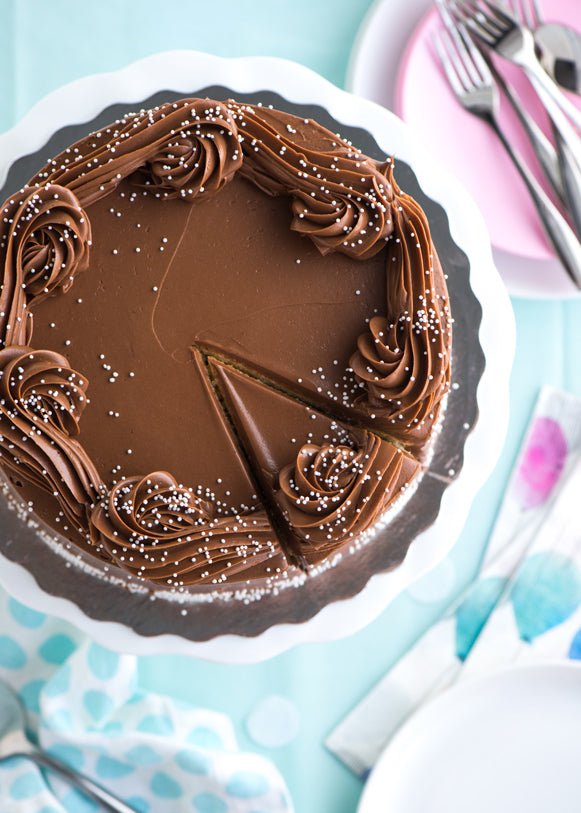
So I baked up 3 layers of dark, moist chocolate cake, torted them into a total of 6 thinner layers, and then filled them with vanilla bean Swiss meringue buttercream, homemade salted caramel, buttery shortbread crumble and dark chocolate ganache frosting. To finish it off, we smother the whole thing in a generous layer of more dark chocolate ganache frosting and a sprinkling of Fleur de Sel. I find that the satiny vanilla bean buttercream really balances out the intensity of the dark chocolate and sweet and salty caramel, and the shortbread adds an amazing melt-in-your-mouth textural surprise.

The ganache frosting is essentially a typical ganache (an emulsion of dark chocolate and heavy cream), but with some corn syrup and butter added in to keep it luscious and glossy and a pinch of sea salt to celebrate our love for sweet & salty.  I used a really dark chocolate this time, at 70% cocoa solids, but you could use any quality dark chocolate with at least 53% cocoa solids. I was almost out of the usual dark chocolate callets I love to use from Callebaut, so I bought 2 ginormous (300 grams each) premium chocolate bars, chopped them up and tossed in 100 grams of the chocolate callets I had left. With the super-sweetness of the caramel, I love the deep, dark chocolate frosting.

The 3-ingredient shortbread component is so quick and easy, and these bits & boulders of buttery love are just what this cake needed to really pay homage to the Millionaire's Bars it was inspired by. Heck, they would even make an amazing little ice cream topping, along with the salted caramel perhaps? The salted caramel is so much easier to make than you might think and, as you might imagine, it can be used for so many things--pancakes, waffles, dipping apples, and more. You don't have to "salt" it, but I feel it really heightens the natural caramel flavour and added vanilla.

One thing I've discovered is that when making ganache of any kind, an immersion hand blender (you know, the "stick" type hand blenders) works best to create perfectly homogenous ganache that won't threaten to separate and become grainy. You can certainly use a whisk, but if you have an immersion blender I feel it works just that much better. I included 2 layers of ganache in the cake layers because I felt that 5 layers of caramel could be a little much, but maybe I'm crazy. So you could always keep the ganache as the frosting and fill all of the layers with the buttercream, caramel and shortbread. I'm thinking there's no wrong way of doing this, you know?

So, here's the recipe for this sweet & salty Millionaire's Layer Cake along with a quick list of the layer-pattern of this cake: cake buttercream + caramel + shortbread cake ganache cake buttercream + caramel + shortbread cake ganache cake buttercream + caramel + shortbread cake

Millionaire’s Layer Cake

Dark moist chocolate cake filled with satiny vanilla bean buttercream, homemade salted caramel, buttery shortbread crumble, dark chocolate ganache and frosted with more ganache and a sprinkling of sea salt.

For the Chocolate Cake:

  • 2 1/4 cups 285 g all-purpose flour
  • 2 1/4 cups 450 g superfine sugar
  • 3/4 cup 90 g dark Dutch-process cocoa powder (I use Cacao Barry Extra Brute)
  • 2 1/4 teaspoons 10 g baking soda
  • 2 1/4 teaspoons 10 g baking powder
  • 1 teaspoon 8 g salt
  • 1 cup 240 mL buttermilk
  • 3/4 cup 180 mL brewed coffee or espresso, hot
  • 1/3 cup 80 ml vegetable oil
  • 3 eggs (room temperature)
  • 1 tablespoons 15 mL pure vanilla extract

For the Vanilla Bean Swiss Meringue Buttercream:

  • 6 egg whites
  • 1 3/4 cups 350 g sugar
  • 2 cups 454 g unsalted butter, softened, cut into cubes
  • 2 teaspoons 10 ml vanilla bean paste or 1 vanilla bean, seeded and scraped
  • Pinch of salt

For the Salted Caramel:

  • 2 cups 400 g sugar
  • 1/2 cup 120 ml water
  • 1 cup 240 ml heavy cream (whipping cream)
  • 2 tablespoons 30 g unsalted butter
  • 2 teaspoons pure vanilla extract or vanilla bean paste
  • Generous pinch of sea salt (I used Fleur de Sel)

For the Shortbread Crumbs:

  • 1 cup 125 g all-purpose flour
  • 1/4 cup 50 g sugar
  • 1/2 cup 115 g unsalted butter, softened, cut into cubes

For the Ganache Frosting:

  • 1 pound plus 6 ounces (700 g best-quality dark chocolate (at least 53% cocoa solids), chopped or callets)
  • 2 cups 480 ml heavy cream (whipping cream)
  • 1/3 cup 110 g corn syrup
  • 1/4 teaspoon sea salt
  • 8 tablespoons 120 g unsalted butter, cut into cubes
  • 1 tablespoon 15 ml pure vanilla extract

For the Chocolate Cake:

  1. Preheat oven to 350° F. Spray three 8-inch round cake pans with cooking spray and line the bottoms with parchment paper rounds.
  2. Into the bowl of electric mixer fitted with the whisk attachment, sift flour, sugar, cocoa powder, baking soda, baking powder and salt.
  3. In a large measuring cup with a spout, combine the buttermilk, coffee, oil, eggs and vanilla.
  4. Add liquid mixture to dry ingredients and mix on medium speed until smooth, about 1 minute. Divide batter among the 3 cake pans (weigh batter for even layers at about 520 grams per cake pan).
  5. Bake 2 of the layers until a toothpick or skewer inserted into the center comes out with a few crumbs, about 20-25 minutes. Try not to over-bake. Repeat with the final layer. Let cakes cool in the pans for 10 minutes and then turn onto a wire rack until completely cool.

For the Vanilla Bean Swiss Meringue Buttercream:

  1. Wipe the bowl and whisk of an electric mixer with paper towel and lemon juice, to remove any trace of grease. Add egg whites and sugar, and simmer over a pot of water (not boiling), whisking constantly but gently, until temperature reaches 130°F, or if you don't have a candy thermometer, until the sugar has completely dissolved and the egg whites are hot, about 8-10 minutes.
  2. Place bowl back on mixer and fit with the whisk attachment. Whip on medium-high speed until the meringue is thick, glossy, and the bottom of the bowl feels neutral to the touch (this can take up to 10 minutes, or longer). Switch over to paddle attachment and, with mixer on low speed, add softened butter in chunks until incorporated, and mix until it has reached a silky smooth texture (if curdles, keep mixing and it will come back to smooth). Increase speed to medium and beat until the mixture becomes thick and fluffy, about 2 minutes.
  3. Add vanilla bean paste and salt, continuing to beat on low speed until well combined.
  4. You can also add a wide variety of flavourings, extracts, and more, but always add the vanilla first, as it brings out the true taste of the other flavours. Keep in an airtight container at room temperature for up to 1 day, refrigerated for up to 1 week, or in the freezer for up to 2 months. Thaw at room temperature. Bring chilled buttercream back to smooth consistency by bringing to room temperature and then beating on low speed with an electric mixer for a few minutes.

For the Salted Caramel:

  1. In a medium saucepan over medium heat, stir the sugar and water until combined. Brush down the sides of the saucepan with a wet pastry brush and increase the heat to medium-high.
  2. Stop stirring, and let the mixture bubble until it reaches an amber colour (about 350°F). Promptly remove the saucepan from the heat and whisk in the heavy cream (be careful, as this will bubble and steam aggressively for a moment) until smooth, followed by the butter.
  3. Clip a candy thermometer onto the saucepan and return the mixture to medium-high heat until it reaches 248°F). Transfer the caramel to the heatproof bowl and stir in the vanilla and sea salt. As the caramel reaches room temperature it will become thick and spreadable. Store in a sealed jar in refrigerator for up to 2 weeks.

For the Shortbread Crumbs:

  1. Preheat oven to 350°F. Line a baking sheet with parchment paper or a Silpat mat.
  2. In a medium bowl, combine the flour and sugar. Cut in the butter using a pastry blender or your fingers, until you have distributed the butter and achieved pea-size bits. Turn the mixture in an even layer onto the prepared baking sheet and bake for 10 minutes. Remove the tray from the oven and, using a heatproof spatula, gently break up the mixture and return to the oven for 10 more minutes. Let tray cool completely on a wire rack. Once cool, keep in an airtight container for up to 2 weeks.

For the Ganache Frosting:

  1. Place chopped chocolate (or callets) in a large heatproof mixing bowl (I find a stainless 5 quart mixer bowl works well).
  2. In a medium saucepan over medium heat, combine the cream, corn syrup and salt and bring just to a boil. Pour hot cream mixture over the chocolate and let sit for about 1 minute. Using an immersion blender (or whisk, if necessary) combine the chocolate mixture until smooth. Add butter and vanilla and mix again until smooth. Mixture with thicken to spreadable frosting consistency, and eventually become solid at room temperature. To soften, simply warm and bring to desired consistency.

Assembly of the Sweet & Salty Millionaire's Layer Cake:

  1. Prepare your fillings and frosting and ensure they are all at spreadable consistency. For the ganache, this will take about 15-30 minutes after making it, and about 30-60 minutes for the caramel. If you have made ahead, simply warm the ganache and let cool until spreadable, and do the same for the caramel.
  2. Slice all three cake layers in half horizontally, so you have a total of 6 cake layers.
  3. Smear a small dollop of the ganache frosting on a cake plate, pedestal or cake board, and place your first layer cut side up (so bottom of the cake layer is touching plate), and using a small offset palette knife, spread about 1 cup of buttercream on the layer leaving about 1-inch around the edge, followed by one-third of the caramel and then a generous handful of shortbread crumble. Place your next cake layer on top, and spread about 1 cup of the ganache frosting all the way to the edge.
  4. Repeat previous step until you get to the final cake layer. Place last layer face down (cut side down) and frost entire cake with the ganache frosting. Let sit for about 15 minutes and then finish with a thick "coat" of more ganache frosting.
  5. Use a turntable and palette knife to create texture (as in photo)--use one hand to turn the turntable and hold the palette knife in the other hand. Keep palette knife in place and let the turntable do the moving. Use a small offset palette knife to create texture on the top of the cake and sprinkle on some Fleur de Sel. Finished cake can be kept at room temperature for up to 8 hours. Keep refrigerated if longer than 8 hours, but serve at room temperature.
  6. For a little extra sparkle, you could even top with some Silver Squares Edible GlitterGold Squares Edible Glitter or both - with the All That Twinkles Edible Glitter Blend!
Sweetapolita's Notes:
  • For the chocolate cake layers, I used Cacao Barry Extra Brute Dutch-process cocoa powder, but you can use any quality dark Dutch-process variety of your choice.
  • I have become rather fond of using vanilla bean paste instead of actual vanilla beans, as it's convenient and more affordable.
  • When you make the ganache frosting, you'll notice that it's a bit jiggly and gelatinous looking as it sets, but as soon as you being to spread it, it becomes smooth, glossy and glorious.
  • Most cake does best at room temperature in terms of staying moist and fresh, but when it comes to building layer cakes, sometimes there's no choice but to pop it in and out of the fridge a few times to stabilize it (especially when you get into sky-scraping layer cakes). That being said, I recommend only putting most cakes the fridge between the crumb coat and final coat of frosting, or if you feel that things are getting a little wobbly and you want to firm it up before carrying on. For this cake, I didn't refrigerate it at all, so you will likely find that you won't need to either. I was able to avoid the fridge between the crumb coat and final coat of ganache frosting because it begins to dry out at room temperature, sealing all of the crumbs.
Good luck & enjoy!

Leave a comment

All comments are moderated before being published.

This site is protected by reCAPTCHA and the Google Privacy Policy and Terms of Service apply.