Happy spring! Let's talk about cake, happiness and sprinkles: that's what brings us, and has always brought us together, right? This week I felt compelled to make angel food cake--super sweet unicorn style. I think because spring (my favourite season) is kind-of-almost-sort-of in the air, I have got the Easter pastels on my mind, but my heart wanted to fluff it up a bit. Remember when we made the Perfectly Pink Angel Food Cake awhile back? Well, honestly, that cake is one of the most incredibly dream-like cakes I have ever made, and it felt "perfectly" perfect for this pastel unicorn version.
  So what makes an angel food cake a Unicorn Angel Cake? Well, really I only deemed it as such after I sliced it, but the colours, the layers, the sprinkles and, well, the dose of magic I spied when I admired it all together for the first time made it so. And who am I to turn a blind eye upon sprinkly-cake-magic? That said, I know it's a bit more, hmm . . . freestyle looking in its frosting and possibly disheveled appearance, but honestly the texture and taste are nothing short of a dream, and it takes no cake decorating prowess whatsoever--you just generously dollop and swirl. A good old soup spoon does the trick! (And cakelets of all ages LOVE this type of decorating.) The cake is a classic angel food texture with 14 egg whites, superfine sugar and even a generous hit of confectioners' sugar in the mix for the most tender and light as air, spongy texture. After each fluffy, pastel mountain of cake slowly compresses against your plate when you wriggle your fork down to cut a generous bite, it bounces back in front of your eyes (in true angel cake fashion), and it literally melts in your mouth. The swirls of billowy marshmallow frosting are satiny and quite sweet with their nostalgic "meringuey-ness," but then each bite finishes with the pleasant and subtle crunch and candy-like flavour that only sprinkles can bring.
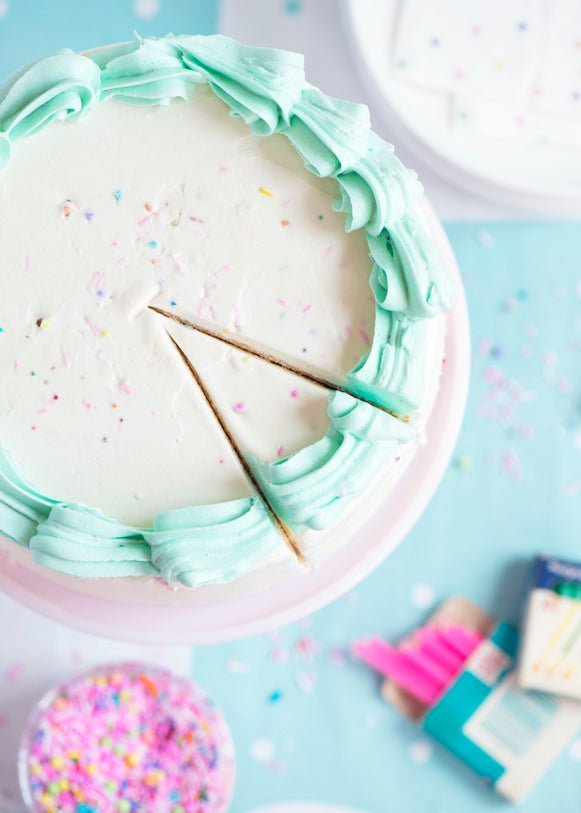
  Unlike a "traditional" rainbow cake, we can't bake the layers in separate pans, so all we do is divide the batter (very gently, since angel food batter is extremely delicate--we won't want to deflate it in any way) evenly into 3 and gently fold in the desired colours. Then we simply add the batter "layers" one at a time and spread gently with spatula (just ensure you don't blend with the batter/colour below). Oh, and don't forget that if you are going for a certain order of coloured "layers," that the top will be the bottom. :) You can see in the photo above, that purple did show through the top--I wasn't sure what to expect, and if the colours would look more blended when I cut the cake, but they actually kept their layers quite nicely! The slightly rounded look to those layers is the result of the batter being pulled upwards while rising. Kind of neat, actually.
  You'll notice that the baked cake has a thin layer of the golden "crust" all over it. If we were leaving this cake exposed, I would have taken the time to gently remove that when the cake was first removed from the pan, because the only time you can really do this without scraping off actual cake, is when it's super hot, and the crust is soft. I did this on the top turquoise layer of the cake, and you can see in the photo how lovely that is. Honestly, though, when you're smothering the cake in mounds of marshmallow frosting, you don't need to worry about taking the time do that. That said, if we were going to go all white with the cake and frosting, I probably would take that time, so we had a purely angelic white cake + frosting.
Sprinkles! Who would have guessed? Hehe. Truth be told, you could add absolutely any sprinkles in the universe to this cake. Or none, for that matter. But I opted for one of my Easter-inspired sprinkles filled with bunnies, chicks, chocolatey-ness and more. Seemed like a perfect fit!  A bit of a beautiful mess, but it does seem that the most luscious cakes are. Don't you agree?
  Spongy, sweet, tender, moist, angelic, fluffy, billowy, meringue-y, satiny and--whoop!--crunchy. The ultimate.
  Hooray! You can modify this angel food cake and marshmallow frosting in so many ways to boast your favourite colour, combination of colours, flavours and even sprinkles. What's your dream cake? So, here we go, friends!
Pastel Angel Food Cake
Super-tender, fluffy, spongy pastel layered Angel Food Cake covered in billowy pastel Marshmallow Frosting and sprinkles!
For the tri-colour cake:
- 1 cup plus 3 tablespoons (140 g cake flour)
- 1 cup plus 3 tablespoons (150 g confectioners' sugar)
- 1/2 teaspoon salt
- 2 cups 13-14 egg whites, room temperature (left out about 1 hour)
- 1 1/2 teaspoons cream of tartar
- 3/4 cup plus 2 tablespoons (180 g superfine sugar (see Sweetapolita's Notes))
- 1/2 teaspoon vanilla bean paste (or pure vanilla extract--see Notes)
- 1/8 teaspoon almond extract (see Notes)
- Pink (Purple and Turquoise soft water-based gel paste food color (see Notes))
For the pastel purple marshmallow frosting:
- 6 egg whites (180 g)
- 1 3/4 cups plus 2 tablespoons (390 g granulated sugar)
- 2 tablespoons 45 g light corn syrup (see Notes)
- 1/4 teaspoon cream of tartar
- Pinch of salt
- 1 teaspoon vanilla bean paste (or pure vanilla extract)
- Purple food colour (see Notes)
- Sprinkles of your choice
Make the pastel angel food cake:
- Arrange oven rack to the lower third of the oven. Preheat the oven to 350°F (180°C). Sift the cake flour, confectioners' sugar and salt together 4 times. Set aside.
- Wipe the bowl and whisk attachment of an electric mixer with paper towel and lemon juice, to remove any trace of grease. Add the egg whites and beat on the lowest speed until they start to become frothy, about 30 seconds. Stop the mixer and sprinkle the cream of tartar over the egg whites. Beat on medium speed until the egg whites thicken just slightly and you can see swirl lines in the mixture from the whisk (very soft peaks), about 1 minute. Add the superfine sugar 1 tablespoon at a time and beat until the egg whites thicken and reach soft/medium, droopy (not stiff) peaks, 1-2 minutes. Beat in the vanilla and almond extract.
- Remove the bowl from the mixer. Sift the dry ingredients 1/4 at a time on top of the meringue and fold gently but thoroughly with a rubber spatula.
- Divide the batter evenly into 3 bowls and add a few drops of each colour to create each tinted batter layer by folding every so gently until blended: few drops of pink to one bowl; purple to another; turquoise to the third.
- Gently transfer the batter, one layer at a time, to an ungreased 10" angel food cake pan and smoothing each with a small offset spatula or back of a spoon. Bake on the lower rack of the oven until the top of the cake springs back when touched lightly, and when a skewer inserted into the cake comes out clean, about 35 minutes. Don't check the cake before 35 minutes, or you could deflate your cake, but also try not to over-bake.
- Remove the cake from the oven and invert the whole pan onto a wire rack so it cools upside down. Let cool for one hour and then loosen sides around the center and outside of the cake using a thin metal spatula or knife. Gently coax the cake out of the pan onto the wire rack and let cool completely. Take your time with this step--you can even use your fingers to loosed the bottom edges, by reaching down between the cake and the pan, pushing the cake away from the sides. It will bounce right back. Do this all around the bottom before pulling the cake out of the pan.
Make the marshmallow frosting:
- Wipe the bowl and whisk attachment of an electric mixer with paper towel and lemon juice, to remove any trace of grease. Add egg whites, sugar, corn syrup, cream of tartar and salt and simmer over a pot of water (not boiling), whisking constantly but gently, until temperature reaches 130°F (54°C) on a candy thermometer.
- Return the bowl to the stand mixer and beat on low speed for 2 minutes, then increase the speed to medium and beat for 2 more minutes. Increase the speed to high and beat until it is very thick and glossy, about 5 minutes. Add vanilla and food colour, if using, and beat to combine. Best used right away (for best texture to apply frosting to the cake--after that it's best enjoyed up to 1-2 days at room temperature).
Frost the cake:
- Place the cake wide end down onto a cake plate, board or pedestal. Pile the frosting on top of the cake and use a metal spatula to spread the frosting from the top down. Create swirls using the back of a spoon and sprinkle with your favourite sprinkles. Slice cake using a serrated knife in a gentle sawing motion. Cake keeps at room temperature for up to 2 days. Best enjoyed day 1 (the cake stays very moist for days, but marshmallow frosting is best enjoyed sooner than later).
Sweetapolita's Notes:
-
Sugar: I use “superfine” sugar for most of my cake and meringue recipes, as it lends to a lighter cake and dissolves quickly into meringue, etc. This is simply a finer grain of granulated sugar that you can purchase as such (also referred to as caster sugar, baking sugar, and more), but I just buy regular granulated sugar and process it for about 60-90 seconds until it is, well, superfine. :)
-
Flour: I used Swan's Down Cake Flour this time, but I typically use either Robin Hood or Five Roses brand. And remember--you can make your own cake flour in a snap: for every needed cup of cake flour, measure 1 cup of bleached all-purpose flour and remove 2 tablespoons from that cup (some bakers prefer to replace those 2 tablespoons all-purpose flour with 2 tablespoons cornstarch, but I choose not to), so 1 cup bleached all-purpose flour minus 2 tablespoons = 1 cup of cake flour.
-
Light Corn Syrup: You'll often see marshmallow and candy-related recipes calling for Light Corn Syrup. The term "light" means that it is clear, and not golden, not "light" as in less sugar. I, being in Canada, use Lily White brand, and in the US, a popular brand is Karo Light Corn Syrup.
-
Colour: You definitely want to use a water-based colour for this recipe. Oil-based colours will cause your meringue to flop. For the food colour in the cake itself, I used a few drops of Turquoise, Pink and Purple, and then just the Purple for the frosting, but as I mentioned in the "Perfectly Pink Angel Food Cake" post, you can certainly go all white–that is always so angelic and classic, however, any colour would be magical.
-
Equipment: I used a classic 10-Inch Angel Food Cake Pan
, but I also recommend one with a removable bottom (like this 2-Piece Angel Food Pan
if you’re going out to buy a new one, otherwise I did just fine with the classic style), particularly if you might opt to serve the cake without frosting. With coaxing the cake does come out of the classic pan just fine, but it tends to take the very thin brown top “crust” off the cake, which I loved for a cake that will boast frosting (typically not a big fan of the brown cake crust).
-
Flavouring: This time, I used Nielsen Massey Madgascar Bourbon Vanilla Bean Paste for both the cake and the frosting. You can certainly use pure vanilla extract (I suggest a good quality one), though. I also used Nielsen Massey Almond Extract in the cake (a hint of this in almost anything vanilla or chocolate is like magic).
-
Sprinkles: The sprinkles used on this cake were limited edition, but of course use any sprinkles that make you happy! I love Birthday Party, but any sprinkles you like will work!
-
Make Ahead: You can make the actual cake up to 1 day ahead and keep wrapped in plastic wrap at room temp, but the frosting you should make right before applying to cake. Once paired with the cake, they are best-enjoyed by day 2.
See you SOON with more happiness!