I'm starting to notice that I have become a wee bit of a chocolate enthusiast these days: dark chocolate, extra-dark chocolate, and sometimes even-more-than-one-kind-at-a-time chocolate. I know that sounds like a stating of the obvious, but, in the big scheme of things, that's a new thing for me. I have always been a vanilla, or even white-of-any-kind dessert girl, and would never think to eat chocolate anything, if there was a vanilla, or the like, option. A cake girl, though, well that I've been since birth, so, of course, vanilla cake with vanilla icing was always on the top of my list.
But I remember things like white cheesecake (never chocolate), carrot cake, lemon & poppy seed cake, apple cake with fresh whipped cream, crepes, pumpkin pie, pecan pie, strawberry pie, sugar cookies, shortbread, bread pudding, cruller and even white powdered donuts (I know, I know . . . but I was a kid, and it's an obligatory Canadian thing to have a favourite donut or two) etc., were all alone up there on my dessert-love list. (I suppose being among a dozen others isn't exactly "alone," but looking back, I suspect they were all lonely without their future friend "chocolate.")
I still love and appreciate all of those sweets, but chocolate has really taken on an entirely new role and appeal in my life, and I think about it--a lot. Maybe the problem was, as a kid, that I was turning to the wrong chocolate desserts, or is it perhaps an appreciation that grows with age? Hormones? Post-baby? Has this happened to anyone else?

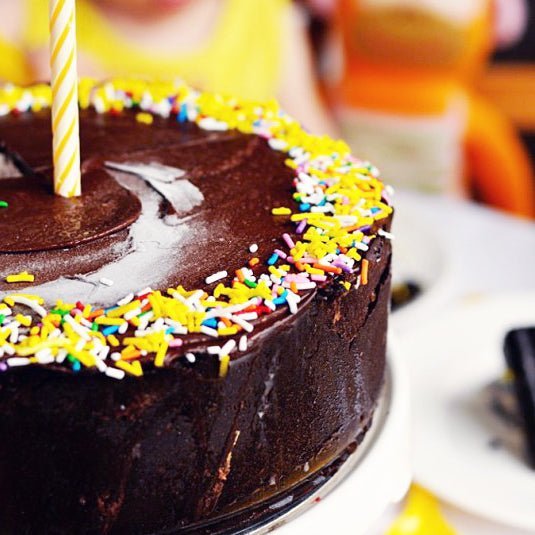
I've also found that straight chocolate-on-chocolate dessert just doesn't seem to excite me as much as one would think, considering my recent love and adoration for it, but I find myself needing to pair it with other flavours to truly appreciate it. Ironically, I often find that I opt for the deepest, darkest chocolate cake paired with vanilla Swiss buttercream--I love the contrast, and a part of me will always need to incorporate vanilla into a dessert somehow or another. In this case, though, the contrast of sweet and salty and chocolate & caramel is what I'm passionate about: 3 layers of dark fudge cake filled with salted caramel Swiss buttercream and frosted with dark fudge frosting and sprinkled with more Fleur de Sel. This cake is extremely chocolaty, with billowy salted caramel buttercream, and very fudgy frosting--so for the truest of chocolate lovers, and very decadent. The day after I made this, I made a larger version to take with me to the cottage, but I decided to make a Chocolate Swiss Meringue Buttercream, and actually just added the actual fudge frosting to some vanilla Swiss buttercream I had made, to create an even lighter, satiny, and less fudge-like consistency and taste ( I wish I had a photo, but it was quickly enjoyed!). It was still very full in chocolate flavour, but it was the same consistency as the caramel buttercream inside. I found it was a nice variation on this super-chocolatey combination. You could try it either way (you don't have to actually make the fudge frosting to add to/make the chocolate Swiss buttercream, but rather just melted chocolate will do--I've included the recipe below), and both are delicious. The only thing I would change next time I make it with the fudge frosting is that I would make my layers of salted caramel buttercream filling much thicker, and I might even add more caramel to the buttercream for a stronger caramel flavour. As with any recipe or cake/filling combination, experimenting is key! 
I have to admit that when I made the Dark Chocolate Fudge Frosting for this little cake, it was the first time I made it, so I somehow used a bit less boiling water than I needed to when mixing with the cocoa powder, so the frosting in the photo doesn't look as gloriously shiny as it did when I did it the second time and added the correct amount of water to the cocoa. It's such a gorgeous, intensely chocolate, and full-of-sheen frosting that would be incredible on pretty much anything. I particularly love it sprinkled with the Fleur de Sel, but of course, sprinkles also look fantastic on top. Whatever your heart desires!
For those of you who aren't big sea salt users or lovers, you may want to make an exception for this glorious and special sea salt. Fleur de Sel is a gourmet salt hand-harvested, typically in France (and translates to "flower of salt"), that, albeit pricey, adds a perfect balance of salty (yet not too salty) flavour and a flaky, moist-yet-crunchy, and sprinkle-like texture. It can be a delicious and lovely touch to both sweet and savoury dishes. To calculate and compare the cost per pound to table salt may be a painful thought, but luckily you only need the tiniest bit for impact. You can find smaller packages of it at most gourmet shops or online for under $10, and it would last you quite some time, unless you develop a serious sweet & salty addiction, but I would know nothing about that . . .
Because it seems to be best appreciated in its natural form and texture, you could use regular sea salt when the salt will be dissolved and mixed into a recipe, such as the salted caramel buttercream. You can then save the Fleur de Sel for sprinkling over top of any other yumminess you decide to sprinkle it upon!). There is definitely some debate among foodies/chefs as to if using the Fleur de Sel, dissolved or not, within the recipe will always yield the best result, so feel free to give it a whirl and decide for yourself. I used all Fleur de Sel, even in the caramel, but next time I will save it for just sprinkling and try the rest of the recipe using a good sea salt to compare.
Here's the recipe for all of the cake's components, but don't be afraid to even use them separately, and paired with your other favourite frosting/filling/cake recipes. Experiment, experiment, experiment! For this cake, you will fill with the Salted Caramel Buttercream, but there are two options for the outside frosting of this cake: 1. Dark Chocolate Fudge Frosting (as shown) OR 2. Chocolate Swiss Meringue Buttercream. You'll notice that the method for the caramel buttercream is a little different than our usual Swiss meringue buttercream method, because I adapted this recipe from Martha Stewart who actually whips the butter first for caramel buttercream and then adds it in slowly, as opposed to the chunks of butter. You can also simply add a cooled caramel sauce as the last step of your typical Swiss meringue buttercream recipe. I was curious to see if there was a difference, and although I can't pinpoint the difference exactly, it was definitely a heavenly version--as fluffy as can be. The recipe is for a 6-inch round 3-layer cake (but note that in the photo I made a 5" round cake with 4 thin layers). It does look like a ton of work, but I promise, it's really not so bad, and it's worth it! Here are the recipes:
Salted Caramel Chocolate Fudge Cake {click to print}
Yield: One 6-inch, 3-layer cake
Chocolate Fudge Cake Yield: Three 6-inch round layers Serves: 8+
Ingredients
- 1 1/2 cups (180 g/6 oz) all-purpose flour
- 1 1/2 cups (300 g/ 10 oz) sugar
- 3/4 cup (90 g/3 oz) dark unsweetened cocoa powder (I use Cacao Barry Cocoa Powder - Extra Dark)
- 1 1/2 teaspoons (7.5 mL/6 g) baking soda
- 1 teaspoon (5 mL/4 g) baking powder
- 1 teaspoon (5 mL/5 g) salt
- 1/4 cup (60 mL/2 liquid oz) vegetable oil
- 3/4 cup (190 mL/6 liquid oz) buttermilk
- 3/4 cup (190 mL/6 liquid oz) hot brewed coffee
- 2 eggs, room temperature, lightly beaten
- 2 teaspoons (10 mL) vanilla (I use Nielsen-Massey Vanillas 8-oz. Madagascar Bourbon Vanilla Extract)
Method
1. Preheat oven to 350° F (180°C). Prepare three 6-inch round cake pans with butter, parchment paper rounds and cocoa powder. Tap out excess.
2. In bowl of electric mixer, sift all dry ingredients and add all remaining ingredients to bowl with the dry ingredients and with paddle attachment on mixer, mix for 2 minutes on medium speed (you may need the plastic splash-guard that comes with mixer) and pour into prepared pans. If possible, use a digital kitchen scale and weigh divided batter in pans for even layers. Batter will be liquidy.
3. Bake for 20 minutes and rotate pans in oven. Cakes are done when toothpick or skewer comes clean--approximately 30 minutes. Try not to over bake.
4. Cool on wire racks for 20 minutes, then loosen edges with a small palette knife and gently invert onto racks until completely cool.
Salted Caramel Swiss Buttercream (for filling) Yield: ~4 cups
Ingredients
- 1 cup (200 g/7 oz) sugar
- 1/4 cup (60 mL) water
- 1/4 cup (60 mL) heavy cream
- generous pinch of sea salt (and additional sea salt, preferably Fleur de Sel, for sprinkling), for example: Fleur de Sel De Guerande- French Sea Salt 6oz
- 1 1/2 cups (340 g/12 oz) unsalted butter, at room temperature
- 4 large egg whites (120 g/4 oz)
- 1 teaspoon (5 mL) pure vanilla extract
Method
The first step is making the salted caramel (you can also do a non-salted caramel by omitting the sea salt), to set aside to cool while you make the Swiss Buttercream. You then add the cooled caramel sauce it to the buttercream as the very last step. I haven't tried buying ready-made gourmet caramel sauce and adding it, but I suspect it would taste nothing short of awesome.
1. Place 130 grams (5 ounces or 1/2 cup + 2 tablespoons) of the sugar and the water in a medium saucepan to a boil over medium heat. Brush down the sides of the pot with a dampened pastry brush to prevent sugar crystals from forming. Stop stirring and cook until caramel is dark amber, gently swirling from time to time. Remove from heat, and slowly add cream, whisking by hand until smooth. It will be splatter, so be careful. Whisk in sea salt and vanilla. Let cool.
2. Place butter in an electric mixer fitted with the paddle attachment (flat beater) and beat on medium speed (I use #4 on my mixer), until pale and fluffy, about 3-5 minutes. Transfer to a large bowl and set aside.
3. Wipe the bowl of an electric mixer clean with lemon juice, and place egg whites and remaining sugar into bowl over a pot of simmering water (not boiling--you don't want to cook the eggs). Whisk occasionally and gently until sugar dissolves and mixture registers 160° on a candy thermometer.
4. Remove the bowl from heat, and place back onto the mixer fitted with the whisk attachment. Whisk on medium speed for 5 minutes. Increase speed to medium-high, and whisk until stiff, glossy peaks form (about 5-6 minutes). Once the bottom of the bowl is neutral and no longer warm to the touch, reduce speed to medium-low, and add beaten butter, one cup at a time, whisking well after each addition.
5. Switch to paddle attachment. With mixer on low speed, add cooled caramel, and beat until smooth (about 3-5 minutes).
6. Prepare to taste the most incredible buttercream you will ever encounter.
Dark Chocolate Fudge Frosting Yield: ~5 cups
Ingredients
- 1/4 cup + 2 tablespoons (45 g/1.5 oz) unsweetened Dutch-process cocoa powder (I use Cacao Barry Cocoa Powder - Extra Dark)
- 1/4 cup + 2 tablespoons (90 mL/3 oz) boiling water
- 1 1/2 cups (3 sticks/341 g/12 oz) unsalted butter, room temperature
- 1/2 cup (63 g/2 oz) confectioners' (icing/powdered) sugar
- pinch of salt
- 1 pound (454 g/16 oz) good-quality semi-sweet chocolate, melted and cooled
Method
1. Combine cocoa powder and the boiling water in a small bowl or glass measuring cup, and stir until it cocoa has dissolved.
2. In an electric mixer fitted with the paddle attachment (flat beater), beat the butter, the icing sugar, and salt on medium-high speed until it is pale and fluffy--about 5 minutes.
3. Reduce mixer speed to low, and add melted chocolate (cooled), beating until combined and scraping down the sides of the bowl as needed.
4. Beat in the cocoa mixture until well incorporated.
Sweetapolita's Notes:
1. Frosting can be refrigerated for up to 5 days, or frozen for up to 1 month in an airtight container.
2. Before using, bring to room temperature (usually overnight on counter does the trick), and beat on low speed until smooth. *Dark Chocolate Fudge Frosting Recipe adapted from Martha Stewart *Alternatively, for a lighter, less dense and fluffier chocolate frosting option for this cake, you can use Chocolate Swiss Meringue Buttercream to mask and frost the outside of this cake. The colour will be a lighter chocolate colour and much more subtle chocolate flavour (less fudgy), and it goes very well with the caramel buttercream filling. If you are opting for this buttercream in place of the Dark Chocolate Fudge Cake, then you can make it easier by making a double batch of the Vanilla Swiss Meringue Buttercream and simply divide, then add your caramel sauce to the first half, and your melted chocolate to the second half.
Chocolate Swiss Meringue Buttercream Yield: ~5 cups
Ingredients
- 300 grams (10 oz) chopped semi-sweet or bittersweet chocolate, melted, and cooled
- 5 large, fresh egg whites (150 g/5 oz)
- 1 1/4 cups (250 g/9 oz) sugar
- 3/4 lb (3 sticks/340 g/12 oz) butter, cut into cubes and cool, but not cold
- 2 teaspoons (10 mL) pure vanilla extract (I use Nielsen-Massey Vanillas 8-oz. Madagascar Bourbon Vanilla Extract)
- pinch of salt
Method
1. Melt chocolate in heatproof bowl over pot of simmering water, or in a microwave-safe bowl in 25 second intervals, stirring in between until smooth. Set aside to cool (you can scrape it out into a new container to speed up cooling).
2. Wipe the bowl of an electric mixer with paper towel and lemon juice, to remove any trace of grease.
3. Add egg whites and sugar, and simmer over a pot of water (not boiling), whisking constantly but gently, until temperature reaches 150°F, or if you don't have a candy thermometer, until the sugar has completely dissolved and the egg whites are hot.
4. With whisk attachment of mixer, begin to whip until the meringue is thick, glossy, and the bottom of the bowl feels neutral to the touch (this can take up to 10 minutes or so). *Don't begin adding butter until the bottom of the bowl feels neutral, and not warm.
5. Switch over to paddle attachment and, with mixer on low speed, add butter cubes, one at a time, until incorporated, and mix until it has reached a silky smooth texture (if curdles, keep mixing and it will come back to smooth). *If mixture is too runny, refrigerate for about 15 minutes and continue mixing with paddle attachment until it comes together.
6. Add vanilla and salt, continuing to beat on low speed until well combined.
7. Add melted chocolate and mix on medium-low speed until combined.
Assembly of the Sweet & Salty Cake
1. Trim any doming from the tops of your cake layers with a sharp, serrated knife and place first layer, face up, on your cake board, pedestal, or plate.
2. Using a small offset palette knife, spread approximately 3/4 cup of the caramel buttercream evenly on the top.
3. Repeat this 1-2 until you come to the final layer, which you will place face down on the top of the cake.
4. Place cake on a turntable (if possible), and using a small offset palette knife for the top of the cake, and medium straight palette knife for the sides, cover the cake in a thin layer of chocolate frosting (or chocolate buttercream, if using) to mask (seal in crumbs). Refrigerate for 30 minutes (or more). *This does not need to be perfect, as that will come with the top "coat" of buttercream.
5. Repeat step 4, and, for best results, use bench scraper held at 90° against the side of the cake, slowly turning the turntable and keeping your hand steady--let the turntable do the work. Clean up edges with your small offset palette knife.
6. Chill cake to set. *Bring to room temperature before serving--about 2+ hours. Never serve Swiss Meringue Buttercream until it is soft and room temperature, as cold buttercream is, well, kind of yucky!
7. Sprinkle with Fleur de Sel, or try any sprinkles you love!
8. Place any remaining buttercream/frosting in airtight containers and refrigerate up to a week, or freeze for up to 2 months, bringing back to room temperature before rewhipping to smooth consistency.
9. Serve at room temperature, and slice with a long, thin-bladed, sharp knife. Rinse knife with hot water and dry before each new slice, for best results. As I included in my last post (Six-Layer Dark Chocolate & Strawberry Buttercream Cake), here are a few tips for baking your best cakes, and some of my favourite baking tools:
A Few More Steps to Baking/Making Better Cakes
1. I always use a kitchen scale to weigh my ingredients. They're small, light, and don't have to be fancy or expensive; here is what I use: Salter 1020 Aquatronic Electronic Kitchen Scale. It's just a great habit to get into. You wouldn't believe the difference in what one person may scoop as a cup of flour, versus another, and weighing it to the exact gram/oz is your safest bet. Having too much flour can sure dry out a cake in a hurry, just as too little will throw it off kilter. I really believe that using a scale is one of the habits that made me a much better baker, and definitely more consistent. Trust me! I even use mine to weigh my coffee grinds for a perfect pot, my serving portions (when I'm eating clean), homemade burgers, and when dividing batches of pizza dough, etc.
2. You may notice that I bake "layer by layer," so rather than baking a higher cake and slicing layers for a standard 3-layer cake, I bake 3 more shallow layers in 2" high pans. This way, the cakes seem to come out more moist, with no "doming," and ready to be frosted. It may seem an inconvenience at first, because you have to buy 3 cake pans in each diameter, but you get used to it quickly, and it's so worth it. You also save the time trying to slice even layers, unless of course you are turning 3 layers into 6. But, then again, that's worth it too!
3. Never open the oven before 20 minutes, or you could disrupt the baking process. Always wait 20 minutes, and then, if you're baking 3 cake layers at a time, rotate the pans and then continue baking.
4. There are a few tools that I mention in almost every post, and since I've been receiving many emails asking more about the cake baking/decorating essentials, I thought I would take this chance to create a list of some of my favourite things in the kitchen, and things that I believe really make a difference:
- When torting, filling, frosting, and/or decorating cakes, I always use a cake turntable. They definitely range in price, but I think as long as you have one that is sturdy and turns, it should do the trick. I use something similar to this: Fat Daddio's Professional Cake Decorating Turntable with Cast Iron Base, 12 Inch x 5.5 Inch.
- When filling and frosting cakes, I use several sizes of offset and straight spatulas--I couldn't live without them. Rule of thumb: offset for the top of cakes, straight for the sides. Here's an example: Ateco Natural Wood Small Sized Spatula, 4.5 Inch Blade.
- When I want to achieve a perfectly smooth finish to buttercream, such as in this cake, or before applying fondant, I always use a bench scraper. Here's an example of the one I use: Ateco Stainless Steel Bench Scraper.
Good luck & enjoy!