
You're here! Thank you for not forgetting about me completely while I wasn't able to post for the past few weeks. I promise it won't be like that forever, but I have to admit while I work on the book it's been more difficult for me to post often. (It will be worth it!) It could also have something to do with my crazy side, and how many times I make a recipe before I'm happy with it and ready to share. Either way, I'm here now and I'm so pleased you are too. xo
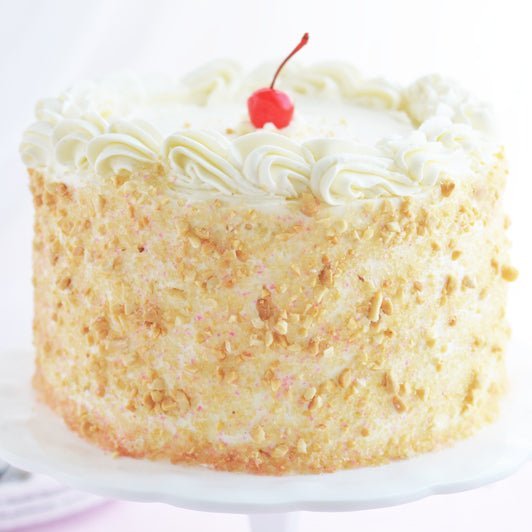
So let's talk about Diner Dream Cake. (And my need to give include superfluous adjectives in my cake titles?) I call it that because after I made it to satisfy my recent craving for diner-ish flavours -- things like chocolate chips, peanut butter, vanilla and whipped cream. After I assembled the cake I realized that it actually did look like something you'd find in a little hidden gem of a diner (I think it was the cherry on top that did it).

It's a super simple cake to make, which is always a plus, and I love the way these flavours came together: moist chocolate chip buttermilk cake filled with a fluffy peanut butter mousse and then frosted in a quick and easy vanilla bean whipped cream frosting. It was looking rather . . . vanilla, so I crushed up some roasted peanuts and tossed them with turbinado sugar and a bit of pink sanding sugar and coated the cake -- it always tastes so good to me when things are super fluffy and then there's a hit of crunch in there. (Yep, I was the one kid who always ordered those little peanuts on my McDonald's sundaes.)

I assembled this final cake moments before the sun was out and ready for me to photograph it in the short time I had with the right natural light, so you can see that perfect slices only happen when cake is chilled ahead of time, and that I don't have cake-cutting super powers unless the cake is set. But isn't it true that the messiest cakes are the best tasting? Soft, fluffy, fall-apart cakes are the ultimate to eat. And I don't know, I haven't made a lot of chocolate chip cakes yet, but I realized that simply tossing premium chocolate chips into vanilla cake batter really is what makes a cake "chocolate chip cake," so if you have a favourite vanilla cake recipe, you could always use that and toss in the chips and go from there. The peanut butter mousse filling is a cream cheese based filling with peanut butter, icing sugar, whipped cream and vanilla -- a simple mix, whip, mix and it's done. When I spotted it on Serious Eats I knew it would be the perfect peanut butter filling -- there's something about cream cheese and peanut butter that is so magical and reminds of peanut butter pie. The vanilla bean whipped cream frosting I did this time is just a simple whip of whipped cream, icing sugar and vanilla bean paste. It takes 2 minutes to make, and if you whip it until firm peaks form (just don't overdo it until it appears dry and spongy), you can pipe a border and frost the cake with ease.

You definitely don't have to coat the cake in peanuts and sugar to make it a tasty cake, but who wants to pass up a chance to, literally, throw handfuls of sugar and peanuts at your cake (of course, you could always use sprinkles too)? Plus I love that the sugar creates this subtle sparkle on a cake you wouldn't expect to find sparkle . . . I hope you're all having an amazing summer so far. With the sugar storm in my kitchen for the past few months, the time has been going by alarmingly quickly. So much so that it just dawned on me that next Tuesday I'm turning thirty nine. As in years old. As in next year I'm, you know, the number that comes after thirty nine. I'm not one to worry about age, but I have to admit that number frightens me. But hey, a birthday is a birthday, and where there is a birthday there is celebration. And where there is celebration there is confetti. And where there is confetti, you know there's going to be cake. And around cake is no place to be anything but happy. ♥
Diner Dream Cake
Three layers of moist chocolate chip buttermilk cake filled with peanut butter mousse, smothered in vanilla bean whipped cream frosting and coated with sugar & peanuts. With a cherry on top!
For the Chocolate Chip Cake:
- 5 egg whites (at room temperature)
- 1 whole egg (at room temperature)
- 1-1/3 320 ml cups buttermilk, at room temperature
- 2 teaspoons 10 ml pure vanilla extract OR Princess Bakery Emulsion
- 2-3/4 cups 317 g cake flour, sifted
- 1-3/4 cups 350 g sugar
- 1 tablespoon + 1 teaspoon (18 g baking powder)
- 3/4 teaspoon 5 g salt
- 10 tablespoons 130 g unsalted butter, cold and cut into 20 even pieces
- 3/4 cup 130 g quality semisweet chocolate chips
For the Peanut Butter Mousse:
- 1 package (250 g brick cream cheese, cold and cut into cubes)
- 1 cup 125 g icing sugar (confectioners')
- 3/4 cup 130 g smooth peanut butter
- 1 tablespoon 15 ml pure vanilla extract
- 3/4 cup 180 ml whipping cream (35% fat)
For the Vanilla Bean Whipped Cream Frosting:
- 2 cups 480 ml whipping cream (35% fat)
- 1/4 cup 30 g icing sugar (confectioners')
- 2 teaspoons 10 ml vanilla bean paste
- Pinch of salt
For the Peanut Sugar Coating:
- 1/2 cup 75 g roasted peanuts, chopped into small pieces
- 1/2 cup 100 g turbinado sugar
- Few tablespoons of pink sanding sugar (optional)
- 1 maraschino cherry
For the Chocolate Chip Cake:
- Preheat the oven to 350° F. Butter the bottom of three 7-inch round cake pans (or two 8-inch round or 9-inch round pans) and line bottoms with parchment rounds.
- In a medium measuring cup with a spout, lightly whisk the egg whites and yolk. In a separate measuring cup, combine the buttermilk and vanilla.
- In the bowl of an electric mixer fitted with the paddle attachment, whisk together the flour, sugar, baking powder and salt. With the mixer set to low speed, add the cold butter one piece at a time, about 10 seconds apart. (You can keep half in the fridge while you add the first half of butter.) Continue mixing on low speed until all of the butter has been blended and there are no clumps. Mixture should have a fine crumbly, cornmeal-like texture.
- Gradually add the buttermilk mixture to these dry ingredients, and mix on medium speed for 4 minutes. Scrape the sides and bottom of the bowl to ensure all of the ingredients are well incorporated. Reduce the speed to low and gradually add the egg mixture; once the mixture has been added, increase speed to medium and beat for 1 minute, but no more.
- Toss the chocolate chips with a few pinches of cake flour and gently fold into batter.
- Divide batter evenly among the 3 prepared pans (use a kitchen scale to ensure 3 even layers--cakes should weight ~450 g each). Place two of the cake pans on a baking sheet and bake until a cake tester or wooden toothpick inserted into the center comes out with a few crumbs but no batter, about 23 minutes. Repeat with the final layer. Let the layers cool in the pans for 10 minutes, then loosen sides with thin metal spatula or knife, and carefully turn out onto wire racks, peel of the paper liners, and let cool completely.
For the Peanut Butter Mousse:
- In the bowl of an electric mixer fitted with the whisk attachment, mix the cream cheese, icing sugar, peanut butter and vanilla on medium speed until smooth and fluffy, about 3 minutes. Transfer mixture to another bowl (unless you're lucky enough to have another mixer bowl). Wash and dry both bowl and whisk attachment and chill in the freezer or refrigerator.
- Fit the mixer with the chilled bowl and whisk and whip the cream on medium high speed until firm peaks form (but not clumpy), about 1 minute. Fold whipped cream into peanut butter mixture and cover and chill until ready to use.
For the Vanilla Bean Whipped Cream Frosting:
- Chill your mixer bowl and whisk in freezer for 5 minutes, then whip the cream, icing sugar and salt on medium high speed until firm peaks form (but not clumpy). Add vanilla bean paste and mix on low speed until incorporated. Best used right away.
Assembly of the Cake:
- I recommend making the filling while the cakes are in the oven, and then chilling until the cakes are cool. Once cakes are cool and you have filled them with the peanut butter filling, make the whipped cream frosting (it only takes a couple of minutes to make).
- Trim any dark edges or crust from cake layers with a very sharp serrated knife. Place your first cake layer, face-up, onto a cake stand, plate or cake board. Place half of the peanut butter filling on top of the layer and spread evenly using a small offset spatula.
- Repeat until you come to your final cake layer, which you will place face-down. If you find the cake too soft and unstable, put in refrigerator for a few moments to firm it up, then resume. Use your clean offset spatula to carefully smooth the frosting so it's flat against the cake.
- an even layer of frosting to the entire cake, to seal in crumbs. Chill again until frosting is firm, about 30 minutes.
- Place cake plate/board with cake onto a turntable, if possible. Using an offset spatula, spread the whipped cream frosting on the top of the cake, letting it extend about 1/2" over the edge, then smooth excess onto side of cake. With a medium straight spatula, cover the sides of the cake until you have a smooth even coat of frosting by slowly turning the cake turntable with one hand while holding the spatula steady with the other. Use your small offset spatula to smooth top of cake. Place remaining whipped cream in a pastry bag fitted with a large closed star tip (I used #887) and pipe a border around the top perimeter for the cake. Chill for 30 minutes.
- In a medium ziploc bag, combine the peanuts and sugar (or sprinkles, if you choose to add them). Remove cake from fridge put back onto turntable. Place turntable and cake onto a baking sheet (for ease of clean-up), and gently coat the sides of the cake with the sugar mixture. (You may have to "throw" it at the cake!) Top with a maraschino cherry.
- Keep cake refrigerated for up to 2 days, but serve at room temperature. Best enjoyed day 1.
Sweetapolita's Notes:
- The recipe is for a three layer, 6-inch round cake, but the one in the photo is an 8-inch round. If you want to make a three layer, 8-inch round cake, you can increase the cake recipe by half (rather than doubling the recipe). You can keep the filling and frosting recipes the same.
- You can make the cake layers up to 1 day ahead, but keep them wrapped tightly and at room temperature. I do, though, recommend making them the morning you need the cake, if possible.
- You can make the peanut butter filling one day ahead, but keep refrigerated.
- The whipped cream frosting is best made right before you need it.
- For the frosting, I used Madagascar Vanilla Bean Paste-- a quick and easy way to get that real vanilla bean taste and those awesome little black vanilla flecky things we all love.
- For all of my cake decorating, I use a cake turntable–it’s definitely a must-have. I have a homemade version, but have recently started using the Ateco Revolving Cake Stand, and I love it.
- I always use a Small Offset Spatula and Medium Straight Spatula when frosting a cake.