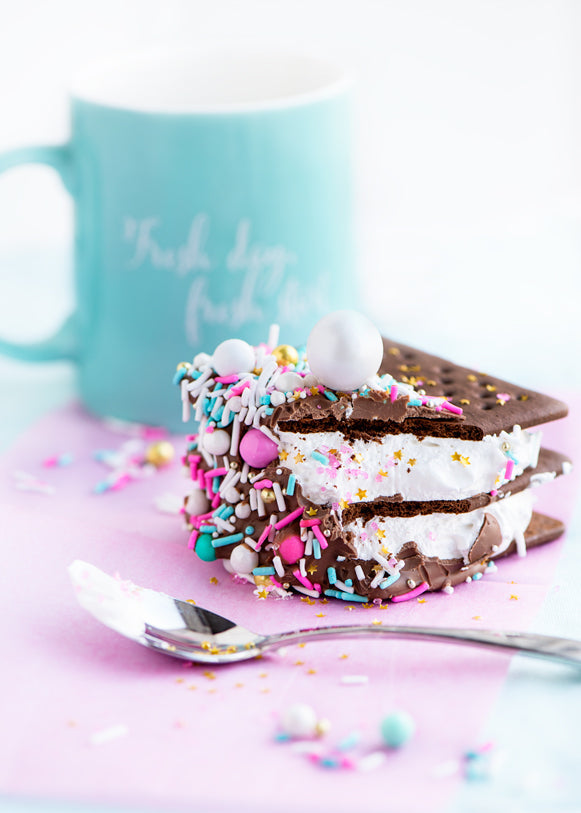
Oh, hi! I'm here! And I come bearing twinkly black cake--Glam Rock Layer Cake, to be exact. A sweet celebration of contrast and colour! As you probably remember, I spend most of my days now in the shop packing orders and making sprinkle medleys, which means that my day is literally filled with every colour in the universe. This is about as much fun as you would think, but it always has me wondering what baked goods would best bring these colour combinations to life, since that is why we love and collect sprinkles, right? They are pretty charming on their own, all candy-like and pretty, but their lives aren't really complete until they find their spot to shine. And working in a "sprinkle factory," I probably forget this more than anyone! I just think the world is a better place by the mere existence of them ;).
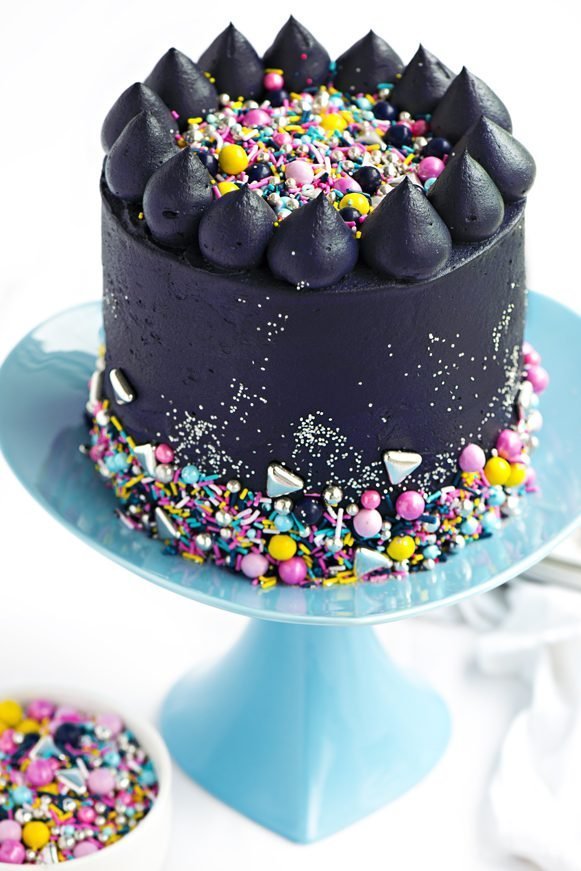
  I named these sprinkles "Glam Rock" because they really do bring me back to my "glam rock-ish" teenage life (and yep, all of the components are not only edible, but sweet and tasty). As a teen in the late 80s/early 90s, I was as devoted to rainbows, showy rock stars and glam metal bands as one frosty-haired girl should be. And I don't see one good reason why there shouldn't be a sprinkle mix to celebrate it. ;) But no matter what we call it, bright colours = happy, and that's what works. This colour combination could represent so many things, and truth-be-told, I've been dying to make a jet-black frosting cake! So let's talk about the frosting. Tinting frosting black (including fondant, although I prefer to purchase black fondant) can be tricky. Ideally, you are starting with chocolate frosting--when you can start with chocolate frosting (I'm not sure there is really any other way) you're halfway there! True black is likely the most difficult colour to achieve; sure, we could use oodles and oodles of black food colouring, but as anyone who has tried to tint frosting an intense red or black (and sometimes other dark colours), even using a concentrated gel paste, has likely discovered that it is possible but at the cost of a very off-putting after (sometimes not-so-after) taste. Oh, man.
  Colouring black frosting is surprisingly simple, but I think the secret is the black cocoa powder. Remember we used the black cocoa powder a few times in the last few months? Well, first in the Midnight Cookies & Cream Layer Cake layers, and then most recently in the Dark & Dreamy Fudge Layer Cake--both in the cake layers and the frosting. Well that intensity with dark and decadent cocoa is what gives us such a head start. I started with a variation on the super dark and glossy fudge frosting (a slightly sweeter version) from my Dark & Dreamy Double Fudge Cupcakes. I think what makes this frosting so stunning is the gloss--matte black is beautiful too, but I think it's paramount that the frosting on a cake (or any dessert) look truly appealing and luscious. I'd hate to put so much love into something just to have no one actually want to eat it. Eeeek! So to our swirls of glossy dark fudge frosting, we add a small amount of a very concentrated Very Black food colour. Anyway, I started with 1/2 teaspoon of the food colour, but in the end I think I used a total of about 1 teaspoon. Depending on the chocolate you use in your frosting, and some other mysterious factors, you might need more, which is okay. Just make sure that you don't add too much that your frosting tastes off. But, wait! Before you keep adding and adding more colour, let what you've started with "process." Seriously, this part is key! The goal here is to use as little as possible so the taste is undetectable (and I'm pretty certain the less colour paste we ingest in life, the better). Now all colours intensify after they sit for a while, so this applies to anytime you are colouring frosting, but since we really want to maximize the small amount of black we're adding, I say wait about 15 minutes if you can. I'm pretty sure the frosting on my cake is still getting blacker as we speak (literally).
  Now that all said, this is a very rich frosting to start with, and a pretty large batch, so don't fret if it takes more black colour than you hoped. Particularly if you can't find "black" cocoa powder--this stuff literally is black in colour, which is what we need. Dark cocoa powder is better than nothing, but it will just require more paste. Because the frosting is so, so glossy, I was tempted to leave the top bare (as above), but I opted to cover it in the end, because the sides of the cake were mostly exposed, which gives us a chance to admire the glorious sheen. So, let's talk about sprinkling the sides of a cake! So many of you have reached out to me about your issues getting the sprinkles to adhere to your cakes, so I want to chat about that for a minute too. In my experience, there are 2 main factors at play when we sprinkle the sides of a cake: the frosting consistency/temperature and the frosting texture. In terms of consistency, I find that, typically, as long as your frosting is sticky but not "wet" feeling, the sprinkles should stick just fine. In other words, if your frosting is very soft and spreadable, and you've just applied the frosting to the cake, you will want to chill it for a few moments until that initial gooey-ness has gone away. This can take as little as 5 minutes in the fridge, depending on the frosting. See, if the frosting is too gooey, the sprinkles will stick beautifully, but you will end up with frosting on your hands, ultimately smearing it onto the sprinkles you apply over and over. That all said, the actual frosting you use has a lot to do with the "sprinkle stickability" as well. I have had great success with chocolate frostings of all kinds, meringue buttercreams of all kinds, and some vanilla frostings. Just a note that sprinkles don't like "crusting buttercream." While I don't really use crusting buttercream, I know from some seeing very sugary vanilla frostings that tend to almost crust when cold (that sort of rough, dry finish from all of the confectioners' sugar and often shortening), that sprinkles just won't want to stick. Although, if you were to do the sprinkling immediately after you frosted the cake, I imagine that would work in most cases. Essentially, no matter what the frosting, tacky is the ticket!
  I find what works best for applying the sprinkles is to, first off, always build your cake on a thin-but-sturdy cake board, so you can hold the cake from the bottom. I hold the cake in my left hand over a tray, and then with my right hand (dominant), I grab sprinkles from a big bowl and then gently press them onto the bottom of the cake, letting the excess fall to the tray. Once I have gone all the way around, I pour the excess sprinkles from the tray back into the bowl/bottle. Once you get the hang of it, you'll want to sprinkle every cake in the universe
  For the top of a cake with a piped border of any kind, you'll want to chill the cake until the border is firm to the touch (about 30 minutes, usually). Since we don't need the top of the cake to be super sticky (thank you gravity), we can just add the sprinkles to the surface--once the cake comes to room temperature for serving, those sprinkles will magically stick. You can also gently press down on them with your hand to ensure they stick before slicing the cake (although the tinker-patter-kaplink of falling sprinkles whilst slicing a layer cake has a charm of its own).
  I should mention that for anything super tiny or light, such as nonpareils and edible stars/squares, etc. You'll want to go in after and "throw" them where you want them. You can also add more of the larger sprinkles where you want them, if there are some empty spots or if you feel the artistic need to really finish the job the way you see fit. It's kind of amazing how much visual power the right sprinkles have--imagine this cake all black, and then minutes later bursting with colour, contrast and texture. It's so simple but so effective.
  And, oh yes! There *is* an inside to the cake :). To carry our "glam rock" theme throughout, these dark chocolate butter cake layers are black as night with no added colour--yay! Thanks again to our new friend, black cocoa powder. I used the a variation on the chocolate butter cake in my book, because it's unthinkably tender and flavourful--particularly with the dark cocoa powder. Intensely chocolate. While the chocolate butter cake recipe can be baked in 3 x 8-inch round pans, I opted to bake them in 4 x 7-inch round pans for added height and a slight smaller diameter. You could definitely go the 3 x 8-inch round pans though, if you don't have the 7s.
  For the inside frosting I just went with a sweet vanilla frosting which I tinted a vibrant purple. I love this purple! You can boost it or go a little easier on the colouring for a more pastel effect (as in the photo above), but I love the tone of it.
  I'd say this cake is all about contrast, and I just love the striking look of the purple stripes against the black cake and of course the black frosting and sprinkles. It's my kind of party.
  Sprinkles! So let's make this Glam Rock Layer Cake! November 8, 2016 NOTE: I have modified the recipe for the black frosting slightly, as some folks were having issues with the frosting being too soft. Happy baking!
Glam Rock Layer Cake
Super dark, moist and buttery chocolate cake layers filled with colourful vanilla frosting and covered in a decadent jet-black glossy fudge frosting. And let's not forget the sprinkles!
For the "Black" Dark Chocolate Butter Cake layers:
- 2 1/3 cups 315 g all-purpose flour
- 3/4 cup plus one tablespoon (100 g best-quality black cocoa powder)
- 1 1 /2 teaspoons baking powder
- 3/4 teaspoon salt
- 1 1/2 cups 360 ml buttermilk, room temperature
- 1/2 cup 120 ml hot coffee OR very hot water
- 1 cup 227 g unsalted butter, room temperature
- 2 1/2 cups 560 g packed light brown sugar
- 2 teaspoons pure vanilla extract
- 4 large eggs (room temperature)
- 1/4 cup 60 g mayonnaise, room temperature
- 1 1/2 teaspoons baking soda
- 1 teaspoon distilled white vinegar
For the (purple frosting) Vanilla Frosting:
- 1 cup 227 g unsalted butter, room temperature
- 3 cups 375 g confectioners' sugar, sifted
- 1/4 cup 60 ml whipping cream (heavy cream) or milk
- 2 tablespoons water (plus more if needed)
- 2 teaspoons pure vanilla extract
- Pinch of salt
- Few drops of purple food colour
For the Glossy Black Fudge Frosting:
- 2 cups 454 g unsalted butter, softened
- 4 cups 500 g confectioners' sugar
- 3/4 cup 90 g premium dark (preferably black) cocoa powder (I used Guittard Noir)
- 1/2 cup 120 ml hot water
- 1/2 cup 120 ml sour cream
- 1 1/2 teaspoons pure vanilla extract (I used Nielsen-Massey)
- Generous pinch of salt
- 8 ounces 240 g premium dark (but not extra dark) chocolate, chopped or chips, melted (I used Callebaut Callets)
- Black Oil-based food colour
- You will also need:
- 1 large pastry bag (disposable or reusable)
- Large plain round pastry tip (I use Ateco #809)
- Sprinkles of your choice (1-2 cups, depending on size of the sprinkles--see Sweetapolita's Notes)
For the "Black" Dark Chocolate Butter Cake layers:
- Preheat the oven to 350F (180C). Spray two 7"x2" round cake pans (to be used twice for 4 layers) with baking spray (such as Pam for Baking), or grease the bottoms and add parchment rounds to each.
- In a large bowl or atop a large piece of parchment paper, sift together the flour, cocoa powder, baking powder and salt. In a large measuring glass with a spout, mix together the buttermilk and coffee/water. Set aside.
- In the bowl of an electric mixer fitted with the paddle attachment, or using a handheld mixer, beat the butter and brown sugar on medium speed until very light and fluffy, about 8 minutes. Add the vanilla and beat well. Add the eggs one at a time, mixing well (about 30 seconds) and scraping the sides of the bowl with a rubber spatula after each addition.
- Lower the speed to the lowest setting and add one third of the dry mixture until just combined, and add half of the buttermilk mixture. Repeat with the remaining flour and buttermilk mixtures. Remove the bowl from the stand mixer, and whisk in the mayonnaise.
- In a small bowl combine the baking soda and vinegar, and quickly add to the batter. Whisk until smooth, about 30 seconds. Divide one-quarter of the batter into each pan (this should weigh about 430 grams if you are using a digital scale).
- Bake the first two layers in the center of the oven until a wooden pick comes out with a few crumbs, 24-27 minutes. Let the cake layers cool on a wire rack for 10 minutes, and then gently invert onto the wire rack. Wipe the pans clean and repeat with the final layers. Let all of the layers cool completely. The cake layers will keep wrapped tightly in plastic wrap at room temperature for up to 3 days.
For the (purple filling) Vanilla Frosting:
- In the bowl of an electric mixer fitted with the paddle attachment, beat the butter on medium speed until very pale and creamy, about 8 minutes. Reduce the speed to low, and gradually add the confectioners' sugar, heavy cream, vanilla and salt. Beat for 1 minute.
- Increase the speed to medium-high and beat until very light and fluffy, about 6 minutes. Add a few drops of purple food colour, until desired shade is achieved. Frosting will keep in an airtight container in the refrigerator for up to 3 days. Bring chilled frosting to room temperature and beat on low speed to soften. If necessary, you can warm the frosting in a heatproof container in the microwave in 10-second intervals, stirring after each one, until smooth and spreadable.
For the Glossy Black Fudge Frosting:
If you have a food processor:
- Add all of the ingredients, except the melted chocolate and black food color, into the food processor, and pulse until everything is incorporated. Add the melted chocolate and pulse until smooth. Add a small amount of the black color (about 1/2 teaspoon). Pulse until combined. Let sit for about 15 minutes (the color will take awhile to process--it's best to let it sit rather than adding more and more right away). Add more colour if necessary, until desired black tint is achieved.
If you are using a stand mixer or handheld mixer:
- In a bowl of stand mixer fitted with paddle attachment, or with a handheld mixer, beat the butter on medium speed until pale and fluffy, about 6 minutes. Sift together the confectioners' sugar and cocoa powder. Reduce to speed to low, and add the confectioners' sugar, cocoa powder, water, sour cream, vanilla, and salt and beat until incorporated, about 1 minute. Increase the speed to medium and beat for 2 more minutes. Add the melted chocolate and beat on medium speed until smooth, about 1 minute. Add a small amount of the black color (about 1/2 teaspoon). Pulse until combined. Let sit for about 15 minutes (the colour will take awhile to process--it's best to let it sit rather than adding more and more right away). Add more color if necessary, until desired black tint is achieved--remember that it continues to darken over time.
Assembly of the Glam Rock Layer Cake:
- Put your first cake layer top-up on an 7" round cake board or 9" plate, and spread one-third of the purple frosting on top. Repeat with all of the layers, placing the final cake layer top-down. Make sure that your layers are straight and lined up with the ones below. Wrap the cake in plastic wrap and chill for at least 15 minutes.
- Remove the cake from the fridge and, using a turntable, if possible, frost entire outside of cake with a thin layer of the black frosting to seal in the crumbs. Chill until the frosting begins to firm-up, about 30 minutes.
- Remove the cake from the fridge and return it to the turntable. Cover the cake with a thick, even and smooth layer of the black frosting using an offset spatula, reserving about 1 1/2 cups of frosting for the piped top border. Return the cake to the fridge and chill for another 20-30 minutes.
- You will want the frosting for the buttercream "poof" border to be very soft, in order to achieve the appealing peaks. Warm frosting in a small heatproof bowl for about 8-10 seconds, and stir. Fill a pastry bag fitted with a large plain round tip with the softened frosting and pipe some buttercream "poofs" around the top perimeter of the cake.
- Pour your sprinkles into a medium bowl and gently press sprinkles onto the bottom third of the cake, all the way around, letting the excess fall back into the bowl. You can also put the cake on a cookie sheet and let the excess sprinkles fall onto the sheet. Return the cake to the fridge until the buttercream poofs are very firm, about 30 minutes. Pour more sprinkles atop the flat exposed surface of the top of the cake. Cake will keep covered at room temperature for up to 3 days. Serve at room temperature.
Sweetapolita's Notes:
- As I mentioned above, for the black cocoa powder used in both the cake layers and the black frosting for this cake, I used Guittard Cocoa Noir (Black) - 5 lbs (a big tub because I go through it quickly), but you can also find Black Cocoa Powder
on Amazon. You might recall I usually use a very dark (but not black) cocoa powder (Cacao Barry Cocoa Powder Extra Brute
) for all of my chocolate baked goods, which also works very well, tastes amazing, and is quite dark in itself, with a rich red hue. The black cocoa powder just adds more of a midnight black effect, which I love. And, of course, the taste is also incredibly deep, dark and wonderful. Just know that it's very intense! This is a great time to pair things like sugary frostings and candy sprinkles :).
- For the dark chocolate in the frosting, I use Callebaut Semi-Sweet Dark Chocolate in callet form (fancy word for chips)--they taste incredible and are easy to measure & melt.
- I use Fat Daddio’s Anodized Aluminum Round Cake Pan
s for all of my cake layers. For this cake I used the 7-inch x 2-inch round cake pans, because I wanted to cake layers to be a little taller, yielding a taller cake. You can bake this cake in three 8-inch round pans, if you prefer.
- For the poofs on top of the cake, remember that the key is very soft frosting and an extra large round plain tip (I used Ateco #809). And, as always, if you make a mistake or aren't happy with your poofs, you can simply remove it and do it again. I've been known to do this several times! Haha.
- I always use a Silver Embossed Round Thin Board for my cakes--it's perfect for moving the cake to and fro while decorating, and of course transporting.
- For the sprinkles, I used Sweetapolita Glam Rock Sprinkle Medley, which is currently on a break from the Sprinkle Shop, but of course you can use any sprinkles you like! Some similar medleys like Flight of the Unicorn, or any sprinkles that make you happy!
- The cake stand used in these photos is a Pink Milk Glass Cake Stand by Mosser. I have this in several colours, and I love them!
Happy caking, friends! See you soon!