 Hello hello, friends! Happy National Soft Serve Ice Cream Cake Day! I know some of us are ready to say goodbye to summer, but noo, please let's just hold on, guys! Well, I have to admit that I have been occasionally craving cooler nights and crisp walks outside, but today being soft serve ice cream day just begged for a soft-serve-inspired, creamy, crunchy, swirly, pastely, whipped-creamy ice cream cake (obvi)! I've called this creation the Strawberry Sundae Ice Cream Cake Supreme. The best part about making ice cream cakes is that you can get super creative and honestly you can't go wrong! My littlest cakelet, Neve, helped me with this one, and we had so much fun just going through the cupboards looking for yumminess to stick in this thing haha. So let's talk about what ended up inside this frozen delight!
  Okay, so...I went for it. The cake is 4 layers of strawberry-ness filled with all sorts of textural and swirly goodness! Let's take a closer look:
 The base layer is bubble gum ice cream softened by some hand stirring with a wooden spoon, and then filled with chopped Strawberry Cheesecake "Drumsticks" and then a heap of crunched up waffle cones...
  The next layer is softened strawberry ice cream topped with slices of, um, coconutty, jelly-and-whipped-cream-filled Billot Logs (the very Canadian childhood treat, that I happened to see these at the grocery store and, while I don't normally buy this kind of packaged dessert, they were perfect for this!). I'd love to know the American version of these, because there must be? If you know, fill me in? :)
  Then we have our vanilla-bean ice cream layer swirled with strawberry preserves and strawberry sundae syrup and, well...topped with pieces of Strawberry Pop Tarts. You guys!
  The last layer is another vanilla bean swirled-jelly version topped with artisan oatmeal cookies (I say that to be accurate, but honestly I think any good old-fashioned oatmeal cookie would do the trick). These are yummies I chose to include, but just remember you can use almost anything your heart desires for this ice cream cake! Think of it as a super-sweet, girly, casserole, hehe.

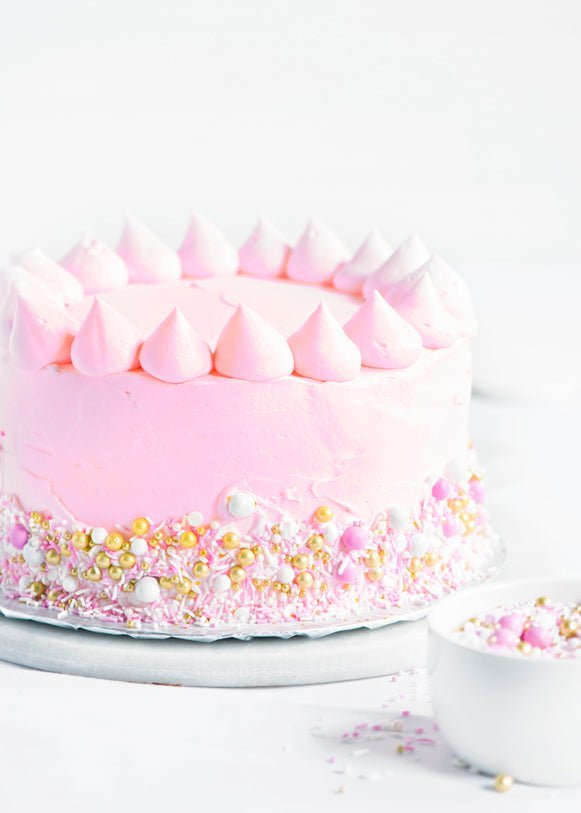
 Yay, yay, hooray! This pink Whipped Cream Frosting is so dreamy and easy. (You might remember it when we made the Birthday Party Ice Cream Cake!) It's just stabilized whipped cream, which means it won't melt away before your eyes, the way regular whipped cream does. The clear gelatine gives it a stability for piping and lasting a few days. Okay let's make this Strawberry Sundae Ice Cream Cake Supreme!
Strawberry Sundae Ice Cream Cake Supreme
For the ice cream layers:
- 1 1.5L container strawberry ice cream
- 1 1.5L container pink bubblegum ice cream
- 1 1.5L container vanilla-bean ice cream
- 1 cup (240ml) strawberry jam
- 3 single "Drumstick" Ice Cream Cones, Strawberry Cheesecake Flavor
- 1 foil package (2 pastries) strawberry Pop-Tarts
- 2 wrapped individual coconut jelly rolls, store-bought (*see notes)
- 3 large oatmeal cookies
- Few squirts strawberry sundae syrup
For the Pink Whipped Cream Frosting
- 2 tablespoons (30ml) water
- 2 teaspoons (10ml) powdered gelatine, such as Knox brand
- 2 1/2 cups (600ml) heavy cream (whipping cream), cold
- 1/4 cup (50g) granulated sugar
- 1 drop pink food coloring (*see notes)
- 1 cup Sweetapolita Sprinkles, optional (*see notes)
You will also need:
- 4 8-inch round cake pans
- plastic wrap
- large round plain pastry tip
- 18" piping bag
Prepare the ice cream layers:
-
Line four 8-inch round cake pans (if you have four--otherwise you can use 2 or 3, let the layers freeze completely, then remove from the pans, continue to freeze, and repeat for the remaining layers) with plastic wrap, leaving a few inches of overhang around the edges.
-
Remove all 3 tubs of ice cream from the freezer, and let sit to soften, about 10 minutes. In the meantime, slice the jelly-rolls.
Starting with the bubble-gum ice cream, transfer the soften ice cream to one of the lined cake pans and gently press the broken waffle cones and chopped drumsticks (if using) into the layer. Place in the freezer.
Next, transfer 1/2 of the vanilla bean ice cream into another of the lined cake pans, and stir in 1/2 of the strawberry jelly/preserves and a few squirts of the strawberry syrup to swirl. Break apart the Pop-Tarts and gently press across the ice cream. Return to freezer.
Transfer the remaining vanilla bean ice cream into the third cake pan, add the remaining jam, more strawberry syrup, then stir and swirl. Crumble the oatmeal cookies onto to the top of the layer and freeze.
Lastly, stir the strawberry ice cream until smooth and transfer to the last cake pan. Gently push the sliced jelly rolls into the ice cream and freeze.
Assemble the ice cream layers:
-
Remove the bubble-gum/waffle-cone ice cream layer from the freezer and use the plastic wrap overhang to remove the layer from the pan. Peel off the plastic wrap, and place the layer on a plate or cake board. Next, remove the swirled-vanilla with Pop-Tarts layer and repeat the steps above.
Repeat with the strawberry ice cream/jelly-roll layer. Finally, remove the vanilla-bean/oatmeal cookie layer from the freezer and from the pan, and then invert the layer, oatmeal-cookie-side down and place on top of the cake. Cover the entire cake in plastic wrap, wiggle into place if necessary, and return to the freezer for at least 4-6 hours (ideally overnight) to set.
For the Pink Whipped Cream Frosting:
-
Place a stainless stand mixer bowl and the whisk attachment (or if using a hand mixer, a stainless mixing bowl and the mixer beaters) in the freezer for at least 20 minutes.
Into a small microwave-safe bowl, sprinkle the gelatin onto the water and let sit for 10 minutes. Microwave the mixture for 20 seconds and stir to combine.
Remove the bowl and whisk from the freezer, add the cream and sugar to the bowl and whip on medium speed for 30 seconds. With the mixer running, add the gelatin mixture in one go and a drop or two of pink food gel coloring. Increase the speed to medium-high and whip until medium-stiff peaks form (thick enough to spread/pipe/hold its shape, but not over-whipped and grainy), but watch closely! This only takes about 1 minute or so.
Decorate the cake:
-
Remove the chilled cake from the freezer and remove the plastic wrap.
Frost the cake with the pink whipped cream, just as you would a regular cake--use a small offset palette knife to cover the top of the cake, and a medium straight palette knife to frost the sides. Working quickly, gently press the sprinkles along the bottom third perimeter of the cake. Cover the remaining frosting with plastic wrap and chill. Return the cake to the freezer for about an hour.
Remove the pink frosting from the fridge and transfer to a piping bag fitted with a large plain round tip. Remove the cake from the freezer and pipe a pink poofs around the top of the cake. Gently press sprinkles into the bottom third of the cake, and add a few on top, if desired. The cake will keep up to 1 week in the freezer.
- For the cake pans, I use Fat Daddio's 8-inch x 2-inch aluminum cake pans (these are my most-used cake pans!).
- I use Knox brand gelatine when making whipped cream frosting.
- To achieve this soft pink, try Sweetapolita Bright Pink.
- Just remember you can use almost anything your heart desires for this ice cream cake!
- For the sprinkles, choose any colour combo you love, the possibilities are endless!
Happy, Happy day friends! See you soon xo.