Sweetapolita

Whipping Up a Sweet + Styley Life

  • Home
  • SHOP
  • SUGAR
    • RECIPES
    • TIPS + INFO
    • SNAPS + STYLING
  • LIFE
    • AFFAIRS OF THE HEART
    • MOMHOOD + CAKELETS
    • ROSIE’S ROUNDUPS + GIVEAWAYS
  • STYLE
    • ROSIE’S CLOSET
    • BEAUTY + WELL-BEING
  • SWEETAPOLITA INC.
    • MEET ROSIE
    • SPRINKLE SQUAD
    • BEHIND THE SCENES
  • TRIPS + TREASURES
    • SWEETS ON THE STREETS
    • TRAVEL
    • VINTAGE TREASURES

Birthday Medley Layer Cake

- 59 Comments

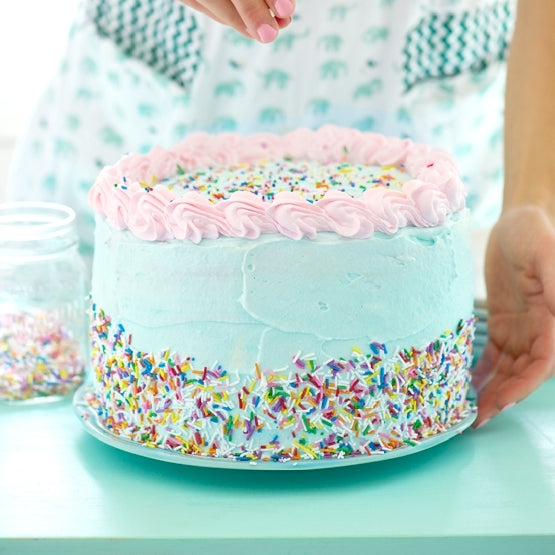
Hi!

So maybe I have a thing for turquoise layer cakes, but they’re just so pleasing. And while a vintagey looking turquoise cake with sprinkles seem to shout “vanilla birthday cake!” I thought we could mix things up a little with this recipe. You know that I’m a sucker for a cake that has an ahhh-factor upon cutting it open–especially when it’s so simple on the outside–and this cake celebrates just that.

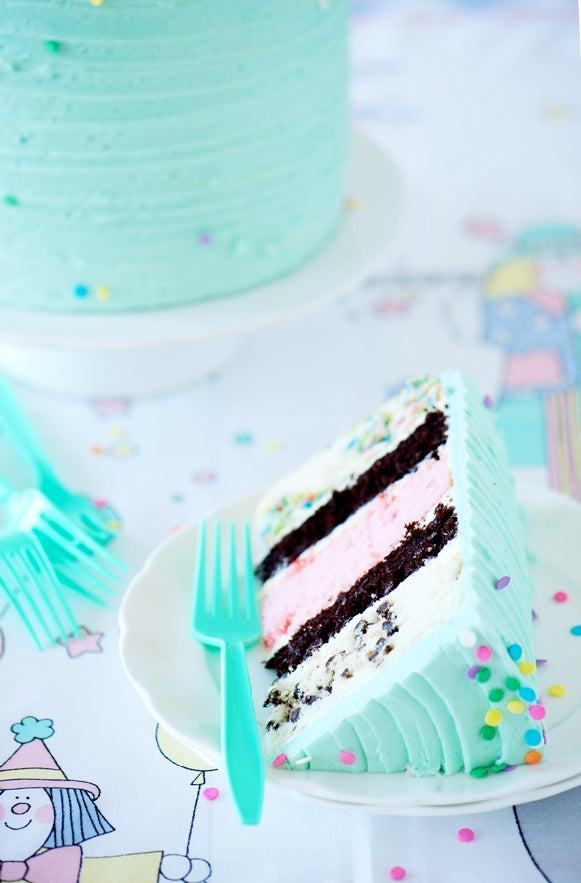
Best part about a 5-layer party cake that boasts 4 different flavoured layers? Only making 2 batter recipes. This cake is super simple and, dare I say, “quick” to make, especially considering it has serious wow-factor going for it. So what exactly is a “Birthday Medley Layer Cake?” Well, it’s a chocolate chip, chocolate butter, cherry chip, confetti layer cake filled and frosted with a quintessential old-fashioned recipe: vanilla cooked flour frosting. We tint the frosting pastel turquoise for a lovely visual and sprinkle on some confetti sprinkles because, well, that’s what we do.

With one vanilla cake batter recipe, we can easily create 3 of the 5 layers by simply incorporating different additions–chocolate chips, confetti quins, and chopped Maraschino cherries. The chocolate butter cake is a partial batch divided into 2 pans, giving us a total of 5 layers. The chocolate cake adds some richness and of course visual appeal. These flavours are a celebration of some of the most beloved birthday cakes, so how can we go wrong?

So let’s talk more about “cooked flour frosting.” This was something I hadn’t tried in years, and I really couldn’t remember much about the outcome. I kept seeing it pop up in different recipes online, and I’d be meaning to make it again out of pure curiosity. I figured this cake was a perfect time to make a batch and run with the whole “old-fashioned” flavours thing. If you’re not familiar with this type of frosting, I would liken it more to a meringue-based buttercream (such as Swiss Meringue Buttercream), than a sweet bakery frosting–it has a silkiness to it that isn’t necessary possible with confectioners’ sugar frosting, as well as a butteriness that might not be for some. Much like meringue-based buttercream it isn’t particularly sweet. It also lends nicely to frosting a cake, piping cupcakes or even cake borders and decorations. I used a version of this recipe from Leelabean Bakes (she also offers a lot of variation ideas).

We start by cooking flour and milk into a super thick consistency, and then we add more milk and sugar until the mixture boils. Once cooled, this concoction is added to whipped butter, blended together and flavoured with vanilla, or even chocolate, peanut butter, etc. As far as ease goes, I’d say it is simple, although the wait time for the mixture to cool can be several hours. I made it the night before and then finished the frosting in the morning, but if you were in a rush this might not be the best frosting option.
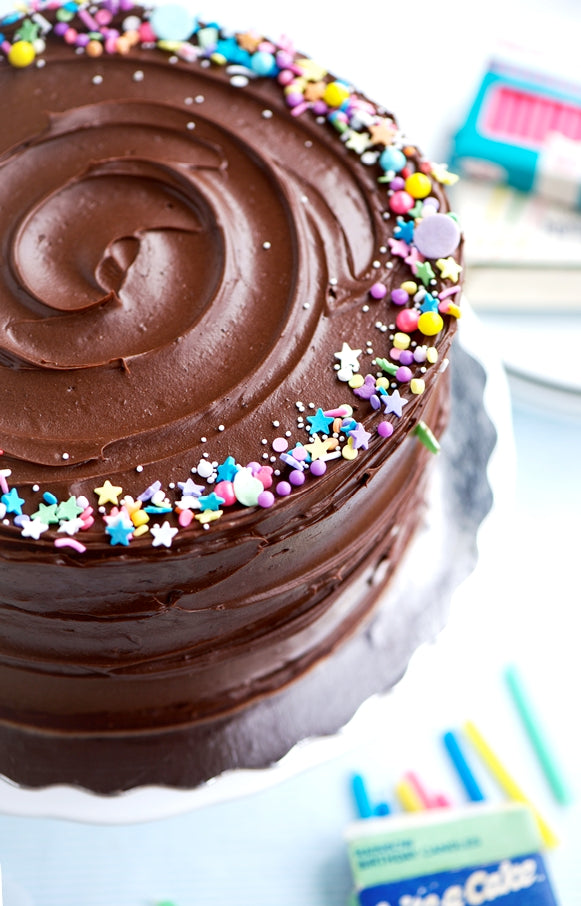
I couldn’t decide if I should try a chocolate-frosted version first or this vanilla option, so if you happen to make this cake with a chocolate frosting, I’d love to hear about it!

And since I am sitting here eating this cake and drinking some incredible Pig Iron coffee, I feel compelled to tell you about Parachute Coffee, which is how I was lucky enough to discover it. This Canadian company is comprised of 2 “caffeinated Canucks,” and they are taking artisan coffee to a whole new level.  Mike and Jake are devoted to finding the best local hand-crafted, fresh-roasted coffee and delivering a different one to your doorstep each month. Because there is only one thing I love to consume more than cake, and that’s good coffee. I think their concept is brilliant!

And before I move onto sharing the recipe, here are a few bits of news from the land of Sugartown since my last post:

I moved! It was kind of spontaneous, but we did it and while we aren’t far from our old house, I am so much happier here. It was definitely time for a change. We’re pretty much unpacked, but it seemed to take me the longest time to get into the groove in the new kitchen. The truth is, I kind of felt displaced, which was weird because I love the new environment. I’ve got most of my baking gear organized, and I’m feeling like I’m myself again. Phew. Now I just need to really figure out where the best spot will be for photographing my cakes . . .

The cover of The Sweetapolita Bakebook is ready to go! I’ve shared it over here on the “My Book” section of my site. Now it really feels, well, real.

So now let’s make this cake!

Print
Birthday Medley Layer Cake
Ingredients
For the vanilla-based layers (chocolate chip, confetti, and cherry chip):
  • 3 cups 345 g cake flour
  • 2 1/4 cups 450 g superfine sugar
  • 1 tablespoon + 1 teaspoon baking powder
  • 3/4 teaspoon salt
  • 3/4 cup 170 g unsalted butter, cold and cut into about 15 pieces
  • 1 1/3 cups 320 ml whole milk, room temperature
  • 6 egg whites room temperature
  • 1 1/2 teaspoons pure vanilla extract
  • 1/4 teaspoon pure almond extract
  • 1 cup 150 g mini chocolate chips
  • 3/4 cup 115 g confetti quin sprinkles
  • 1/4 cup Maraschino cherries chopped (about 12 cherries)
  • 1 tablespoon Maraschino cherry juice
  • Drop pink gel-paste food color
For the chocolate layers:
  • 1 stick 115 g unsalted butter, softened
  • 3/4 cup 165 g packed light brown sugar
  • 1/2 cup 100 g superfine sugar
  • 2 eggs room temperature
  • 1 teaspoon pure vanilla extract
  • 1 1/4 cups 155 g all-purpose flour
  • 1/2 cup 60 g dark cocoa powder
  • 1 teaspoon baking powder
  • 1/2 teaspoon baking soda
  • 1/2 teaspoon salt
  • 1 cup 240 ml buttermilk, room temperature
For the Vanilla Cooked Flour Frosting
  • 2 cups 480 ml whole milk
  • 1/3 cup 45 g all-purpose flour
  • 2 cups 400 g sugar
  • 1/4 teaspoon salt
  • 2 cups 454 g unsalted butter, softened
  • 1 teaspoon pure vanilla extract
  • Few drops turquoise gel-paste food color
  • Confetti quin sprinkles for decorating
Instructions
For the vanilla-based layers:
  1. Preheat oven to 350°F (180°C). Grease and line the bottoms of 3 round 8-inch pans with parchment. I use Parchment Paper Circles for ease.
  2. In a medium-sized measuring cup, combine and stir 1/3 cup of the milk, egg whites, vanilla, and almond extract. Set aside.
  3. Sift cake flour twice. Into the bowl of an electric mixer fitted with the paddle attachment, sift the cake flour, sugar, baking powder, and salt together, and mix on low-speed (I use the “stir” setting on my mixer) for 30 seconds.
  4. Add the butter, one piece at a time, and continue mixing until the mixture is a fine, crumbly texture, about 5 minutes. Add the 1 cup of milk and and mix on medium speed for 3 minutes.
  5. Scrape the sides of the bowl, decrease the speed to medium-low, and gradually add the egg/milk/extract mixture. Once the milk mixture has all been added, continue to mix for 30 seconds.
  6. Pour one-third of the batter (~2 1/2 cups)(500 grams) into one of the prepared pans, another third into another of the prepared pans, and keep the remaining batter in the bowl. Gently stir the chocolate chips into one of the pans of batter and spread the batter evenly with a small offset palette knife. Repeat with the sprinkles in the other pan of batter. Bake the 2 cake layers in the center of oven and 2" apart until a cake tester comes clean when inserted into the center, about 22 minutes. Be so careful to not over-bake. Check cake at 20 minutes, but not before, and once you feel it’s almost ready, set the timer for 2 minute intervals. While the cakes are baking, add a drop of pink gel paste into the remaining batter, along with the chopped cherries. Turn the batter into the third prepared cake pan. Bake once the first 2 layers are out of the oven. Let cool on racks for 10 minutes before loosening the sides with a small metal spatula, and invert onto greased wire racks. Gently turn cakes back up, so the tops are up and cool completely.
  7. Wrap tightly and store at room temperature for up to 2 days, refrigerator for up to 5 days, or frozen for up to 2 months. Best enjoyed day 1 or 2.
For the chocolate cake layers:
  1. Preheat oven to 350°F (180°C). Grease and line the bottoms of 2 round 8-inch pans with parchment.
  2. In a stand mixer fitted with the paddle attachment, beat the butter, brown sugar, superfine sugar, and vanilla on medium-high speed until lighter in color and slightly increased in volume, about 7 minutes. Lower the speed to medium and add the eggs, one at a time, mixing until each is fully incorporated before adding the next, about 30 seconds.
  3. Sift the flour, cocoa powder, baking soda, baking powder, and salt into a medium bowl.
  4. Alternate dry ingredients and buttermilk into creamed mixture, beginning and ending with dry ingredients. Mix until just incorporated, or finish by hand gently.
  5. Divide the batter evenly between the 2 prepared pans. Smooth the batter with a small offset palette knife, and bake until a toothpick inserted into the center comes out with just a few crumbs, about 25 minutes. rotating once after 20 minutes. Cake is done when toothpick or skewer comes barely clean.
  6. Let pans cool on wire rack for 20 minutes, then invert cakes onto racks, gently, peeling away parchment rounds. Let cool completely.
For the frosting:
  1. In a medium saucepan over medium-heat, whisk together 1/2 cup (120 ml) of the milk and the flour until combined. Continue whisking until the mixture thickens and reaches the consistency of brownie batter, 6-8 minutes. Add the remaining milk, sugar, and salt and whisk constantly until the mixture comes to a boil, about 10 minutes. Remove the mixture from the heat and pour through a sieve and into a medium bowl. Place a piece of plastic wrap directly over the mixture and place in the refrigerator until cool (this can be done the night before to save time).
  2. In the bowl of a stand mixer (or large bowl if using a hand mixer), beat the butter until very fluffy, about 7 minutes. Remove the plastic wrap from the cool milk/flour/sugar mixture and stir until smooth (it will be a slightly gelatinous consistency). With the mixer running on medium speed, gradually add all of the milk mixture to the whipped butter. Beat until smooth well-incorporated. Add the vanilla and beat until combined. To remove some of the air bubbles, beat on low speed for a few minutes.
Assemble the cake:
  1. Put a dollop of frosting on an 8-inch round cake board (or cake plate) or 9-inch scalloped cake board.
  2. Put your confetti cake layer top-up on the cake board or plate, and spread about 3/4 cup of frosting evenly across layer. Put a chocolate layer on top and repeat with another layer of frosting. Add the cherry chip layer on top, more frosting, followed by the second chocolate layer. Now place the final layer (chocolate chip) top-down. Cover the cake with plastic wrap and wiggle the layers into place. Refrigerate the cake for about 20 minutes. Add a few drops of turquoise gel paste to the remaining frosting and beat to combine.
  3. Using a turntable, if possible, frost entire outside of cake with a thin layer of turquoise frosting to seal in the crumbs. Chill until the frosting begins to firm-up, about 15 minutes. Repeat with another thin layer of frosting, this time working to achieve a smooth finish. Chill for another 15 minutes.
  4. Apply a third coat of frosting to the cake. Holding a small offset spatula in your dominant hand, press it gently against the side of the cake, starting at the very bottom, and keep it steady. Use the other hand to slowly rotate the turntable until you have gone all the way around the cake, raising the spatula just slightly at every full rotation, so you are working your way up the cake. Clean the spatula and then use the same technique on the top of the cake, starting from the outside working in. This time you will hold the spatula flat against the top of the cake. Sprinkle confetti quins around the perimeter of the cake.
  5. The cake will keep at room temperature for up to 3 days.

Sweetapolita’s Notes:

  • For the chocolate cake, I always use Cacao Barry Extra Brute cocoa powder–it’s super dark and rich.
  • I bought my vintage ballerina cake toppers here.
  • One of my favourite and most-used gel paste colors (and the one I used on this cake) is Americolor Turquoise. A little goes a long way!
  • When making confetti cake, I like to use Edible Confetti Sprinkles because they don’t tend to bleed color as much as some other variations.
  • If you’re not sure about “cooked flour frosting,” or you want a more traditionally sweet party cake frosting, try this recipe (and oh yes, more ballerinas dancing atop a cake!).

Share the Sweetness!
  • Facebook
  • Twitter
  • Pinterest
  • Google
  • Email

Filed Under: Layer Cakes, Mixed Batch Layer Cakes Tagged With: 5 layer, birthday, cake, cherry, chocolate chip, confetti, cooked flour, frosting, layer, pastel, turquoise

« New Blog Design + KitchenAid Mixer Giveaway!
Midnight Pumpkin Layer Cake »

Comments

  1. Ana says

    at

    Thank you so much! Can’t wait to try

    Reply
    • Rosie @ Sweetapolita says

      at

      Thanks, Ana! xo

      Reply
  2. Lisa | Mummy Made.It says

    at

    This is the most stunning, most beautiful cake ever!
    It has been a long time since I made flour frosting but remember it being less sweet than traditional buttercream and very smooth…I did ruin a very pots trying to make it though!

    Reply
    • Rosie @ Sweetapolita says

      at

      Thanks so much, Lisa!

      Reply
  3. Dani says

    at

    When you use the small offset spatula are you holding if flat side down on the side. Also I made another cake with this sort of frosting, it was amazing, never had anything like it!

    Reply
    • Rosie @ Sweetapolita says

      at

      Hi Dani,
      For the position of the small offset spatula, I hold it with the flat side down. For sharper lines, I will hold it on just a slight angle. I hope that helps!

      Reply
  4. Sara says

    at

    Hi Rosie!
    I always love the colors you use for your cakes! They are always so lovely! You have inspired me in my own baking adventures! You always have the perfect shade of pink nail polish in your photos. Can you tell me what brand/ color it is?
    Thank you!

    Reply
    • Rosie @ Sweetapolita says

      at

      Thanks so much, Sara! I’d love to share my nail polish brand and color with you–which photo were you referring to? xo

      Reply
      • Sara says

        at

        The lovely pink nail polish colors from your last two posts- your Macaron Cake and your Ice Cream Cake…
        Thanks so much, Rosie! :)

        Reply
      • Hoa says

        at

        Can you also tell me the nail color that you told Sarah ?! Lovely color !!! Thanks

        Reply
  5. Lena says

    at

    Such a wonderful looking cake and just in time! I have a birthday cake to make this upcoming wkend and am wondering if this icing will work ok under fondant. Any thoughts would be appreciated. Eagerly waiting for your book!

    Reply
  6. Liz @ Floating Kitchen says

    at

    This cake is stunning!! You are so freaking talented! And I just checked out 12-ish, which is new to me. What a neat idea. Love it!

    Reply
    • Rosie @ Sweetapolita says

      at

      Thank you, Liz! Such a sweet comment. I really appreciate it!

      Reply
  7. Jess @ Sweet Menu says

    at

    This is an absolutely epic cake! Super impressive, all the beautiful colours and layers – I’m in awe!

    Reply
    • Rosie @ Sweetapolita says

      at

      Thanks, Jess! It means a lot! xo

      Reply
  8. Katrina @ Warm Vanilla Sugar says

    at

    This cake is so unbelievably gorgeous! Loving that cooked flour frosting!

    Reply
    • Rosie @ Sweetapolita says

      at

      Thanks so much, Katrina!

      Reply
  9. Amanda says

    at

    Beautiful and I am sure DELICIOUS cake!!!

    Reply
  10. Brian @ A Thought For Food says

    at

    Those layers… my heart just went pitter-patter. Love!

    Reply
    • Rosie @ Sweetapolita says

      at

      Thank you, my dear! xo

      Reply
  11. Nazia @ Your Sunny Side Up says

    at

    That blue! Just stunning!

    Reply
    • Rosie @ Sweetapolita says

      at

      Thank you, Nazia. I appreciate it! :)

      Reply
  12. Natalie | Paper & Birch says

    at

    This is gorgeous! Just pre-ordered your book, can’t wait to see it! :)

    Reply
    • Rosie @ Sweetapolita says

      at

      Thanks so much, Natalie! xo

      Reply
  13. Angelyn @ Everyday Desserts says

    at

    This is absolutely beautiful!!

    Reply
  14. Zainab @Blahnik Baker says

    at

    This is just stunning!! And I love your love for turquoise :)

    Reply
  15. Kylee says

    at

    If you’re after a chocolate version of the cooked flour frosting, try this one: http://www.ourbestbites.com/2010/05/chocolate-frosting/

    Everyone I know says this is one of THE BEST frostings they have ever tasted.

    Reply
  16. Jordan Baker says

    at

    What an Amazing cake! more of a work of art! good job, have to try this recipe.

    Reply
  17. EllenQ says

    at

    I love this idea so much I want to marry it.

    Reply
  18. Maribel Cota {Bruni's Boulangerie} says

    at

    Amazing Layers and definitely I’ll try the Vanilla cooked flour frosting.

    I’m a fan of yours chocolate cakes, especially “The Campfire Delight Cake” I love the chocolate layers of this cake, looove the black coffee addition and the cake, but the best part, is the super easy cake ever.
    I like the light brown sugar in this one but it hasn’t coffee and the method is much different.

    Rosie, here’s the biggest question, what is your favorite?

    PD. Wonderful and yummy cakes Always!

    Reply
  19. Lyndsay // Coco Cake Land says

    at

    Cooked flour frosting! My mind is kind of blown – I don’t think I’ve ever heard of it! I am dying to try it now though!! I love this cake so much, it has your gorgeous signature colours and flavours and vintage flair, Rosie! Mmmm those flavours … :)

    Glad to hear you are settling in with your move, too! I hear ya – it’s always tough to find the BEST SPOT for photograph-taking, especially for the cake-photo-obsessed like ourselves! ^__^

    LOVE the cover of your book!! And cannot wait to get a copy! Wishing you all the best and sending lotso love! xoxo

    Reply
  20. nosh says

    at

    Hi ! Love this cake n your website. Im making this cake today just one question….can we bake the chocolate cake layers one by one just like we bake the 3rd layer vanilla cake after the two.? I mean does chocolate batter sray fine outside for 20 mins as i have heard to bake the cake immediately as mixed.. pleeeeaase reply soon im making the cake today .

    Reply
  21. Tracey says

    at

    What a glorious cake!

    And one day, when your book is available in Australia, I’ll get it. And I will be happy.

    Reply
  22. cupcake recipes says

    at

    sweek and I love the colors

    Reply
  23. gerri says

    at

    Thanks Rosie!! This is going to be an impressive presentation at my grand daughter’s 4th birthday party. I can always count on you for a no fail cake.

    Reply
  24. Terameracake says

    at

    I would be making this cake for my customer….Thanks to Rosie….

    Reply
  25. Janice @Kitchen Heals Soul says

    at

    I agree with your description of this frosting: it’s very much like a meringue-based frosting but with a cooked flour base. And you are right, the base does take quite a while to cool, and if you are hasty, the butter will melt!
    By the way, the first time I discovered this frosting was when I baked a cake from recipes in the Baked books (from Matt & Renato of Baked in Brooklyn: amzn.to/1o1bDpN). I highly recommend all their books. Great recipes inside, and if you don’t own them yet, I’m sure you’d love them ;)

    Reply
  26. Leelabean says

    at

    Rosie,
    I m thrilled that you enjoyed the cooked flour recipe as much as I do. This has become my go-to frosting for the past few years. Its versatility, relative ease of preparation, and absolute yumminess makes it ideal for almost any cake!
    Also, I have loved your blog for some time now. You are inspiring and so creative and you just make everything look gorgeous! Thanks for the inspiration and congrats on the book!!
    Leela

    Reply
  27. Thalia @ butter and brioche says

    at

    This is probably the best looking cake I have seen in ages.. I wish I it was my birthday so I could justify making the recipe! Pinned!

    Reply
  28. indugetscooking says

    at

    Amazing color on the frosting. Wouldn’t mind turning a year older if I get to celebrate with that cake !

    Reply
  29. Amber Cakeaholics says

    at

    AMAZING!!! I love the aqua colouring in this cake and its nice to see instead of pinks. Well done

    Reply
  30. SweetiePieLMK says

    at

    The colour of this cake is incredible…. ^___________^

    Reply
  31. Ashley says

    at

    This is the quintessential birthday cake, complete with blue frosting! I can’t wait to make this. Genius!

    Reply
  32. jami says

    at

    Hi there! I made this cake today and all of my mini chocolate chips sank to the bottom of the cake layer when baked. Same thing happened with the sprinkle layer. Any thoughts? Won’t be eating it until tomorrow but the cake seems to have a nice texture.

    Reply
    • Chelsea says

      at

      This happened to me too!

      Reply
      • Gina says

        at

        Two years too late but it may help someone else. I read recently to coat the choc chips in flour and toss then add to the batter, it will prevent them sinking. Haven’t tried it myself, but I will be with this cake.

        Reply
  33. Loretta says

    at

    This cake looks incredible, I’m going to attempt it for my little boy’s 3rd birthday next week (boys CAN do turquoise). I have a fan oven should I adjust the temperature maybe to 160 oC?

    Can’t wait to make it, thank you for the inspiration. Loretta x

    Reply
  34. Dorothy says

    at

    I made this cake and it was beautiful. Brought it to work and everyone loved it. Even bought the exact vintage ballerinas. Just two things that I need to work on — My choc chips sank to the bottom–not sure how to avoid that. Maybe if I would have rolled them in flour first? It was still fine though. I love choc chip cake!

    Had trouble with the frosting. My milk flour base seemed too thin even after it cooled. I was afraid it would make the frosting too thin so I didn’t use it. I’m not sure what the consistency should be right before you put mix it in the butter. I did the flour part twice and didn’t think it would work so I ended up tossing it out and making the cooked flour frosting recipe from your other post –the BAKED whiteout cake. That flour mixture was thicker in the end. I colored it turquoise and it was great.

    Maybe when I strained the first batches, too much flour did not go through the sieve– there was a good amount left in the sieve. The BAKED recipe does not strain the flour mixture and it was not lumpy but thicker when I mixed with butter.
    The cake layers were great! Cherry chips worked out well, confetti Quinn’s baked up nicely and you are right did not bleed through.

    And I made the midnight pumpkin a few weeks before and it was a hit too!
    It’s been fun to bake these cakes. Thank you! Dorothy

    Reply
    • Cassie says

      at

      I think you might need to cook the flour and milk longer – it should be very thick, like paste, almost. Keep trying, this frosting is delicious!

      Reply
  35. Sofia says

    at

    I am planning to use this recipe to make the birthday cake for my son, but we don’t like overly sweet cakes. Will there be a big texture problem if I use 1 1/2 cup sugar instead of 2 1/4? Should I substitute with something?
    Thanks!

    Reply
  36. Jayne says

    at

    Rosie, I made the cake with chocolate icing…………omg it is in my top 5. Thanks so much for sharing this recipe……..definitely a keeper! Pics on my FB page.

    Reply
  37. Charlotte says

    at

    I love your website, and your cake designs, and flavour combinations! You are my go to cake person.

    I made these cakes and they were a complete miss, why? My chocolate chips, confetti quins and cherries sunk to the bottom and made burnt tasting hard crusts. My oven temp was right… But they took way longer to bake than the instructions called for. I was very disappointed.

    If you have insight, let me know!

    C.

    Reply
    • Cassie says

      at

      My chocolate chip layer had a bit of a crust too, but I realized that it was because the cake was done even though it didn’t look like it was, so I overcooked it a bit. The other vanilla-based layers i didnt bake as long, and they were perfect. The cake is very soft and moist and doesn’t bounce back like a firmer cake would, so try using a skewer to check doneness. For me the times were pretty close to right on. Did you sprinkle the chocolate chips on top? If you mix them in, they might sink, as they are prone to do. Please keep trying, I have found the recipes from this site to be very reliable and absolutely top shelf.

      Reply
  38. Lin says

    at

    Love! Beginner baker here. What tool did u use to achieve the cake exterior

    Reply
  39. Cassie says

    at

    My daughter and I baked this cake together yesterday, for her 16th birthday/4th of July BBQ. Every layer was so moist and delicious, and our family was very impressed :). The only changes I made were to add a touch more almond to the cherry layer, and we used the cooked frosting for the filling, and a vanilla buttercream for the outside. It was amazing! Thank you for such wonderful and reliable recipes!!

    Reply
  40. Lucia says

    at

    Tried this recipe…. all the cakes went wrong! The vanilla ones were far too hard and sticky and wouldn’t leave the tin, the chocolate chip one had to be abandoned completely, and the chocolate one didn’t bake at all and was liquid at 20 mins and collapsed and burnt around the edges after 25. I don’t understand what went wrong I followed the recipe to the letter. A lovely cake I’m sure, but if I try again I’ll be using different recipes.

    Reply
  41. Sue says

    at

    Love cooked flour frosting!! Just a couple of questions for you:

    1) Do you have a chocolate version you could share?

    2) It says at the end of recipe the cake keeps for 3 days at room temperature. Does that mean that cooked flour frosting doesn’t need to be kept refrigerated? I have heard conflicting opinions and this is confusing to me and makes me reluctant to use a cooked flour frosting for anything other than home baking for my family.

    Reply
    • Leelabean says

      at

      Hey Sue!
      Here’s the link to the frosting used in the recipe above – http://leelabeanbakes.com/blog/frosting-filling/even-better-cooked-flour-frosting/

      There are plenty of variations to create and enjoy! Happy Baking!

      Reply
  42. Stephanie says

    at

    hi Rosie! this is a beautiful cake, it is my moms 50th birthday and i made (or am in the process of making) this cake for her surprise party.. I’ve finished the white layers and the chocolate layers are currently cooling in the pans. However, the white cakes were so soft (which isn’t a bad thing) that when I flipped the chocolate chip layer, it split in half :(
    do you have a remedy for that? or I will just have to make do?

    Reply

Leave a Reply to Sue Cancel reply

Your email address will not be published. Required fields are marked *

HELLO, HELLO!

Hi, I’m Rosie! Welcome to the Sweetapolita blog! You will find heaps of baking recipes, sprinkles and all things happy!
Learn more about me here!

Let’s hang!

Get in Touch

Get in Touch

Never Miss a Post!

Latest Recipe

FACEBOOK

My Book

My Book

Copyright © 2021 · Design by Melissa Rose Design