 Happy Friday! Hello from the land of -25°C and random blizzards! But that's okay. It just makes being inside baking that much more inviting and cozy . . . And when it doubt, make cake. Especially a pastel wintery wonderland cake. It just makes good sense, right?
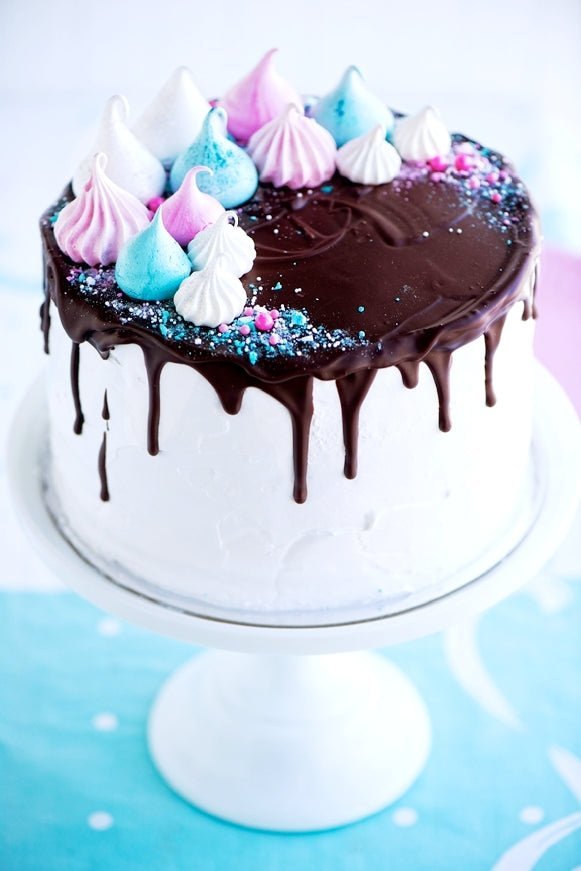
  This Meringue Dream Cake is a deep, dark moist chocolate layer cake is filled with a snow white, billowy meringue frosting and colourful crushed baked meringue, and then frosted with more meringue frosting and topped with dark chocolate glaze and more pastel baked meringue and sprinkles. And while I adore pastel and sprinkles more than one girl should, this cake really just comes from my love for the irresistible combination of the chocolaty-chocolate cake and the fluffiest of marshmallowy meringue frosting. I mean, there's just nothing like it.
  As you probably know, I have a thing for both cake and meringue, and this cake is a simple celebration of those things. And it's amazing how you can bring such classic cake elements to life by adding some super fun splashes of colour and texture. I can't resist the pink, turquoise, snow white and dark chocolate colour combination! Makes the little girl in me giddy. If you make this cake, I definitely recommend having fun with the shapes, sizes, and colours of the baked meringues, since that really is what makes the visual. My inspiration when it came to creating a more elaborate statement with a meringue medley atop the cake comes from some of the over-the-top colourful cakes I have come across lately by fellow caker, Katherine Sabbath. And this cake was so fun to make!
  While tempted to tint that beautiful white meringue frosting pastel, it's not often we get to flaunt pure white frosting, you know? There are a few options for white-as-white frosting including Seven Minute Frosting, Marshmallow Frosting, etc. which are all variations of meringue, but usually have corn syrup and what not. This is just a straight Swiss meringue (like when we make Swiss meringue buttercream, minus the butter), so just a delightful fluffing of egg whites, sugar, and vanilla. Heaven. Swiss meringue is thick, glossy, and very stable, so it makes for a lovely frosting, but just keep in mind that it's best to make it right before you frost the cake and best enjoyed on day 1 or 2 (the meringue will become slightly airy and spongy--think meringue on lemon pie). I found that it frosted beautifully, but, again, looks and holds up best on day 1.
  My heart belongs to pastel meringues. It just does. Crispy, airy, melt-in-your-mouth, chewy . . . and did I mention downright beautiful to look at? I use powder food colouring with meringues because I find it keeps the texture nice and dry, as with gel paste colour sometimes the meringues get a little sticky and shiny. I love the matte finish and stunning colours you can get with the powder variation. I added some lustre dust to the white meringues after baking, which is hard to capture in the photo, but oh my goodness it looks so twinkly in person! This cake is all about having fun and getting creative. :)
  Super moist, fluffy, crispy, billowy, chocolaty, pastel goodness. (Oh, and for those of you who are incredibly observant, this slice was from the first cake I made before re-doing it with a much thicker top coat of the meringue frosting--it had to be done!).
  Meringues are way too photogenic! You can see a bit more of the glittery twinkle on the white ones in this photo. So wintery and wonderful.
  Broken up and sprinkled, the meringues make a really delightful addition to the filling, both visually and texturally. Melt-in-your-mouth amazingness.
  So here is the recipe, friends! xo
Meringue Party Cake
Deep, dark, moist chocolate cake filled with billowy meringue frosting, crushed baked meringues, and frosted with more meringue frosting and topped with dark chocolate glaze and colourful baked meringues.
For the Baked Meringues:
- 3 egg whites (room temperature)
- 3/4 cup 150 g superfine sugar
- Pinch of cream of tartar
- 1 teaspoon pure vanilla extract
- Powdered food colour (petal dust in turquoise and pink (or other desired shades)
- Lustre dust in white (optional)
For the Chocolate Cake Layers:
- 2 1/4 cups 285 g all-purpose flour
- 2 1/4 cups 450 g sugar
- 1 1/3 cups 160 g dark unsweetened cocoa powder
- 1 tablespoon baking soda
- 1 1/2 teaspoons baking powder
- 1 1/2 teaspoons salt
- 1 1/2 cups 360 ml buttermilk, room temperature
- 1 cup 240 ml hot coffee
- 1/2 cup plus 2 tablespoons (150 ml vegetable oil)
- 2 teaspoons pure vanilla extract
- 3 eggs (room temperature)
For the Swiss Meringue Frosting:
- 10 egg whites
- 2 1/2 cups 500 g sugar
- 1 teaspoon pure vanilla extract
- Pinch of fine salt
For the Chocolate Glaze:
- 5 ounces 150 g best-quality dark chocolate, chopped or callets
- 3/4 cup 90 g unsalted butter
- 1 tablespoon light corn syrup
- Pinch of salt
- Sprinkles (for decorating - see notes for suggestions!)
For the Baked Meringues (French meringue):
- Preheat the oven to 200°F (90°C). Line two baking sheets with parchment paper and set aside.
- Wipe a stainless stand mixer bowl and whisk attachment with lemon juice to eliminate any grease. Place the egg whites and cream of tartar in the bowl and whisk on low speed for 30 seconds, and increase the speed to medium. Beat until the egg whites have soft peaks, about 1 minute. Increase the mixer speed to medium-high and add the sugar 1 spoonful at a time. One all of sugar has been added, increase the speed to high and beat until the meringue is stiff and glossy, about 3 minutes. Turn off the mixer, add the vanilla extract and beat until combined. Divide the meringue into thirds and tint one third turquoise and another pink. Pipe one baking tray of medium-sized meringues and one tray of smaller meringues using different decorating tips of your choice (I used large plain round for smooth meringues, large open star for the textured pink meringues, and a small open star for the small textured white meringues).
- Baked both trays at the same time until crisp but not browned or discolored, about 1 hour for the smaller meringues, and 1 1/2 hours for the larger ones. You should be able to gently pull the meringue away from the parchment with no sticking. Sprinkle the white meringues with some white lustre dust, if desired. Store in plastic zip top bags at room temperature for up to 1 week. I made two batches of these meringues to experiment different shapes and sizes, and the leftovers make perfect little treats or gifts.
For the Chocolate Cake Layers:
- Preheat oven to 350° F (180°C). Spray four 8-inch round cake pans (or however many you have--you will just have to wash and re-use for the remaining layers) with cooking spray and line bottoms with parchment rounds. Set aside.
- In a large mixing bowl, sift flour, sugar, cocoa powder, baking soda, baking powder, and salt.
- In a medium bowl or measuring cup, combine the buttermilk, coffee, oil, and vanilla, and then mix in eggs.
- Add liquid mixture to dry ingredients and whisk until smooth, about 1 minute. Divide batter equally among the four cake pans or weigh for accuracy--each pan should weigh about 420 grams.
- Bake two layers at a time until a wooden pick inserted into the centre of the cake comes out with a only a few crumbs, about 20 minutes. Try not to over-bake. Let cakes cool in pans on a wire rack for 10 minutes, and then turn onto rack to cool completely. When ready to assemble the cake, wrap the layers in plastic wrap and chill for about 30 minutes.
For the Swiss Meringue Frosting:
- Wipe the bowl and whisk attachment of an electric mixer with paper towel and lemon juice, to remove any trace of grease. Add egg whites and sugar, and simmer over a pot of water (not boiling), whisking constantly but gently, until temperature reaches about 140°F, or if you don't have a candy thermometer, until the sugar has completely dissolved and the egg whites are hot.
- Return the bowl to the stand mixer and beat on medium speed until meringue starts to thicken, about 1 minute, and then increase to high speed. Beat until thick, glossy, and cool (or neutral in temperature). Add vanilla and salt and beat to combine. Best used right away.
For the Chocolate Glaze:
- In a small microwave-safe bowl, melt the chocolate, butter, corn syrup and salt in the microwave, about 50 seconds, and stir until smooth. (You can also melt in a heatproof bowl set over a pot of simmering water.) Let cool until it thickens slightly, about 15 minutes. Store for up to 1 week in an airtight container in refrigerator, and warm in microwave when ready to use.
Assemble the Meringue Dream Cake:
- Put a nonslip square on a turntable (if using), followed by a large piece of wax paper, topped with another nonslip square smaller than your cake. Place a thin 8-inch round cake board or larger cake plate on the turntable and place the first chocolate cake layer on top. Spread about 1 cup of meringue frosting on top and sprinkle with a generous layer of crushed baked meringues (save the prettiest ones for the top of the cake). Repeat until you come to the final cake layer, which you will place face down. Cover the cake in a "coat" of meringue frosting and chill the cake for 30 minutes.
- Remove the cake from the fridge and cover in another thick, smooth layer of meringue frosting. Chill the cake for about 15 minutes.
- When the chocolate glaze in no longer warm, pour on top of the cake and gently spread with a small offset palette knife, pushing some over the sides. Gently place a variety of the baked meringues on top of the cake, as well as some crushed meringue and sprinkles, if desired.
- Cake will keep at room temperature for up to 2 days, but best enjoyed day 1 (due to the meringue frosting).
Sweetapolita's Notes:
- For the powdered food colours, I used Powder Colour in Turquoise
and Hot Pink
, and for the white edible lustre, try Edible Glitter in any colour you love. You should avoid oil-based colours for the merignues, as the oil will cause them to flop. Powder colours will be lightweight and help maintain the air.
- To pipe the meringues, I used decorating tip Wilton 1A
(for the smooth meringues), Wilton 6B
(for the large textured pink meringues) Wilton 4B
(for the small textured white meringues).
- For chocolate glaze, I used Callebaut Dark Callets 53.8 %
which are deep and dark but not over-powering.
- To frost the cake, I used the Ateco Cake Stand
, a small Offset Spatula
for the top of the cake (and spreading the glaze), and a Medium Sized Straight Spatula
for the sides.
- For the sprinkles, choose anything that makes you happy!
See you soon with another dose of sugar!


