 So I lied. This recipe isn't really spooky at all! I had serious intentions of making a super-eery Halloween-inspired confection, but here's the thing: in my world, Halloween isn't necessarily filled with orange, black, witches and ghosts, but rather two small girly cakelets masquerading as fairies and quirky princesses with ensembles slightly askew. When I was reflecting on what I find most spooky (and yet most enchanting), my mind kept wandering to the world of the vintage carnival--the world of strange whimsy and a balance of mad and wonderful. (This is actually one of several sweets I envisioned, so I hope to share a few more.) For the swirly effect, I looked to one of my favourite colour-schemes found in the Pastel Swirl Cake I shared this past summer. Much like with the cake technique, I love that each apple becomes a one-of-a-kind, and that you can create a completely different look by simply using different colours.
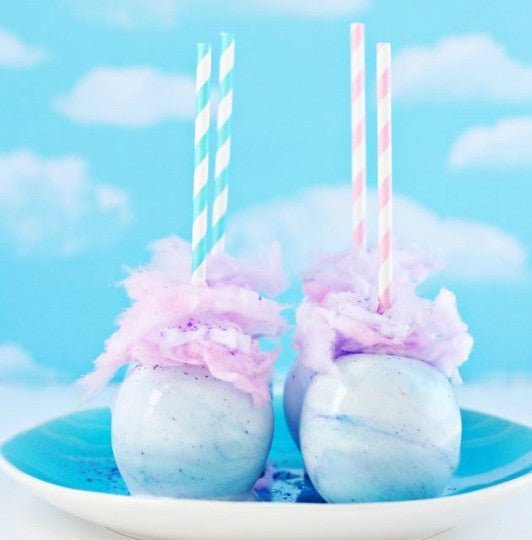
  A Pastel Swirl Cotton Candy Apple is an almost-traditional candy apple in the sense that it's a fresh apple on a stick, dipped and coated in a sugar mixture that's brought to the hard-crack stage. The difference is that, in this case, we play with flavour by adding a cotton candy flavoured oil, and colour by whitening the coating and then adding a few drops of other colours to create a swirl effect. Top that with a generous array of actual cotton candy and sprinkles, and whimsy prevails.
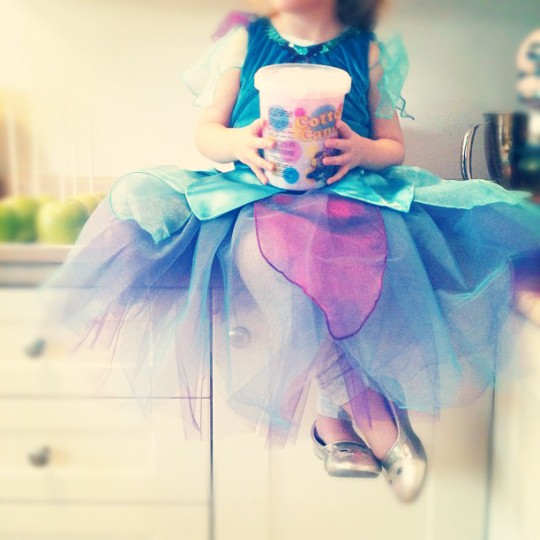
It's almost hard to imagine that under all of that shiny pastel coating and feathery cotton candy fluff, there sits these innocent green apples. Tart, crisp, healthy and unsuspecting 80-calorie-apples. Muahahahahaha. Now, there are a bazillion candy apple recipes out there, but for the candy coating I used that of my dear friend, Heather. In her incredible first book, SprinkleBakes: Dessert Recipes to Inspire Your Inner Artist, she shares a recipe for the most stunning and elegant Snow Apples (pure white candy apples with swirly sticks and white glitter!), so I followed her steps for creating the candy coating. It worked like a dream. You might remember my talking about her book back when I used her fabulous French macaron recipe for my Lemon-Blueberry Macaron Delight Cake. Her recipes never let me down.  And what every Whimsical Pastel Swirl Cotton Candy Apple maker needs is their own fairy assistant. I just recommend the fairies tend to their fairy business while the hot candy apple coating process is underway. This particular cakelet-fairy was in charge cotton candy quality control, and assisting with adorning the coated apples with the finishing touches. I've been kind of obsessed with cotton candy for most of my life, likely for the same reason most people are. It's as beautiful as it is sugary-awesome, and it's a rare indulgence. I recently bought an amazing Candy Cotton Candy Maker, which is a whole other adventure, but for this recipe I bought a small tub of store-bought cotton candy. I found that the store-bought variation lasts a little bit longer atop the apples than homemade before it starts to break down and dissolve. I find that if you add the cotton candy within an hour of serving, it holds up relatively well.
  And of course allowing me to snap photos of her frolicking in pastel apple glee. You might notice in this photo that some of the apples, depending on how you swirl/coat them, have a much more contrast-y effect (which I love!). The apples' fate is completely based upon your colour choices and each one can be a little, tasty work of art.
For those wondering, Neve chooses to wear this fairy outfit on an almost-daily basis, so I swear there was no crazy mommy-driven costume bribes going on here. It doesn't always work out that way, but sometimes it just does. And for the record, my cakelets eat about 10% of the treats that I make. They almost always test a bite or two, but rarely eat an entire dessert in one sitting. It's kind of how we make it through this thing I call Sweetapolita with our teeth and health in tact.  Wishing you a whimsical weekend! ♥ Here's the recipe for the apples. As I mentioned, the coating base of the recipe comes from SprinkleBakes: Dessert Recipes to Inspire Your Inner Artist, combined with my instructions for creating this bizarre and delightful confection.
Whimsical Pastel Cotton Candy Apples
- 6 medium granny smith apples (or variation of choice, washed, dried and stems removed)
- 3 cups 600 g(1 lb + 5 oz) granulated sugar
- 1 cup 237 mL water
- 1/2 cup 118 mL light corn syrup
- 1 dram bottle (3/4 teaspoon(3.75 mL) cotton-candy candy flavour oil)
- 2 tablespoons 30 mL bright white soft gel food colour, plus 2-3 additional colours of choice
- cotton candy
- glitter/sprinkles of choice
You will also need:
- candy thermometer
- heatproof rubber spatula
- pastry brush
- 6 medium cookie sticks
- 6 paper straws (optional)
- scissors (for trimming straws)
- silicone baking mat (optional)
- Line a baking sheet with a silicone baking mat or a baking sheet greased with shortening.
- Insert the cookie sticks about 3/4 of the way into each apple, but be sure the stick doesn't come out the bottom. (You might need to use a metal skewer to pierce each apple prior to inserting the sticks.) Place prepared apples close to the stovetop, as you will need to move quickly once the candy coating is ready to go.
- In a medium heavy-bottom saucepan combine the sugar, water and corn sryrup. Brush the sides of the saucepan with a damp pastry brush to rid of stray sugar crystals. Turn the heat to medium-high and clip on a candy thermometer (be sure the thermometer doesn't touch the bottom of the saucepan).
- Let the mixture bubble and cook undisturbed until the thermometer reaches 302°F (hard crack stage). In the meanwhile, get your flavour oil and colours ready to go.
- When the candy coating has reached 302°F, promptly remove from heat and stir in the flavour oil, followed by the white colour, using a heatproof rubber spatula. Once the white is blended completely, quickly add a drop or two of your favourite food gel colours, but this time do not stir the coating. You can swirl the saucepan once or twice, or use a skewer to marble the colours, but be sure not to over-blend, or you will end up with a solid colour.
- Holding the handle of the saucepan with one hand, tilt so the coating pools to one side, and dip/swirl each apple until thoroughly coated. Let the excess coating drip back into the saucepan, and set aside on prepared baking sheet.
- When ready to serve, pierce a poof or two of cotton candy and slide down each stick to sit atop the apples. Adorn with sprinkles or glitter of choice.
- If using patterned paper straws, simply slide the straw over the cookie stick and trim the tops of each straw to match the height of the stick underneath.
- For the apples in these photos, try White, Sky Blue, Purple,
and Pink
Oil-Based Colours. Just remember to go really easy on the added colours, or you will end up with one solid colour and no swirl.
- For the cookie sticks, I used Wilton Cookie Sticks, 8-Inch
and covered them with pink and turquoise paper straws from I'm With Cupcake. They slide right over the cookie sticks like sleeves.
- I used LorAnn Cotton Candy Flavoring.
- For sprinkles or sparkles, try Edible Dessert Glitter or any sprinkles you love
- For easy clean-up, fill your candy saucepan 2/3 full with water and boil for a few moments. Pour out water and then wash as usual.
- Coated apples with last 2-3 days at room temperature, but only add the cotton candy right before serving.


