


Modest title, right? Okay, well, I am proud of my sugar cookies, so don't mind me. I've been baking up batches like crazy these days, so I feel as though I have it down to a science. Funny, I used to make them primarily for special occasions, but they have become such a nice treat for pretty much anytime at all, simply because they taste so good. Sure, I decorate the heck out of them typically, but the cookies themselves are so good that I often eat them simple and plain.
Crisp, sugary, and vanilla-y, which is just what a sugar cookie should be. The dough is the perfect consistency for rolling and cutting; and the batch is a really workable size, in my opinion. I've had a bunch of readers ask for my sugar cookie recipe, and albeit simple, to me it really is perfect. So, I thought now would be a good time to share it, and my steps to making them, with you, so that we can keep going with of plenty of decorated versions, and that we're all on the same sugar-cookie-basics page. I have to admit that I get told often that these cookies taste better than most, including the ones at Starbucks :) I started adding pure lemon extract to the batter in addition to the vanilla. This came to me after becoming hooked on the lemony-vanilla flavour in some Italian animal crackers I bought for the girls that tasted just like McDonaldland Cookies (Italians worldwide are cringing as we speak).
I've added my own steps for the chilling/rolling/cutting process in the method below with what works for me. It may seem like a lot of work, but I promise that it's worth it. I learned, over the years, that if the cookies are baked with anything less than perfectly chilled dough, that they expand and don't keep their clean intended shapes. So frustrating, but avoidable.
Here are some photos to help us along, and since I was making cookie pops this past weekend, I thought I would add that bit into this tutorial, just in case you felt inspired to make cookie pops; they too can be frustrating if the correct steps aren't taken. I purposely left the decorating portion out of this post, so that we can focus on the fundamentals of baking the cookies themselves. I want to say, though, that making sugar cookies is about personal preference, just as any technique is, and this is my way, but not necessarily the only way. 
I've included explicit instructions for the sugar cookie recipe/chilling/rolling/baking below, but to give you a visual of the cookie pop process as well, I've included some extra photos. Here is the cookie dough after well-chilled and rolled using 2 dowels for even thickness and sandwiched between 2 pieces of parchment. This yields a perfectly even sheet of dough for cutting. I always slide this entire thing, minus the dowels, onto a large cutting board and place into refrigerator for about 30 minutes.

I then take the chilled sheet of dough out of the fridge and begin cutting my shapes. For cookie pops, I tend to cut one at a time, insert the cookie stick, place on baking sheet, and then move on to cutting the next cookie.
Side-note, let me say that collecting cookie cutters is slightly addictive!

So when making cookie pops, I take my cut shape, make sure it's near the edge of my board, gently place my left hand on top of the cookie shape, and using my right (dominant) hand, I slowly insert the end of the cookie stick (found at baking supply shops) into the bottom of the cookie, using a slow, turning motion.
This really helps minimize breakage of the dough when inserted . . .

But, as we all know, hearts can be broken, so after inserting the stick, although the top of the cookie looks perfect, when I gently (and I mean so, so gently) turn the cookie over with a sharp spatula, I see that the bottom has broken a bit. But, that's okay, we can fix that . . .

I take little wee bits of the cookie dough scraps and patch it up with my fingers (now is a good time to use some nice clean food prep sanitary gloves). See, all better.
Now oh-so-carefully pinch the bottom of the cookie, where the stick meets it, and ensure it's secure. I then place each cookie pop onto the cookie sheet using a cookie spatula.
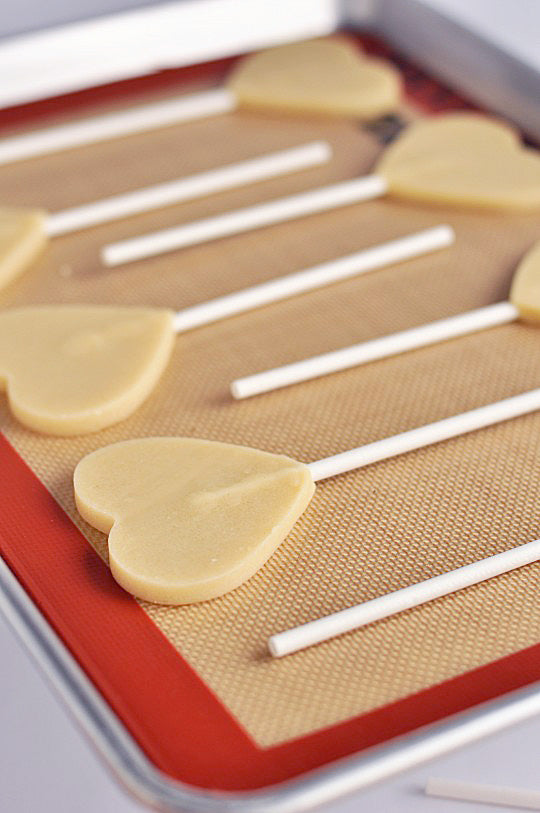
Here they are ready to go into the oven, using a baker's mat. (I use Silpat Mats and clean Nordic Ware aluminum bakers half sheets, and I reserve the half sheets for cookie baking only, to keep them pristine.)

And baked! I find the key is letting them get a golden edge, but also a light golden hue--otherwise, I find they aren't crispy on the outside. They look so ready for some serious cookie decorating.
Here is the recipe! Good luck & let's bake the world happy!

