abovecake

How to Make a (Perfectly Delightful) Vanilla Birthday Cake

Diner Dream Cake Reading How to Make a (Perfectly Delightful) Vanilla Birthday Cake 13 minutes Next Watercolor Buttercream Party Cake

Perfectly Delightful Vanilla Cake via Sweetapolita

As you may have guessed, I love birthdays. Not just mine, but pretty much any birthday I can be part of. I especially love those celebrated by my family and friends, and now that we're into spring nearing summer, it's a birthday extravaganza. Between my husband, myself, my kids, my dad, and more, it seems there's a birthday every week (and one wedding anniversary in 3 days!), and that's one way to guarantee there will be no shortage of birthday cake (in case you're concerned about my lack of cake). The kick off was on April 25th, when our little (but not so little) Reese turned 5. You might remember this colourful post from last year, when she turned 4--I feel as though I just made that cake, and yet it was a year ago. As a mom, that both amazes and saddens me, but of course it's always a super happy occasion, and making cake for my girls is one most fulfilling things possible.
Perfectly Delightful Vanilla Cake via Sweetapolita

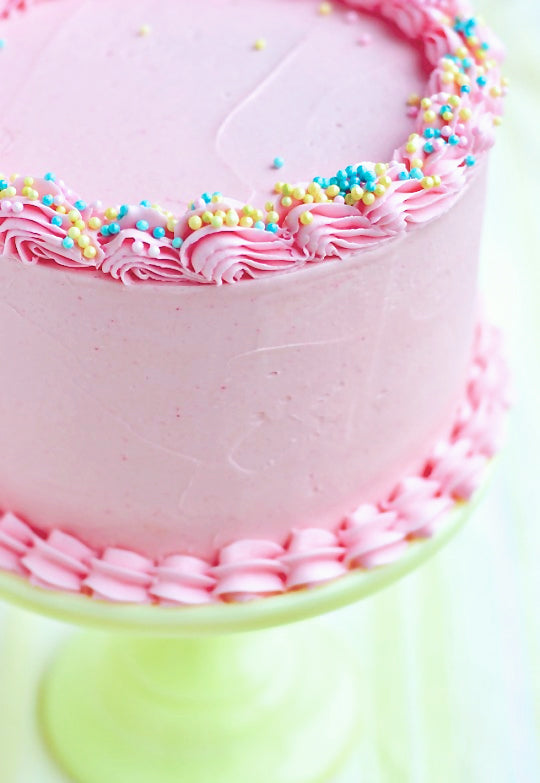
This year we threw her a Baking Party, which was something I've been wanting to do for a long time. I made her a cake just like this pink party cake--it was the perfect balance of girly, fancy, and delicious (and shh, don't tell the girls, but this is one of the easiest and quickest cakes to make). The party itself was, as you can imagine, so much fun and complete chaos! The girls wore handmade chef's hats (complete with pink satin lining--thank you Auntie Mary!), adorned with cupcake liner flowers (which the girls made when they arrived) and their names added by them in colourful letter stickers. Wearing their favourite aprons, we whipped up chocolate sprinkled party spoons, decorated cupcakes, made strawberry jam and more. They each took home a pink-twine wrapped bakery box filled with their own creations as well as a "slice" of goodie box cake filled with loot bag treats, designed by the talented Linnette of PaperGlitter, and printed and assembled by our friend, Danielle. Planning, preparing for and playing at this party made my inner 5-year old super-duper happy. I was determined to engage, partake and enjoy every minute first hand this year, which I was able to do, but I wasn't able to take photos as well, which does break my heart a bit. Looking back I would have designated someone to take photos or even hire a photographer, because there were just too many adorable, hilarious, messy, crazy moments. Most importantly, though, is that the we made the memories and nothing can take that away.

Perfectly Delightful Cake via Sweetapolita

The recipe itself for this cake is really just a very slightly adapted version of some of the other vanilla cakes I've posted (like this one, for example) but enough for 4 layers, paired with one of my best-loved sweeter frosting: a quick and easy (but super creamy and delightful) Whipped Vanilla Frosting that, as a result of whipping the butter and the blended frosting, tastes like creamy ice cream, and there is no sugary residue or chalky texture as with some sweet frosting. With an all-butter base and the addition of pure vanilla (and often vanilla bean), there's an authenticity to it, even with all of that icing sugar. It also has a glide factor that makes it wonderful when applying it to the cake. I use this recipe anytime I need a fast fix or when baking for those attached to bakery frosting memories from childhood (although, isn't that all of us?). The reason I've put it together again for this post (aside from the slight adaptations of the cake), is because I've never posted it for a full 4-layer version of the cake, which is a simple way to make the cake party-worthy, along with some , again, quick and easy decorating I do when I can't spend oodles of time on a cake. Truth is, sometimes even if I have the time, I still prefer cakes like these, and cakes that trigger all of my childhood memories. Perfectly Delightful Vanilla Cake via Sweetapolita

If you knew Reese, you'd know that, like most 5-year-old little girls, she's devoted to pink. And cake. And anything involving tutus and twirls, so the simple addition of a few retro ballerinas and sprinkles really fancies it up. In the past, I've done cakes for the girls that have taken me a week to do, but honestly, not only could I simply not make that happen this time with all of the party prep, but it wasn't necessary. You know I love that kind of thing, so it's not to say I won't make more of those for her down the road, but this cake was enough to make all the girls giddy (even the moms!).

Perfectly Delightful Vanilla Cake via Sweetapolita

The best part about this kind of moist, buttery white cake is that it pairs nicely with this type of sweeter party frosting, as I like to call it, as well my all-time favourite, Swiss Meringue Buttercream. I took the super-simple approach of filling and frosting the cake with the same thing, but I've also filled this cake with strawberries and whipped cream, lemon curd, homemade jam, and more.  Just remember that for best results with these cake layers, you really need to weigh your ingredients. It really is the only way to guarantee cake success with this recipe--I promise! And before I go, I thought it would be fun to share a short home video of Reese when she was 2 years old (I don't normally share home videos, but just for fun!) This was at a little family dinner at my dad's for her 2nd birthday (notice one of the early fondant cakes I made--apparently I thought we were serving a few million), and although it's just your standard Happy Birthday song video, I love the look of wonder in her eyes and the fact that she was almost going to bust of excitement--it's kind of what this whole baking thing is all about.
:
And, if you have 3 minutes and 24 seconds to fill, you can watch my all-time favourite video of Reese here. It has nothing to do with cake or birthdays, but funny as can be. These videos may make me cry, but I hope they make you smile. ♥

Sweetapolita

Beautiful baker birthday girl, Reese.

Perfectly Delightful Vanilla Birthday Cake


  • 1-1/2 cup 360 ml whole milk, at room temperature
  • 7 large egg whites (210 g, at room temperature)
  • 1 whole egg (at room temperature)
  • 1 tablespoon 15 ml pure vanilla extract
  • 1/2 teaspoon 2.5 ml almond extract
  • 3-3/4 cups 430 g cake flour, sifted
  • 2-1/4 cups 450 g sugar
  • 1-3/4 tablespoons 25 g baking powder
  • 1 teaspoon salt (8 g)
  • 1-1/2 sticks (170 g unsalted butter, at room temperature and cut into cubes)
  • 6 tablespoons 85 g vegetable shortening

For the Whipped Vanilla Frosting:

  • 2-1/2 cups 5 sticks(575 g) unsalted butter, softened and cut into cubes
  • 5-1/4 cups 600 g confectioners’ sugar, sifted
  • 4-1/2 tablespoons 70 ml milk
  • 1-1/2 tablespoons 23 ml pure vanilla extract
  • pinch or two of salt
  • few drops pink gel colour - try Sweetapolita Bright Pink
  •  Pastel Bit Chips (or any other sprinkles you like for decorating)

For the Cake:

  1. Preheat oven to 350°F (180°C). Grease, line with parchment and flour two round 8-inch pans (you will be using each one twice), or four 8-inch pans (if you're lucky enough to have four on hand). I use Parchment Paper Circles for ease.
  2. In a medium bowl or measuring cup, combine and stir 1/2 cup of the milk, stir the egg whites, whole egg, vanilla and the almond extract. Set aside.
  3. Sift cake flour twice. In the bowl of an electric mixer fitted with the paddle attachment, combine the dry ingredients, including the sugar, together on low-speed (I use the “stir” setting on my mixer) for 30 seconds.
  4. Add the butter and shortening, blending on low-speed for about 30 seconds, then add remaining 1 cup of milk, and mix on low-speed until just moistened. Increase to medium speed and mix for 1 -1/2 minutes (90 seconds), but no more.
  5. Scrape the sides of the bowl and begin to add the egg/milk/extract mixture in 3 separate batches; beat on medium speed for 20 seconds after each addition.
  6. Pour 1/4 of your batter (~2 cups)(445 grams) into each prepared pan (if you have 2 pans, you will bake 2 layers first followed by the remaining 2), spreading it evenly with a small offset palette knife. If possible, weigh the batter in the pans to ensure 2 even layers.
  7. Bake cake layers two-at-a-time in center of oven and 2" apart for 20 minutes or until a cake tester comes clean when inserted into the center. Be so careful to not over-bake. Check cake at 20 minutes, but not before, and once you feel it’s almost ready, set the timer for 2 minute intervals. Let cool on racks for 10 minutes before loosening the sides with a small metal spatula, and invert onto greased wire racks. Gently turn cakes back up, so the tops are up and cool completely.
  8. Wash the 2 cake pans and line, grease and flour again and repeat.
  9. Wrap tightly and store at room temperature for up to 2 days, refrigerator for up to 5 days, or frozen for up to 2 months. Best enjoyed day 1 or 2.

For the Whipped Vanilla Frosting:

  1. In the bowl of an electric mixer fitted with the paddle attachment, whip butter for 8 minutes on medium speed (I use “4″ on my KitchenAid). Butter will become very pale & creamy.
  2. Add remaining ingredients and mix on low-speed for 1 minute, then on medium speed for 6 minutes. Frosting will be very light, creamy, and fluffy. If you want all of your frosting (for filling and frosting cake) pink, then add a drop of pink gel colour and mix again, adding one drop at a time until desired pink shade is achieved (see notes). If you want just the outside of the cake pink, you will fill the cake layers first, and then colour the remaining frosting pink.
  3. Best used right away (for ideal spreading consistency), but keeps well once frosted.

Assembly of the Perfectly Delightful Vanilla Birthday Cake

  1. Trim any doming or top crust from cake layers using a very sharp serrated knife.
  2. Use a cake turntable for filling, frosting and decorating, if a possible. Place a small dollop of frosting in the center of a cake plate or 8″ round thin foil-covered cake board, and place the bottom cake layer on top, face-up.
  3. Place ~1 cup of frosting on top of the cake layer, and spread evenly with a small offset palette knife. Gently place 2nd cake layer, face up, on top. Repeat until you come to your 4th layer, which you will place face down.
  4. Put a generous scoop of frosting on top, spreading evenly with a small offset palette knife and working your way down the sides until you have a thin layer of frosting over the entire cake. Chill until set, about 30 minutes.
  5. Remove from refrigerator and apply another "coat" of frosting.
  6. For the top of the cake border, place a large star decorating tip (I used 1E) in a large Decorating Bag filled no more than 1/2 full with pink frosting.
  7. Hold pastry bag in one hand (your dominant hand) and slowly rotate the turntable with the other. Holding frosting-filled bag at a directly above the top of the cake (90° angle), squeeze a small bit of frosting and turn the table a bit at the same time, releasing pressure slowly then stop (this will create a tapered decoration). Repeat all the way around the cake, overlapping slightly each time you pipe a new "shell."
  8. For bottom border, you will want to have the cake on the plate or pedestal which you plan to serve it upon. Fill another pastry bag the same way, and this time use tip 1M. You will pipe at about a 45° angle this time (give or take).
  9. Sprinkle with Pastel Bit Chips, Pastel Confetti or you own favourite sprinkles atop the top border. For some kitschy charm, add a few Vintage Ballerina Cupcake Toppers to your cake!
  10. Store, covered in a cake dome, at room temperature for up to 2 days, or in refrigerator for up to 5 days. Best enjoyed day 1 or 2 at room temperature.
Sweetapolita’s Notes:
  • If you do not have access to cake flour, you can quickly and easily make your own to cake flour substitute. Substitutions with other flour types will result in a drastically different cake.
  • This cake batter method of blending the butter with the sugar and dry ingredients first is called the “reverse creaming method,” and was pioneered by cake guru, Rose Levy Beranbaum.
  • As with any vanilla cake, you can use 100% liquid egg whites in the cake layers (simply weigh them on your kitchen scale), which saves wasting the yolks. If using whole eggs and separating, always separate when eggs are cold, but use when room temperature.
  • Baking the cake layers in 4 pans, rather than 2 and then splitting the layers afterwards, yields an evenly baked cake that bakes faster and without overdone edges.
  • I highly recommend (strongly urge!) you to use a digital kitchen scale to measure ingredients.
  • This batter makes fabulous cupcakes.
  • The frosting tastes like vanilla ice cream–you’ll see!
  • Some pink food gel colours cause streaking. I find that, for me, Americolor Electric Pink does not cause streaking (but it's an intense pink, so go easy!). After several hours there are some teeny darker pin-sized dots, but the cake in the photos is after several days, to give you a better idea. Also note that pink colour fades, particularly in the sun. You still want to go easy with the colour, but just keep it in mind. You will also achieve a beautiful pink with a few drops of Sweetapolita Bright Pink!
  • You may enjoy reading my previous post, 50 Tips for Baking Better Cakes.
Good luck & enjoy!

Leave a comment

All comments are moderated before being published.

This site is protected by reCAPTCHA and the Google Privacy Policy and Terms of Service apply.